🧢 Beautiful ✨ Detailed πŸ’ Adorable

Low Sew Spider Amigurumi Pattern

Low Sew Spider Amigurumi Pattern
4.3β˜… Rating
3-4 Hours Time Needed
3.4K Made This
βœ‚οΈ

Intermediate Level

Ideal for those with basic knitting experience, featuring slightly more advanced stitches and techniques to expand your skills.

⏱️

Weekend Treat

Takes 5-7 hours, making it an enjoyable project to finish over a couple of days.

🧸

Cute Companion

An adorable friend to cherish, handcrafted with love to bring comfort and joy for years to come.

About This Low Sew Spider Amigurumi Pattern

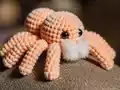
This low sew spider amigurumi pattern creates an approximately 8-inch friendly creature with eight sturdy legs, multiple eyes, and fuzzy fangs that add character without being scary. The pattern uses continuous rounds and requires minimal sewing, making assembly straightforward and enjoyable. Each leg can be customized for either a stiffer standing pose or floppy posable movement, giving you creative control over your spider's final personality and appearance.

Low Sew Spider Amigurumi Pattern crochet pattern - detailed view of completed project

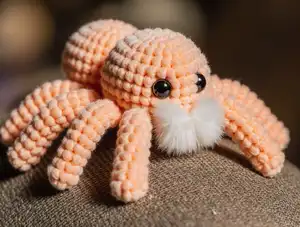
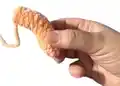
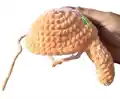
Working from the top of the head down, you'll attach the legs directly as you crochet the head, eliminating most finishing work. The combination of safety eyes in two sizes creates an endearing expression that transforms this eight-legged friend into an irresistible cuddle buddy.

Why You'll Love This Low Sew Spider Amigurumi Pattern

I absolutely love how this spider pattern brings together simplicity and charm in one delightful project! The low-sew construction means you spend more time crocheting and less time with a needle and thread, which makes the whole process so much more enjoyable. I'm particularly fond of how the legs attach directly during construction, creating a seamless look without tedious assembly work afterward. The combination of different sized safety eyes gives each spider such a sweet personality, and those fuzzy yarn fangs add just the right touch of whimsy without being scary. What really makes this pattern special is the flexibility it offers - you can create stiff legs for display or looser legs for posing, and the plush yarn creates such a wonderfully soft texture that makes these spiders impossible not to cuddle. It's one of those patterns that looks impressive but comes together more easily than you'd expect, making it perfect for gift-giving or starting your own collection of adorable arachnids!

Low Sew Spider Amigurumi Pattern step 1 - construction progress Low Sew Spider Amigurumi Pattern step 2 - assembly progress Low Sew Spider Amigurumi Pattern step 3 - details and accessories Low Sew Spider Amigurumi Pattern step 4 - final assembly and finishing

Switch Things Up

I love experimenting with different yarn textures and colors to create unique spider personalities! Instead of traditional spider colors, try using bright pastels or rainbow variegated yarn for a whimsical, kid-friendly version. You could even use sparkly or metallic yarn for a glamorous spider that catches the light beautifully.

For the fangs, I've found that using eyelash yarn or even thin ribbon creates interesting textural contrasts. Some makers skip the fuzzy fangs entirely and embroider tiny fangs with black thread for a more subtle look. You could also add small felt details like spots or stripes on the body for extra personality.

The eye placement offers lots of creative freedom too! While the pattern calls for two different sizes creating a classic spider look, you could use all the same size for a more uniform appearance, or even add more eyes for a truly authentic spider vibe. I've seen makers use buttons instead of safety eyes for a vintage, handmade aesthetic.

Consider making seasonal versions by adding tiny accessories - a small crocheted witch hat for Halloween, a Santa hat for Christmas, or a flower crown for spring! The body could be stuffed with lavender or dried herbs to create a scented decoration. You might even add a small loop on top to turn your spider into a hanging ornament.

Playing with leg length is another fun variation. Making the legs longer creates a more dramatic, spindly appearance, while shorter legs give a chunkier, more compact look. You could also experiment with wire inside the legs for truly posable creations that hold elaborate positions!

Common Mistakes & How to Fix Them

βœ— Forgetting to stuff the legs as you work them, making it nearly impossible to stuff properly later without distorting the shape βœ— Not securing leg tails with knots after attachment, which can cause legs to become loose or pull out during handling βœ— Placing safety eyes too early before checking leg placement, resulting in misaligned features that can't be easily repositioned βœ— Skipping the stitch marker when working continuous rounds, leading to lost track of round beginnings and uneven shaping βœ— Overstuffing the head or body too firmly, which creates a lumpy appearance and makes it difficult to close the final rounds neatly

Low Sew Spider Amigurumi Pattern

Create your very own adorable eight-legged friend with this charming low sew spider amigurumi pattern! This delightful pattern features posable legs, fuzzy fangs, and multiple safety eyes that give your spider an irresistibly cute personality. Perfect for both Halloween decor and year-round cuddly companions, this pattern uses plush yarn to create a soft, huggable texture that makes it ideal for spider lovers of all ages. With minimal sewing required and continuous rounds construction, you'll enjoy watching your friendly spider come to life stitch by stitch!

Intermediate 3-4 Hours

Materials Needed for Low Sew Spider Amigurumi Pattern

β€” Main Fabric

  • 01
    Plush yarn of choice - Parfait Chunky or Sweet Snuggles Lite recommended (approximately 75 grams)
  • 02
    Small amount of fuzzy yarn or accent yarn for fangs

β€” Tools Required

  • 01
    5mm crochet hook (for Parfait Chunky yarn)
  • 02
    6mm crochet hook (for Sweet Snuggles Lite yarn)
  • 03
    Safety eyes: 20mm and 12mm
  • 04
    Polyfil stuffing
  • 05
    Darning needle
  • 06
    Scissors
  • 07
    Stitch marker (recommended)

Progress Tracker

0% Complete

β€” Legs (Make 8) :

Info :

Stuff the leg as you go

Round 1 :

4 sc in mc (4)

Round 2 :

sc, (inc x3) (7)

Round 3-7 :

sc around (7)

Info :

Start stuffing and continue as you go

Round 8 :

2 sc, inc, 2 sc, dec (7)

Round 9-10 :

repeat round 8 (7)

Round 11 :

sc around (7)

Round 12 :

2 sc (5 sts left unworked)

Finishing :

sl st, FO

Info :

Optional: if you would like floppy legs that can be easily posed, you can close the legs with 3 sc. This will make them move more. For stiffer legs, leave them open as instructed

β€” Fangs (Make 2) :

Info :

Use fuzzy yarn. Leave a yarn tail on both ends because we tie them on later

Instructions :

Chain 5, starting in second chain from hook sc 4

β€” Head :

Info :

Working from the top of the head down

Round 1 :

9 sc in mc (9)

Round 2 :

inc x 9 (18)

Round 3 :

(2 sc, inc) x 6 (24)

Round 4 :

(3 sc, inc) x 6 (30)

Round 5 :

(4 sc, inc) x 6 (36)

Round 6 :

(5 sc, inc) x 6 (42)

Round 7-8 :

sc around (42)

Info :

The next round we will attach the legs. Refer to the photos to make sure they are attached correctly so when you flip it over they point down

Round 9 :

3 sc with first leg, go through the front and back sts of the leg then through the body (3 sts per leg). Repeat till you have attached 4 legs, 7 sc (this is the front where the eyes will be placed), 3 sc with leg x4, sc 11 (42)

Round 10 :

sc around (42)

Info :

Stop and secure the leg tails with knots

Info :

Attach eyes between row 7-8 above legs in the 7 st space. 3 sts between the center eyes. Smaller outer eyes are placed 2-3 sts back. Some makers liked to place the smaller eyes between rows 6-7

Round 11 :

(5 sc, dec) x 6 (36)

Info :

Attach the fangs on row 8 below the eyes, 1-2 sts apart. Note they have a natural curve. Place them so they curve into the head. Slip your yarn tail through and tie a knot on the inside

Round 12 :

(4 sc, dec) x 6 (30)

Round 13 :

(3 sc, dec) x 6 (24)

Round 14 :

(2 sc, dec) x 6 (18)

Info :

STUFF

Round 15 :

dec x 9 (9)

Finishing :

sl st, FO and close

β€” Body :

Round 1 :

6 sc in mc (6)

Round 2 :

inc x 6 (12)

Round 3 :

sc around (12)

Round 4 :

(sc, inc) x 6 (18)

Round 5 :

(2 sc, inc) x 6 (24)

Round 6 :

sc around (24)

Round 7 :

(3 sc, inc) x 6 (30)

Round 8 :

(4 sc, inc) x 6 (36)

Round 9 :

(5 sc, inc) x 6 (42)

Round 10-13 :

sc around (42)

Round 14 :

(5 sc, dec) x 6 (36)

Round 15 :

sc around (36)

Round 16 :

(4 sc, dec) x 6 (30)

Round 17 :

sc around (30)

Round 18 :

(3 sc, dec) x 6 (24)

Finishing :

sl st & FO. Leave a long yarn tail for attaching

Info :

STUFF

Info :

Attach the body 4 rounds from the center of head and 4 rounds from the bottom of the head. Attach body right up against the legs

Assembly Instructions

  • After completing all eight legs, secure each leg by fastening off and weaving in the yarn tails to prevent unraveling.
  • When attaching legs in Round 9 of the head, ensure they point downward by checking orientation before securing each leg connection.
  • Secure all leg attachment tails with knots on the inside of the head after Round 10 to prevent legs from loosening over time.
  • Place safety eyes between rows 7-8 in the 7-stitch space on the front of the head, with 3 stitches between the center 20mm eyes.
  • Position smaller 12mm eyes 2-3 stitches back from the larger eyes, or alternatively between rows 6-7 for varied expression.
  • Attach fuzzy fangs on row 8 below the eyes, spacing them 1-2 stitches apart and positioning them to curve naturally into the head.
  • Attach the completed body 4 rounds from both the center and bottom of the head, positioning it right up against the legs for stability.

Important Notes

  • πŸ’‘Use a stitch marker when working in continuous rounds to track the beginning of each round and maintain even shaping
  • πŸ’‘Stuff the legs as you work them rather than waiting until completion, as it becomes difficult to stuff properly later
  • πŸ’‘The pattern offers flexibility with leg stiffness - close with 2 sc for stiffer display legs or 3 sc for floppy posable legs
  • πŸ’‘Secure all leg tails with knots after attachment to prevent them from coming loose during handling or play
  • πŸ’‘Fuzzy yarn for fangs should have yarn tails left on both ends for easier attachment by tying knots inside the head
  • πŸ’‘Position body attachment carefully against the legs for proper balance and to ensure the spider stands or sits correctly
  • πŸ’‘Finished size is approximately 8 inches and may vary depending on yarn weight, hook size, and individual tension

This adorable Low Sew Spider pattern combines clever construction techniques with irresistible charm to create an eight-legged friend that's perfect for any season! With its multi-sized safety eyes, fuzzy fangs, and customizable leg options, each spider develops its own unique personality. The innovative leg-attachment method during construction means minimal finishing work, letting you enjoy more crocheting and less sewing. Whether you choose stiff legs for display or floppy legs for posing, this approximately 8-inch spider makes a delightful gift or collection piece. The plush yarn creates a wonderfully soft texture that transforms this typically spooky creature into an absolutely huggable companion! πŸ•·οΈπŸ§Άβœ¨

You ask,

we answer.

FAQs

Can I make the legs posable or do they have to be stiff?

The pattern offers flexibility! For stiffer legs that hold their shape for display, follow the pattern as written and close with 2 sc. For floppy, posable legs that can be easily positioned, close the legs with 3 sc instead. This gives you creative control over your spider's final appearance and functionality.

What size hook should I use if I'm using a different yarn?

The pattern recommends a 5mm hook for Parfait Chunky yarn and a 6mm hook for Sweet Snuggles Lite. If using different yarn, check your yarn label recommendations and use a hook size that creates a tight fabric where stuffing won't show through. Your finished spider will be approximately 8 inches with the recommended yarns.

When should I attach the safety eyes and fangs?

Attach safety eyes between rows 7-8 above the legs in the 7-stitch space, with 3 stitches between center eyes and smaller eyes placed 2-3 stitches back. Attach fangs on row 8 below the eyes after Round 11, spacing them 1-2 stitches apart and positioning them to curve naturally into the head.

How do I attach the legs to the head without them falling off?

During Round 9, crochet 3 sc with each leg, going through both the front and back stitches of the leg and then through the body. After completing Round 10, stop and secure all leg tails with knots on the inside. This double-securing method ensures legs stay firmly attached during handling.

Do I need to use fuzzy yarn for the fangs?

Fuzzy yarn is recommended for fangs as it creates a soft, textured appearance that adds character, but you can use any contrasting yarn you prefer. Just remember to leave yarn tails on both ends of the fangs for easier attachment by tying them onto the head.