🧢 Beautiful ✨ Detailed πŸ’ Adorable

Kitty Scarf Crochet Pattern

Kitty Scarf Crochet Pattern
4.4β˜… Rating
4-5 Hours Time Needed
3.5K Made This
βœ‚οΈ

Beginner Friendly Level

Perfect for those just starting their sewing journey, with clear instructions and simple techniques

⏱️

Weekend Treat

Takes 5-7 hours, making it an enjoyable project to finish over a couple of days.

🧣

Snug Essential

Everyday comfort with practical charm, designed for both functionality and style through changing seasons.

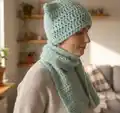
About This Kitty Scarf Crochet Pattern

The Kitty Scarf pattern is a delightful combination of practicality and cuteness that will keep you warm while showcasing your love for cats. The scarf portion is worked in simple double crochet rows to your desired length, making it customizable to your preferences. The cat hat is cleverly worked off-center from the scarf, ensuring balanced draping when worn. This thoughtful design detail means you'll look stylish from every angle!

Kitty Scarf Crochet Pattern crochet pattern - detailed view of completed project

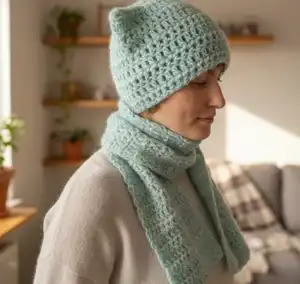
Using worsted weight yarn held double creates a plush, warm fabric that's perfect for cold weather. The pattern is wonderfully flexible, allowing you to choose any yarn and hook size combination you prefer.

Why You'll Love This Kitty Scarf Crochet Pattern

I absolutely love this pattern because it's the perfect blend of adorable and practical! There's something so satisfying about creating a functional accessory that also makes people smile. The fact that you can customize the width and length means you can make it exactly how you want it, whether you prefer a narrow fashion scarf or a wide, cozy wrap. Plus, working the cat hat off-center is such a clever design choice that makes the finished piece look professionally made. It's a quick project that yields impressive results, and it makes the most wonderful gift for any cat enthusiast in your life!

Kitty Scarf Crochet Pattern step 1 - construction progress Kitty Scarf Crochet Pattern step 2 - assembly progress Kitty Scarf Crochet Pattern step 3 - details and accessories Kitty Scarf Crochet Pattern step 4 - final assembly and finishing

Switch Things Up

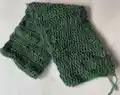
I love how versatile this pattern is! You can really make it your own in so many ways. Try using a variegated or self-striping yarn to add visual interest without any color changes - the simple stitch pattern is perfect for showing off beautiful yarn colorways. If you're feeling adventurous, work the scarf in one color and the cat hat in a contrasting color to make it really pop. You could even add small embroidered details like whiskers or eyes to the hat portion for extra cuteness!

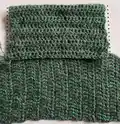
For a more luxurious feel, try using a blend with alpaca, mohair, or cashmere. The double strand technique works beautifully with a fine mohair held together with a solid worsted weight yarn, creating a soft, fluffy halo effect. If you prefer a more structured scarf, use cotton or acrylic yarn for easy care and great stitch definition.

Consider adding fringe to the ends of the scarf for a bohemian touch, or work a simple border around the entire scarf edge in a contrasting color. You could even make matching mittens or a regular beanie to complete a full cat-themed winter set. The possibilities are endless, and that's what makes this pattern so much fun!

Common Mistakes & How to Fix Them

βœ— Not marking the center of the scarf before starting the cat hat, which can result in uneven scarf lengths on each side when wearing βœ— Forgetting to count whether turning chains are stitches or not consistently throughout the project, leading to width variations βœ— Rushing the slip stitch seam on the cat hat sides, which can create a bumpy or visible closure instead of neat edges βœ— Not turning the hat inside out after seaming, leaving the less attractive side of the slip stitches showing on the outside

Kitty Scarf Crochet Pattern

Create an adorable and functional cat-themed scarf with this charming pattern! This unique design features a long, cozy scarf with an attached cat hat worked off-center, allowing the scarf to drape evenly on both sides when worn. Perfect for cat lovers and anyone who wants to add a playful touch to their winter wardrobe, this pattern combines warmth with whimsy in the most delightful way.

Beginner Friendly 4-5 Hours

Materials Needed for Kitty Scarf Crochet Pattern

β€” Main Fabric

  • 01
    Any yarn you like - approximately 300g total (designer used worsted weight yarn held double)
  • 02
    Drops Cotton Merino - approximately 3 skeins
  • 03
    Drops Brushed Alpaca Silk - approximately 3 skeins

β€” Tools Required

  • 01
    Crochet hook (7mm recommended, or any hook that fits your yarn weight)
  • 02
    Tapestry needle (for weaving in ends)
  • 03
    Measuring tape
  • 04
    Stitch markers
  • 05
    Scissors

Progress Tracker

0% Complete

β€” Scarf :

Step 1 :

Chain your desired scarf width. Designer used approx. 22cm / 20 stitches.

Step 2 :

Do two more chains (these are your turning chains). Do one dc into the third stitch from hook.

Step 3 :

Do one dc into each chain.

Step 4 :

At the start of each row do two chains and turn your work.

Info :

It does not matter whether you count the turning chain as a stitch, this is up to your personal preference. Designer does not count turning chains as stitches.

Step 5 :

Do rows with dc until you reach your desired scarf length. Designer did 130cm / 65 rows.

Step 6 :

Fasten off.

β€” Cat Hat :

Info :

The cat hat is worked off center. That way, the scarf will be (approximately) the same length on both sides when wearing it.

Step 1 :

Mark the middle of the scarf with a stitch marker.

Step 2 :

Attach a second stitch marker approx. 11cm away. It does not matter whether to the left or right.

Step 3 :

Attach yarn at the second stitch marker.

Step 4 :

Start working dc into the side of the scarf, away from the first stitch marker. Designer does 2 stitches per row.

Step 5 :

Do dc until you reach approx. 28cm. Designer did 28 stitches.

Step 6 :

Do rows with dc until your hat part is approx. 36cm long. Designer did 18 rows.

Step 7 :

Fold the hat part in half.

Step 8 :

Sl st together along sides.

Step 9 :

Fasten off.

Step 10 :

Turn hat inside out.

Assembly Instructions

  • Mark the exact center of your completed scarf using a stitch marker to ensure balanced placement
  • Measure and mark the second stitch marker approximately 11cm away from the center marker
  • Work the cat hat portion carefully, maintaining consistent tension to match the scarf body
  • Fold the completed hat section precisely in half before seaming to ensure symmetrical ears
  • Use slip stitches to join the sides of the hat, working through both layers evenly
  • Turn the hat inside out after seaming so the neat side of your stitches shows on the outside
  • Weave in all yarn ends securely, especially at color changes if using multiple yarn colors

Important Notes

  • πŸ’‘Holding two strands of yarn together creates a thicker, warmer fabric - adjust hook size accordingly
  • πŸ’‘Your gauge will affect the final measurements, so use the provided measurements as guides rather than absolutes
  • πŸ’‘The off-center placement of the cat hat is intentional and crucial for balanced draping when worn
  • πŸ’‘Using stitch markers helps maintain accurate placement and prevents having to remeasure constantly
  • πŸ’‘The pattern works with any yarn weight, just adjust your hook size to match your yarn choice
  • πŸ’‘Consider making the scarf longer or shorter based on your height and personal preference for scarf length

This charming Kitty Scarf pattern brings together warmth, style, and feline fun in one adorable accessory! Perfect for beginners who want to create something both practical and playful, this pattern uses simple double crochet stitches to build a cozy scarf topped with an cleverly placed cat hat. The off-center design ensures the scarf drapes beautifully, while the straightforward construction means you'll have a finished piece in just a weekend. Wrap yourself in handmade coziness and let your cat-loving spirit shine! 🧢✨

You ask,

we answer.

FAQs

Can I use a different yarn weight for this pattern?

Absolutely! This pattern is very flexible. Just choose a crochet hook that matches your yarn weight. The designer used worsted weight yarn held double with a 7mm hook, but you can use any weight from bulky down to DK. Keep in mind that lighter yarn will create a lighter, more drapey scarf while heavier yarn will be warmer and more structured.

Why is the cat hat worked off-center instead of in the middle?

The off-center placement is a clever design feature! When you wear the scarf, the hat sits on your head or shoulders, and working it off-center ensures that the scarf tails hang at approximately equal lengths on both sides of your body. If it were centered, one side would be much shorter than the other when worn.

How do I determine my scarf width?

The width is completely customizable to your preference! The designer used about 22cm (20 stitches), which creates a standard scarf width. For a narrower fashion scarf, use 12-15 stitches. For a wider, cozier wrap-style scarf, try 25-30 stitches. Just remember that a wider scarf will require more yarn.

Do I need to count the turning chain as a stitch?

The pattern states this is up to your personal preference! The important thing is to stay consistent throughout your project. If you count it as a stitch, your first double crochet goes into the second stitch. If you don't count it, your first double crochet goes into the first stitch. Choose one method and stick with it for even edges.

How much yarn will I need for this project?

The designer used approximately 300g total (about 3 skeins each of two different yarns held together). However, your yarn requirements will vary based on your chosen scarf length and width. For a standard scarf similar to the pattern, plan for 250-350g of yarn. It's always better to buy an extra skein than to run short!