🧢 Beautiful ✨ Detailed πŸ’ Adorable

Handsome Puppy Dog Amigurumi Pattern

Handsome Puppy Dog Amigurumi Pattern
4.1β˜…Rating
5-7 HoursTime Needed
3.5KMade This
βœ‚οΈ

Intermediate Level

Ideal for those with basic crocheting experience, featuring slightly more advanced stitches and techniques to expand your skills.

⏱️

Weekend Treat

Takes 5-7 hours, making it an enjoyable project to finish over a couple of days.

🧸

Cute Companion

An adorable friend to cherish, handcrafted with love to bring comfort and joy for years to come.

About This Handsome Puppy Dog Amigurumi Pattern

Handsome Puppy Dog Amigurumi Pattern crochet pattern - detailed view

This charming pup makes a heartfelt gift for baby showers, birthdays, or dog lovers. He sits beautifully on a nursery shelf or office desk, spreading handmade joy wherever he goes.

Why You'll Love This Handsome Puppy Dog Amigurumi Pattern

I absolutely adore how much character this little guy has! The seamless way his head changes color from mustard yellow to creamy white is incredibly satisfying to crochet, and making those tiny overalls feels like dressing up a real doll. It is the perfect cozy weekend project to curl up with.

Handsome Puppy Dog Amigurumi Pattern step 1 Handsome Puppy Dog Amigurumi Pattern step 2 Handsome Puppy Dog Amigurumi Pattern step 3 Handsome Puppy Dog Amigurumi Pattern step 4

Switch Things Up

There is something incredibly magical about creating a character from a simple ball of yarn. When I first designed this handsome pup, I wanted him to feel like an old-school heirloom toyβ€”the kind of companion that carries a bit of nostalgic charm. His little green overalls and floppy ears give him so much personality before you even finish embroidering his face!

If you want to customize your pup, try experimenting with different coat colors. A soft grey or chocolate brown would look absolutely darling. For his overalls, you could use a festive red or a sunny yellow depending on the season. I love adding tiny wooden buttons to the straps to give him an extra touch of rustic warmth.

Take your time with the facial details. The way you position the nose and stitch the little mouth line is where the magic really happens. Don't be afraid to pull out a stitch or two and reposition things until his expression feels just right to you. Happy stitching!

Common Mistakes & How to Fix Them

βœ— When joining the legs at Round 21, make sure your stitch marker is placed accurately so the join doesn't twist, or the body will end up facing sideways.βœ— If you work the front loop only rounds on the arms too tightly, it will be very difficult to slip stitch the sleeve details later on.βœ— Sewing the nose too high or too low can completely alter the dog's expression; ensure it is pinned precisely between rounds 16 and 20 before stitching.βœ— Be careful not to overstuff the arm sleeves near the top, or they will stick out awkwardly instead of resting naturally against the body.

Handsome Puppy Dog Amigurumi Pattern

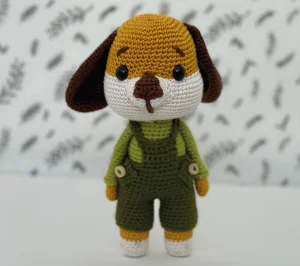
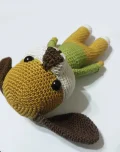
Meet your next favorite crochet project! This sweet little pup, dressed in his absolute best green overalls, is ready to bring a touch of handmade warmth to your home. Crafting him is a joyful experience that lets you play with beautiful color transitions and classic shaping techniques. You will love watching his cute face and tiny overalls come together stitch by stitch.

Intermediate 5-7 Hours

Materials Needed for Handsome Puppy Dog Amigurumi Pattern

β€” Main Fabric

  • 01
    Sport weight cotton yarn in Mustard for the main head, legs, and arms
  • 02
    Sport weight cotton yarn in White for the lower muzzle and socks
  • 03
    Sport weight cotton yarn in Light Green for the inner sweater section
  • 04
    Sport weight cotton yarn in Dark Green for the overalls and matching straps
  • 05
    Sport weight cotton yarn in Brown for the ears, tail, and nose details

β€” Tools Required

  • 01
    2.5 mm crochet hook or size needed to obtain a firm gauge
  • 02
    One pair of 10 mm black safety eyes
  • 03
    Polyester fiberfill stuffing
  • 04
    Tapestry needle for sewing and seamless assembly
  • 05
    Stitch markers and straight pins for positioning parts
  • 06
    Scissors

Progress Tracker

0% Complete

β€” 1. Head :

Round 1 :

Using Mustard yarn, make 6 sc into a magic ring (6)

Round 2 :

Work 6 inc rounds (12)

Round 3 :

Repeat [1 sc, 1 inc] 6 times (18)

Round 4 :

Repeat [2 sc, 1 inc] 6 times (24)

Round 5 :

Repeat [3 sc, 1 inc] 6 times (30)

Round 6 :

Repeat [4 sc, 1 inc] 6 times (36)

Round 7 :

Repeat [5 sc, 1 inc] 6 times (42)

Round 8 :

Repeat [6 sc, 1 inc] 6 times (48)

Round 9-17 :

Work 1 sc in each st around for 9 rounds (48)

Info :

Insert the safety eyes between Rounds 15 and 16, leaving a space of 9 stitches between them.

Round 18 :

Work 12 sc, repeat [1 inc, 9 sc] 2 times, work 1 inc, then 12 sc (66)

Colour Change :

Switch to White yarn.

Round 19-26 :

Work 1 sc in each st around for 8 rounds (66)

Info :

Begin stuffing the head firmly, continuing to add fiberfill as you progress.

Round 27 :

Repeat [9 sc, 1 dec] 6 times (60)

Round 28 :

Repeat [8 sc, 1 dec] 6 times (54)

Round 29 :

Repeat [7 sc, 1 dec] 6 times (48)

Round 30 :

Repeat [6 sc, 1 dec] 6 times (42)

Round 31 :

Repeat [5 sc, 1 dec] 6 times (36)

Round 32 :

Repeat [4 sc, 1 dec] 6 times (30)

Round 33 :

Repeat [3 sc, 1 dec] 6 times (24)

Round 34 :

Work 1 sc in each st around (24). Fasten off, leaving a long tail for assembly.

β€” 2. Legs and Body :

Info :

Make two legs. For the first leg, fasten off after Round 20. For the second leg, do not cut the yarn.

Round 1 :

Using White yarn, work 6 sc into a magic ring (6)

Round 2 :

Work 6 inc rounds (12)

Round 3 :

Repeat [1 sc, 1 inc] 6 times (18)

Round 4 :

Work in flo, 1 sc in each st around (18)

Round 5-8 :

Work 1 sc in each st around for 4 rounds (18)

Colour Change :

Switch to Mustard yarn.

Round 9-20 :

Work 1 sc in each st around for 12 rounds (18)

Round 21 :

Align the legs and ch 4 to connect them together.

Round 22 :

Work 18 sc around the first leg, 4 sc along the connecting chain, 18 sc around the second leg, and 4 sc along the opposite side of the chain (44)

Round 23-29 :

Work 1 sc in each st around for 7 rounds (44)

Round 30 :

Repeat [6 sc, 1 dec] 6 times (38)

Colour Change :

Switch to Light Green yarn.

Round 31-37 :

Work 1 sc in each st around for 7 rounds (38)

Round 38 :

Repeat [4 sc, 1 dec] 6 times (32)

Round 39 :

Repeat [14 sc, 1 dec] 2 times (30)

Round 40-43 :

Work 1 sc in each st around for 4 rounds (30). Fasten off and weave in ends.

β€” 3. Arms :

Info :

Make two arms. Do not stuff the sleeves.

Round 1 :

Using Mustard yarn, work 6 sc into a magic ring (6)

Round 2 :

Work 6 inc rounds (12)

Round 3-6 :

Work 1 sc in each st around for 4 rounds (12)

Round 7 :

Work in flo, 1 sc in each st around (12)

Colour Change :

Switch to Light Green yarn.

Round 8-22 :

Work 1 sc in each st around for 15 rounds (12)

Round 23 :

Press the opening flat and work 6 sc through both layers to close. Fasten off.

Arm Detail :

Attach Light Green yarn to the blo of Round 7, work 3 ch, then slst to finish the sleeve cuff detail.

β€” 4. Overalls :

Info :

Make two trouser legs first, joining them at Round 12.

Round 1 :

Using Dark Green yarn, ch 20, join with a slst to form a ring (20)

Round 2 :

Work 1 sc in each ch around (20)

Round 3-11 :

Work 1 sc in each st around for 9 rounds (20). Fasten off for the first leg; keep yarn attached on the second leg.

Round 12 :

Join the legs together by working sc directly into the stitches of both pieces (40)

Round 13-22 :

Work 1 sc in each st around for 10 rounds (40)

Round 23 :

Work 24 sc, then turn your work (24)

Round 24 :

Work 8 sc, then turn your work (8)

Round 25 :

Work 8 sc, then fasten off (8)

Hangers :

Make two. Ch 18, work 18 sc back along the chain, then fasten off leaving a long sewing tail.

β€” 5. Pockets :

Info :

Make two pocket details for the overalls.

Round 1 :

Using Dark Green yarn, ch 5, work 5 sc starting from second ch, then turn (5)

Round 2 :

Work 5 sc, then turn (5)

Round 3 :

Work 5 sc, then fasten off leaving a tail for sewing (5)

β€” 6. Nose Tip :

Round 1 :

Using Brown yarn, ch 2, work 2 sc in the second ch from hook, then turn (2)

Round 2 :

Work 1 sc, 1 inc, then turn (3)

Round 3 :

Work 1 sc, 1 inc, 1 sc, then turn (4)

Round 4 :

Work 1 sc, 1 inc, 2 sc, then turn (5)

Round 5 :

Work 1 sc, 1 inc, 3 sc (6). Fasten off, leaving a long tail for sewing.

β€” 7. Nose :

Round 1 :

Using White yarn, ch 5, then work 10 sc around both sides of the chain (10)

Round 2 :

Repeat [1 sc, 1 inc, 3 sc] 2 times (12)

Round 3 :

Repeat [1 sc, 1 inc, 4 sc] 2 times (14)

Round 4 :

Repeat [1 sc, 1 inc, 5 sc] 2 times (16)

Round 5 :

Repeat [1 sc, 1 inc, 6 sc] 2 times (18). Fasten off, leaving a long tail for sewing.

β€” 8. Ears :

Info :

Make two ears. Do not stuff.

Round 1 :

Using Brown yarn, work 6 sc into a magic ring (6)

Round 2 :

Work 6 inc rounds (12)

Round 3 :

Repeat [1 sc, 1 inc] 6 times (18)

Round 4 :

Repeat [2 sc, 1 inc] 6 times (24)

Round 5 :

Repeat [3 sc, 1 inc] 6 times (30)

Round 6-10 :

Work 1 sc in each st around for 5 rounds (30)

Round 11 :

Repeat [3 sc, 1 dec] 6 times (24)

Round 12-15 :

Work 1 sc in each st around for 4 rounds (24)

Round 16 :

Repeat [2 sc, 1 dec] 6 times (18)

Round 17-21 :

Work 1 sc in each st around for 5 rounds (18)

Round 22 :

Press the opening flat and work 9 sc through both layers to close. Fasten off, leaving a tail for sewing.

β€” 9. Tail (Queue) :

Round 1 :

Using Brown yarn, work 6 sc into a magic ring (6)

Round 2 :

Work 6 inc rounds (12)

Round 3 :

Repeat [3 sc, 1 inc] 3 times (15)

Round 4-6 :

Work 1 sc in each st around for 3 rounds (15)

Round 7 :

Repeat [3 sc, 1 dec] 3 times (12)

Round 8-12 :

Work 1 sc in each st around for 5 rounds (12)

Round 13 :

Repeat [1 sc, 1 dec] 4 times (8)

Round 14-15 :

Work 1 sc in each st around for 2 rounds (8)

Round 16 :

Press flat and work 4 sc through both layers to close. Fasten off, leaving a tail for sewing.

Assembly Instructions

  • Sew the white nose piece centered between the eyes, positioning it nicely over Rounds 16 to 20.
  • Attach the brown nose tip to the top peak of the white nose piece, then stitch a vertical line downward to form the mouth.
  • Securely stitch the head to the body opening, adding extra stuffing to the neck area before closing up to prevent a wobbly head.
  • Pin the ears to the sides of the head near Round 4, ensuring they hang symmetrically, then stitch them down securely.
  • Attach the arms to the sides of the body at Round 42, just below the neck seam.
  • Sew the tail to the back of the body, positioning it so it peeks out perfectly beneath the overalls.
  • Slip the overalls onto the dog, sew the straps over his shoulders, and attach the pockets and tiny buttons to the front bib.

Important Notes

  • πŸ’‘Stuff the body and head very firmly to make sure your puppy can stand up straight and hold its shape over time.
  • πŸ’‘When switching colors, make the change on the final pull-through of the previous stitch for a perfectly clean line.
  • πŸ’‘Use plenty of straight pins to hold all the parts in place before sewing; this is the secret to a perfectly symmetrical face.
  • πŸ’‘The overalls are designed to be removable, but you can stitch them directly to the waist if you prefer a permanent outfit.

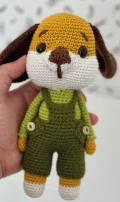
I hope you have the absolute best time bringing this dapper little pup to life! There is nothing quite like finishing that last stitch, dressing him up in his tiny overalls, and seeing his sweet face smile back at you. Don't forget to share your finished puppy with our wonderful crafting communityβ€”we all love seeing your unique creative touches! Happy crocheting, my friends! πŸ§Άβœ¨πŸ•

You ask,

we answer.

FAQs

Can I use a different yarn weight for this puppy pattern?

Absolutely! Just keep in mind that if you use a heavier yarn like worsted weight, your finished dog will turn out larger, and you will need to scale up your safety eyes and hook size accordingly to keep the stitches tight.

How do I make sure the head doesn't wobble?

The key is firm stuffing. Right before you finish sewing the head to the body, use the back of your crochet hook to push extra fiberfill into the neck joint. This creates a solid support column so your puppy stands proud.

Are the overalls removable or sewn on?

They are fully removable! You can slip them off and on, which makes this toy extra fun for kids. If you prefer, you can easily tack them down with a few hidden stitches around the waist.

What is the best way to sew the pieces together cleanly?

I highly recommend using a whipstitch or mattress stitch with a blunt tapestry needle. Sewing through the loops of both pieces while keeping your tension even will give you a neat, professional-looking seam.