๐Ÿงถ Beautiful โœจ Detailed ๐Ÿ’ Adorable

Halloween Pumpkin Amigurumi Pattern

Halloween Pumpkin Amigurumi Pattern
4.6โ˜… Rating
3-4 Hours Time Needed
2.5K Made This
โœ‚๏ธ

Intermediate Level

Ideal for those with basic knitting experience, featuring slightly more advanced stitches and techniques to expand your skills.

โฑ๏ธ

Weekend Treat

Takes 5-7 hours, making it an enjoyable project to finish over a couple of days.

๐ŸŽƒ

Holiday Cheer

Festive fun for the season, bringing handmade magic to celebrations and creating new family traditions.

About This Halloween Pumpkin Amigurumi Pattern

This Halloween pumpkin pattern combines classic amigurumi techniques with creative details to bring autumn magic to life. The pattern features a unique construction method that creates authentic pumpkin ridges by working through the back loops and then shaping the body with strategic decreases. What makes this pattern special is the brown decorative top section with its characteristic holes and the dripping wax effect created with varying chain lengths, adding a spooky yet whimsical touch to your Halloween decor.

Halloween Pumpkin Amigurumi Pattern crochet pattern - detailed view of completed project

The finished pumpkin measures approximately 10 cm in height when made with the suggested materials, making it perfect for tabletop displays, seasonal wreaths, or as a charming handmade gift. The light brown stalk adds the finishing touch to complete this festive creation.

Why You'll Love This Halloween Pumpkin Amigurumi Pattern

I absolutely love how this pattern captures the essence of Halloween with its adorable yet slightly spooky design! The technique for creating the pumpkin ridges is so satisfying to work, and watching the shape come together as you decrease rounds feels like magic. What really makes me excited about this pattern is the creative drip detailโ€”it's such a unique touch that elevates this from a simple pumpkin to a true Halloween statement piece. The variety of chain lengths for the drips means each pumpkin you make will have its own personality. Plus, it's incredibly rewarding to see how the brown top section with its decorative holes adds such authenticity to the final piece!

Halloween Pumpkin Amigurumi Pattern step 1 - construction progress Halloween Pumpkin Amigurumi Pattern step 2 - assembly progress Halloween Pumpkin Amigurumi Pattern step 3 - details and accessories Halloween Pumpkin Amigurumi Pattern step 4 - final assembly and finishing

Switch Things Up

I love experimenting with this pumpkin pattern to create different seasonal looks throughout autumn! Sometimes I'll make the entire pumpkin in cream or ivory yarn for an elegant neutral decoration that works beautifully with farmhouse decor. Other times, I'll add metallic gold or copper yarn for the stalk to give it a more upscale, sophisticated vibe perfect for Thanksgiving centerpieces.

One of my favorite variations is creating mini pumpkin patches by making multiple pumpkins in different sizesโ€”I'll use a 2.0mm hook for larger ones and a 1.25mm hook with thinner yarn for tiny ones. They look absolutely adorable clustered together on a shelf or mantle! I've also experimented with adding embroidered details like swirls or stars instead of the traditional jack-o'-lantern face for a more whimsical, fairytale aesthetic.

For a fun twist, try making the drips in a contrasting color like white or cream to really emphasize the melted wax effect. I've even added a battery-operated tea light inside a larger version by leaving the bottom partially openโ€”it creates the most magical glowing effect! You could also experiment with the top section by adding tiny crochet leaves or vines around the stalk for extra autumn charm. The possibilities are endless, and each variation brings its own special character to your seasonal decor!

Common Mistakes & How to Fix Them

โœ— Forgetting to work through back loops only on round thirteen which creates the essential ridge line for authentic pumpkin texture โœ— Not stuffing the pumpkin properly from center to sides before closing which results in an uneven lumpy shape instead of smooth rounded form โœ— Skipping the tightening process when creating pumpkin segments which prevents the characteristic ribbed pumpkin appearance from forming correctly โœ— Making drips all the same chain length instead of varying from three to seven chains which creates monotonous unrealistic wax dripping effect

Halloween Pumpkin Amigurumi Pattern

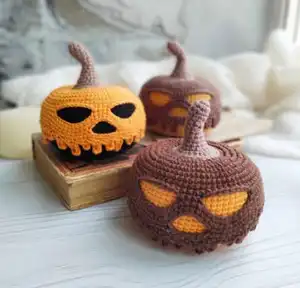
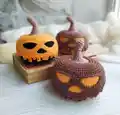
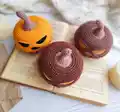
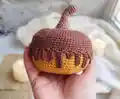
Create an adorable crocheted pumpkin perfect for Halloween decorations or autumn displays! This charming amigurumi pattern guides you through making a spooky-cute pumpkin complete with a carved face and dripping wax details. Standing at approximately 10 cm tall, this festive creation features a brown top section with decorative holes, vibrant orange body with characteristic ridges, and a light brown stalk. The pattern includes detailed instructions for creating the classic jack-o'-lantern face and realistic drip effects that make this pumpkin truly special.

Intermediate 3-4 Hours

Materials Needed for Halloween Pumpkin Amigurumi Pattern

โ€” Main Fabric

  • 01
    Sport weight 4ply yarn Yarn Art Jeans in orange color (50g/160m)
  • 02
    Sport weight 4ply yarn Yarn Art Jeans in brown color (50g/160m)
  • 03
    Sport weight 4ply yarn Yarn Art Jeans in light brown color (50g/160m)

โ€” Tools Required

  • 01
    Crochet hook 1.75 mm
  • 02
    Fiberfill stuffing
  • 03
    Scissors
  • 04
    Embroidery and sewing needle
  • 05
    Pins for attaching details
  • 06
    Stitch markers

Progress Tracker

0% Complete

โ€” Pumpkin :

Info :

Start crocheting with brown thread

Round 1 :

8 sc in MR

Round 2 :

8 inc (16)

Round 3 :

(1 sc, inc) * 8 (24)

Round 4 :

1 sc, inc, (2 sc, inc) * 7, 1 sc (32)

Round 5 :

(3 sc, inc) * 8 (40)

Round 6 :

2 sc, inc, (4 sc, inc) * 7, 2 sc (48)

Round 7 :

(5 sc, inc) * 8 (56)

Round 8 :

3 sc, inc, (6 sc, inc) * 7, 3 sc (64)

Round 9 :

(7 sc, inc) * 8 (72)

Round 10-12 :

72 sc (3 rounds)

Info :

Change color to orange

Round 13 :

BLO: 72 sc

Round 14-27 :

72 sc (14 rounds)

Round 28 :

(7 sc, dec) * 8 (64)

Round 29 :

3 sc, dec, (6 sc, dec) * 7, 3 sc (56)

Round 30 :

(5 sc, dec) * 8 (48)

Round 31 :

2 sc, dec, (4 sc, dec) * 7, 2 sc (40)

Round 32 :

(3 sc, dec) * 8 (32)

Info :

Stuff the toy, spread the fiberfill inside from the center to the sides. Then add fiberfill if you need

Round 33 :

1 sc, dec, (2 sc, dec) * 7, 1 sc (24)

Round 34 :

(1 sc, dec) * 8 (16)

Round 35 :

8 dec (8)

Infos :

Fasten off, leaving a long thread for the pumpkin lift. Insert the thread into the needle. Insert the needle into the base of the pumpkin and exit from the opposite side, tighten the thread. Again insert the needle into the base of the pumpkin and exit from the opposite side, tighten the thread. Repeat twice. Fasten off, hide the yarn tail

Info :

Go back to the 12th round, continue to sc on FLO using the brown thread (the tip of the hook is pointing down)

Round 1 :

72 sc

Round 2 :

26 sc, make chain 12, skip 8 sc, 4 sc, make chain 12, skip 8 sc, 26 sc (80)

Round 3 :

26 sc, 12 sc on the chain, 4 sc, 12 sc on the chain, 26 sc (80)

Round 4 :

80 sc

Round 5 :

37 sc, make chain 7, skip 8 sc, 35 sc (79)

Round 6 :

37 sc, 7 sc on the chain, 35 sc (79)

Infos :

Do not cut the thread. Next, we will crochet the drip on the pumpkin. Make chain 5, start to crochet on the second chain from the hook: 4 hdc, sl st to the next one, 2 sc. Make chain 6, start to crochet on the second chain from the hook: 5 hdc, sl st to the next one, 2 sc. Continue crocheting in a circle, alternating chains of different lengths from 3 to 7 ch. Fasten off, leaving a long thread for sewing

โ€” Pumpkin Stalk :

Info :

Start crocheting with light brown thread

Round 1 :

6 sc in MR

Round 2 :

(1 sc, inc) * 3 (9)

Round 3-6 :

9 sc (4 rounds)

Round 7 :

4 sl st, 5 sc (9)

Round 8 :

9 sc

Round 9 :

4 sl st, 5 sc (9)

Round 10 :

9 sc

Round 11 :

(2 sc, inc) * 3 (12)

Round 12 :

12 sc

Round 13 :

(1 sc, inc) * 6 (18)

Round 14 :

18 sc

Round 15 :

(2 sc, inc) * 6 (24)

Round 16 :

24 sc

Infos :

Fill in the stalk with fiberfill. Fasten off, leaving a long thread for sewing

Assembly Instructions

  • Use pins to secure the eyes, nose, and drip details on the pumpkin before sewing them in place permanently
  • Sew the drip decoration around the brown top section of the pumpkin using the long thread left from fastening off
  • Attach the facial features between the pumpkin ridges created by the back loop only technique for best positioning
  • Fill the pumpkin stalk with fiberfill before sewing to maintain its three-dimensional curved shape
  • Sew the completed stalk to the top center of the pumpkin using the long thread and secure it firmly
  • Ensure all facial features are symmetrically placed by measuring the distance between elements before final sewing
  • Weave in all remaining yarn tails securely on the inside of the pumpkin to maintain clean appearance

Important Notes

  • ๐Ÿ’กUse stitch markers to track your rounds especially during the long stretch of rounds fourteen through twenty-seven
  • ๐Ÿ’กWhen working round thirteen in back loops only make sure your hook enters only the back loop to create proper ridge
  • ๐Ÿ’กStuff the pumpkin from center to sides as instructed to achieve the characteristic rounded pumpkin shape
  • ๐Ÿ’กLeave long tails when changing colors as these will be useful for securing color transitions and weaving in ends
  • ๐Ÿ’กThe drip lengths should vary between three and seven chains to create realistic irregular melted wax appearance
  • ๐Ÿ’กWhen creating pumpkin segments by tightening thread through the base pull firmly but not so tight that fabric puckers

This delightful Halloween Pumpkin pattern brings autumn magic into your home with its charming carved face and realistic details! The combination of textured ridges, decorative brown top with holes, and unique dripping wax effect creates a piece that's both whimsical and festive. Perfect for seasonal decorating, gift-giving, or adding handmade warmth to your Halloween celebrations, this pumpkin will become a treasured part of your autumn traditions for years to come. ๐ŸŽƒ Happy crocheting and have a spooky crafting season! ๐Ÿงถโœจ

You ask,

we answer.

FAQs

What size will my finished pumpkin be?

When made with the recommended Yarn Art Jeans sport weight yarn and a 1.75mm hook, your pumpkin will measure approximately 3.94 inches or 10 cm in height, making it perfect for tabletop displays and seasonal decorations.

Can I use different yarn colors for this pattern?

Absolutely! While the pattern suggests orange, brown, and light brown for a traditional Halloween look, you can customize your pumpkin with any colors you prefer. White yarn would create a ghost pumpkin, while purple or black could give it a more gothic appearance.

How do I create the pumpkin ridges properly?

The ridges are created by working round 13 in back loops only, then later threading through the pumpkin base and tightening. Insert your needle through the base and opposite side, pull tight, and repeat this process twice to create defined segments.

What if my drips don't look right?

The key to realistic drips is varying the chain lengths between 3 and 7 chains as you work around the pumpkin. Each drip should be different lengths to mimic melted wax naturally flowing down the sides.

Do I need to stuff the stalk?

Yes, filling the stalk with fiberfill before attaching it helps maintain its curved three-dimensional shape and gives it a more realistic appearance. Don't overstuffโ€”just enough to hold the form.

Can I make the pumpkin larger or smaller?

Yes! Use a larger hook and bulkier yarn for a bigger pumpkin, or a smaller hook with thread-weight yarn for a miniature version. Just maintain the same stitch counts and proportions throughout the pattern.