๐Ÿงถ Beautiful โœจ Detailed ๐Ÿ’ Adorable

Granny Bucket Hat Pattern

Granny Bucket Hat Pattern
4.2โ˜… Rating
8-10 Hours Time Needed
2.2K Made This
โœ‚๏ธ

Intermediate Level

Ideal for those with basic knitting experience, featuring slightly more advanced stitches and techniques to expand your skills.

โฑ๏ธ

All-Day Adventure

Requires 8-10 hours, ideal for a full day of immersive knitting.

๐Ÿงฃ

Snug Essential

Everyday comfort with practical charm, designed for both functionality and style through changing seasons.

About This Granny Bucket Hat Pattern

This granny bucket hat pattern brings together classic crochet techniques with contemporary fashion. The design features three distinct sections that come together beautifully: a hexagonal top, six colorful granny squares forming the crown, and eleven trapezoids creating the stylish brim. Each piece is worked separately with different colors, making this an excellent stash-buster project while creating a vibrant, eye-catching accessory.

Granny Bucket Hat Pattern crochet pattern - detailed view of completed project

The pattern uses worsted weight cotton yarn and a smaller hook size to create a firm, structured hat that holds its shape beautifully. The colorful design makes it perfect for experimenting with your favorite color combinations.

Why You'll Love This Granny Bucket Hat Pattern

I absolutely love how this pattern transforms simple granny squares into something so fashionable and wearable! The geometric construction is fascinating to work through, and watching all those colorful pieces come together is incredibly satisfying. I appreciate that you can work on each section separately, making it perfect for on-the-go crafting. The structured finish gives it a professional look that rivals store-bought hats, and the endless color combination possibilities mean you can create a unique hat that perfectly matches your style. Plus, there's something deeply rewarding about wearing a handmade accessory that showcases your crochet skills in such a striking way.

Granny Bucket Hat Pattern step 1 - construction progress Granny Bucket Hat Pattern step 2 - assembly progress Granny Bucket Hat Pattern step 3 - details and accessories Granny Bucket Hat Pattern step 4 - final assembly and finishing

Switch Things Up

I love experimenting with this pattern by playing with different color combinations to create completely unique looks. For a boho vibe, I've tried working with earthy tones like terracotta, mustard, sage green, and cream, which gives the hat a vintage festival feel. If you're feeling bold, neon colors create an amazing statement piece that's perfect for summer raves or beach parties.

Another fun variation I've tried is using variegated or ombre yarns for some of the squares and trapezoids, which adds beautiful color transitions without having to weave in as many ends. You could also experiment with texture by using different yarn types โ€“ mixing cotton with linen creates interesting visual depth while maintaining the structure.

For a more subtle look, I sometimes work the entire hat in a single color but use different shades of that color family, creating a monochromatic gradient effect from the top down. Adding surface crochet designs or embroidery to the hexagonal base can personalize your hat even further, making it truly one-of-a-kind.

Common Mistakes & How to Fix Them

โœ— Not maintaining consistent tension throughout squares and trapezoids can result in uneven sizing making assembly difficult and creating a misshapen final hat โœ— Forgetting to count stitches on Round 5 of the hexagon base leading to incorrect stitch count preventing proper attachment of granny squares โœ— Cutting yarn tails too short during color changes makes sewing pieces together extremely challenging and can cause joins to come apart over time โœ— Skipping the blocking step with spray starch results in a floppy hat that doesn't hold its structured bucket shape throughout wear

Granny Bucket Hat Pattern

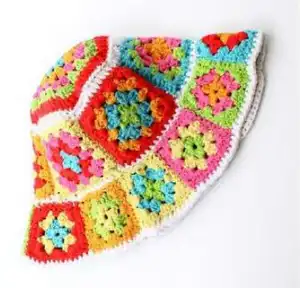
Create this stunning bucket hat using colorful granny squares and trapezoids in a unique geometric design. This versatile pattern combines traditional granny square techniques with modern styling, resulting in a fashionable accessory perfect for any season. The hat features a hexagonal base, six granny squares for the middle section, and eleven trapezoids forming the brim, all sewn together to create a structured yet comfortable fit that's sure to turn heads wherever you go.

Intermediate 8-10 Hours

Materials Needed for Granny Bucket Hat Pattern

โ€” Main Fabric

  • 01
    Approximately 280-320 yards of #4 medium/worsted weight cotton yarn
  • 02
    50-60 yards of each color for multicolor design

โ€” Tools Required

  • 01
    Crochet hook E-4/3.5mm
  • 02
    Scissors
  • 03
    Yarn needle for sewing
  • 04
    Stitch markers
  • 05
    Spray starch or Mod Podge for blocking (optional)

Progress Tracker

0% Complete

โ€” The Hexagonal Base (make 1) :

Round 1 :

Make a Magic ring, into ring crochet Ch3 (note: consider Ch3 as first DC), 2 DC, ch2, *3 DC, Ch2*, repeat from *-* for 5 times, Join with a Sl St to the top of first Ch3. Cut the yarn. (6 groups of 3 DC, 6 Ch2)

Round 2 :

Add the yarn in the last ch 2 space - where you finished the previous row and you made the sl. st., Ch3 and 2 DC into the same Ch 2 space, *in next ch2 space make (3 DC, Ch2, 3 DC)* repeat from *-* for 5 times, in the beginning Ch2 space make 3 DC, Ch2, and join with a Sl St to the top of first Ch3. Cut the yarn. (12 groups of 3 DC, 6 Ch2)

Round 3 :

Add the yarn in the last ch 2 space - where you finished the previous round, Ch3 and 2 DC into the same Ch 2 space, make 3 DC in the space Between the DC groups, *in next ch2 space make (3 DC, Ch2, 3 DC), make 3 DC in between the DC groups*, repeat *-* x 5 times in the beginning Ch2 space make 3 DC, Ch2 and join with a Sl St to the top of first Ch3. Cut the yarn. (18 groups of 3 DC)

Round 4 :

Add the yarn in the last ch 2 space - where you finished the previous round, Ch3 and 2 DC into the same Ch 2 space, make 3 DC in the space Between the DC groups x 2 times *in next ch2 space make 6 DC, (make 3 DC in the space between the DC groups)x 2 times* repeat from *-* x 5 times, in the beginning Ch2 space make 3 DC and join with a Sl St to the top of first Ch3. Cut the yarn. (72 DC)

Round 5 :

Add the yarn in first DC of the Starting corner, Ch3 and DC in each of next 5 DC, (DC in next st, 2DC in next st = increase made, DC in next st) x 2 times, *DC in each of 6 DC from the corner, (DC in next st, 2DC in next st = increase made, DC in next st) x 2 times* repeat from *-* until the end of the round, join with a Sl St to the top of first Ch3. Cut the yarn. (84 DC)

Round 6 :

Add the yarn in the Starting corner, Ch3 and make DC in each DC from previous round (84 DC). Trim your thread and fasten off leaving a 50 inch tail to sew the base and the squares together.

โ€” Granny Square (make 6) :

Round 1 :

Make a Magic ring, into ring crochet Ch3 (note: consider Ch3 as first DC), 2 DC, ch2, *3 DC, Ch2*, repeat from *-* for 3 times, Join with a Sl St to the top of first Ch3. Cut the yarn. (4 groups of 3 DC, 4 Ch2)

Round 2 :

Add the yarn in the last ch 2 space, Ch3 and 2 DC into the same Ch 2 space, *in next ch2 space make (3 DC, Ch2, 3 DC)* repeat from *-* for 3 times, in the beginning Ch2 space make 3 DC, Ch2, and join with a Sl St to the top of first Ch3. Cut the yarn. (8 groups of 3 DC, 4 Ch2)

Round 3 :

Add the yarn into the last Ch 2 space, Ch3 and 2 DC into the same Ch 2 space, make 3 DC in the space Between the DC groups, *in next ch2 space make (3 DC, Ch2, 3 DC), make 3 DC in space Between the DC groups*, repeat from *-* x 3 times, in the beginning Ch2 space make 3 DC, Ch2 join with a Sl St to the Ch3. Cut the yarn. (12 groups of 3 DC, 4 Ch2)

Round 4 :

Add the yarn into the last Ch 2 space, Ch3 and 2 DC into the same Ch 2 space, (make 3 DC in the space Between the DC groups) 2 times, *in next ch2 space make (3 DC, Ch2, 3 DC), (make 3 DC in the space Between the DC groups) 2 times*, repeat from *-* x 3 times, in the beginning Ch2 space make 3 DC, Ch2 and join with a Sl St to the top of first Ch3. Trim your thread and fasten off leaving a 12 inch tail to sew the squares together. (16 groups of 3 DC)

โ€” Granny Trapezoid (make 11) :

Round 1 :

Make a Magic ring, into ring crochet Ch3 (note: consider Ch3 as first DC), 2 DC, ch2, *3 DC, Ch2*, repeat from *-* for 3 times, Join with a Sl St to the top of first Ch3. Cut the yarn. (4 groups of 3 DC, 4 Ch2)

Round 2 :

Add the yarn in the last ch 2 space, Ch3 and 2 DC into the same Ch 2 space, *in next ch2 space make (3 DC, Ch2, 3 DC)* repeat from *-* for 3 times, in the beginning Ch2 space make 3 DC, Ch2, and join with a Sl St to the top of first Ch3. Cut the yarn. (8 groups of 3 DC, 4 Ch2)

Round 3 :

Add the yarn into the last Ch 2 space, Ch3 and 1 DC into the same Ch 2 space, make 2 DC in Between the DC groups, in next Ch 2 space make (2 DC, Ch2, 3 DC), *make 3 DC in the space between the DC groups, in next Ch2 space make (3 DC, Ch2, 3 DC)* repeat from *-* one more time, make 3 DC in the space between the DC groups, in the beginning Ch2 space make 3 DC, Ch2 and join with a Sl St to the top of first Ch3. Trim your thread and fasten off leaving at least a 12-inch tail, to sew the trapezoids together. (3 groups of 2 DC, 9 groups of 3 DC)

โ€” Assembly Instructions :

Step 1 :

Sew the 6 squares to the hexagonal top of the hat. Orient the squares so that you have the starting corner towards the hexagon. Sew with the wrong side facing you using the 50 inch yarn thread from row 6 of the hexagon.

Step 2 :

Sew the sides of the squares with the wrong side facing you using the 12 inch yarn thread from row 4 of each square.

Step 3 :

Work a round of SC around the squares. Add the yarn and make *SC in each st, for a total of 20 SC, then in next st you'll make 2 SC*, repeat from *-* until the end of the round. Trim your thread and fasten off leaving a 50 inch tail. You will obtain 88 SC.

Step 4 :

Sew the 11 trapezoids to the SC round with the wrong side facing you using the 50 inch yarn thread from the previous SC round.

Step 5 :

Sew the sides of the trapezoids with the wrong side facing you using the 12 inch yarn thread from round 3 of each trapezoid. Sew from the middle of the hat to the bottom edge.

Step 6 :

Finish with a round of HDC around the bottom edge of the 11 trapezoids. Fasten off and weave in all ends.

Assembly Instructions

  • Orient all granny squares with starting corners toward the hexagon center for consistent appearance before sewing
  • Sew the 6 granny squares to the hexagonal base using the 50-inch tail from Round 6, working with wrong sides facing
  • Join the sides of adjacent squares together using the 12-inch tails from Round 4 of each square
  • Work a round of single crochet around the bottom edge of all squares (88 SC total) to create attachment point
  • Attach all 11 trapezoids evenly around the single crochet round with wrong sides facing using 50-inch tail
  • Sew the sides of trapezoids together from middle section down to bottom edge using 12-inch tails
  • Finish with one round of half double crochet around the bottom brim edge and weave in all yarn ends

Important Notes

  • ๐Ÿ’กUse a smaller hook size than yarn recommends to create firm, structured fabric that holds hat shape
  • ๐Ÿ’กLeave long tails (50 inches and 12 inches as specified) for easier assembly and secure seaming
  • ๐Ÿ’กKeep consistent tension across all pieces to ensure even sizing and easier assembly process
  • ๐Ÿ’กStart each round in the same corner for cleaner color transitions and professional finish
  • ๐Ÿ’กCount stitches carefully on Round 5 of hexagon to ensure 84 stitches for proper square attachment
  • ๐Ÿ’กBlock finished hat with spray starch or Mod Podge mixed with water for stiffer, more structured shape

This vibrant Granny Bucket Hat pattern combines traditional crochet techniques with modern fashion sensibility. The unique construction method of working separate geometric pieces and joining them creates a stunning visual effect while making the project portable and manageable. Whether you're looking for a stylish sun hat or a statement accessory, this pattern delivers both function and flair. The colorwork possibilities are endless, making each hat a truly one-of-a-kind creation! ๐Ÿงถ Happy crocheting! ๐ŸŽจโœจ

You ask,

we answer.

FAQs

Can I use a different yarn weight for this pattern?

While the pattern calls for worsted weight yarn, you can use different weights by adjusting your hook size. However, using a lighter weight yarn may result in a less structured hat, while bulkier yarn will create a larger, heavier hat. Always make a test swatch to check your gauge before starting.

How do I ensure all my granny squares are the same size?

Maintaining consistent tension is key. Count your stitches carefully at the end of each round and block each square before assembly if needed. Making all squares in one sitting can also help maintain consistent tension throughout.

Do I have to change colors for each round?

No, the color changes are optional and based on personal preference. You can work the entire hat in one color, use two alternating colors, or change colors with every round as shown in the pattern for maximum visual impact.

What's the best way to join all the pieces together?

The pattern recommends whip stitch or mattress stitch for invisible seams. Work with the wrong sides facing you as directed, and use the long tails left from each piece. Pinning pieces in place before sewing helps ensure proper alignment.

Is blocking necessary for this hat?

Blocking with spray starch or Mod Podge is optional but highly recommended if you want a firm, structured bucket hat that holds its shape. Without blocking, the hat will be softer and more slouchy, which some people prefer for a casual look.

Can I adjust the size of this hat?

Yes, you can add or remove rounds from the hexagonal base and adjust the number of squares and trapezoids proportionally. To make a smaller hat, work fewer rounds on the base and use 5 squares and 9 trapezoids. For a larger size, add rounds to the base and increase to 7 squares and 13 trapezoids.