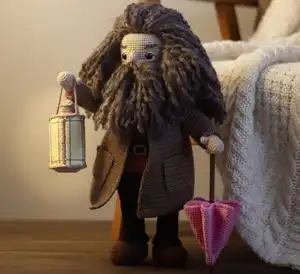
Bring the beloved giant to life with this magical 36cm (14 inch) crochet pattern! This detailed design captures every endearing detail from his wild curly hair and beard to his signature pink umbrella and glowing lantern. Perfect for fantasy lovers and collectors, you'll create a cuddly companion complete with a chocolate vest, copper brown coat with pockets, and even a hidden magic wand. The pattern includes innovative techniques for creating tousled hair texture and realistic clothing details that make this gentle giant truly special.
Progress Tracker
0% Complete
— Arms :
Thumb :
Round 1: 6sc in MR (6)
Round 2-3 :
6sc (6) - 2 rounds
Info :
Cut the thread and fasten off
Main Piece - Round 1 :
Start in skin color: 6sc in MR (6)
Round 3 :
(inc, 1sc)*6 (18)
Round 4-8 :
18sc (18) - 5 rounds
Round 9 :
3sc along the thumb and main piece at same time, 15sc along main piece (18)
Round 10 :
3sc along rest stitches of thumb, 15sc along main piece (18)
Round 11 :
(4sc, dec)*3 (15)
Info :
Stuff slightly. Insert wire and continue crocheting around it, stuff as you go
Round 12-13 :
15sc (15) - 2 rounds
Info :
Change thread color to terracotta. Cut skin color thread and fasten off
Round 14 :
(4sc, inc)*3 (18)
Round 15 :
into back loops only 18sc (18)
Round 16-41 :
18sc (18) - 26 rounds
Info :
Fold arm in half and work additional sc to shift thumb to arm side. Cut thread and fasten off
Cuffs :
Return to round 14, attach terracotta thread to front loop
Round 1-5 :
18sc (18) - 5 rounds
Info :
Work additional sc to finish above thumb. Fold cuffs down. Cut thread and fasten off. Make 2 arms total
— Legs :
Info :
Start first leg (left leg for doll) in tobacco color. Make ch13, from second ch from hook
Round 1 :
inc, 10sc, 4sc into 1 stitch, 10sc, inc (28)
Round 2 :
2inc, 10sc, 4inc, 10sc, 2inc (36)
Round 3 :
(1sc, inc)*2, 10sc, (inc, 1sc)*2, (1sc, inc)*2, 10sc, (inc, 1sc)*2 (44)
Round 4 :
(2sc, inc)*2, 10sc, (inc, 2sc)*2, (2sc, inc)*2, 10sc, (inc, 2sc)*2 (52)
Info :
Trace sole on cardboard/plastic, cut 2 insoles 2mm smaller than outline to insert into feet
Round 5-6 :
into back loops only 52sc (52) - 2 rounds
Round 7-9 :
13sc, 26hdc, 13sc (52) - 3 rounds
Info :
Check marker is in middle of heel. Insert cardboard insole
Round 10 :
13sc, (dc dec, 2hdc)*6, dc dec, 13sc (45)
Round 11 :
13sc, (1hdc, dc dec)*6, 1hdc, 13sc (39)
Round 12 :
13sc, 7dc dec, 12sc (32)
Round 13 :
(2sc, dec)*8 (24) - change to dark brown on last stitch
Info :
Cut tobacco brown thread. Prepare 36cm wire pieces, bend loop at one end (1cm), wrap 15cm with tape, bend wire end at right angle (2cm). Insert wire into foot
Round 14 :
into back loops only 24sc (24)
Round 15-18 :
24sc (24) - 4 rounds
Round 19 :
(5sc, inc)*4 (28)
Round 20-21 :
28sc (28) - 2 rounds
Info :
Cut thread and fasten off
Trouser Leg - Info :
Attach dark brown thread to front loop of round 13 at middle. Hold leg with wire facing out. Make ch
Round 1 :
(2sc, inc)*8 (32)
Round 2-3 :
32sc (32) - 2 rounds
Info :
After round 3 make sl st, ch, turn work
Round 4 :
into front loops only 32sc, sl st into ch, make ch, turn (32)
Round 5 :
into back loops only 32sc (32)
Info :
Skip ch, continue in spiral
Round 6 :
(15sc, inc)*2 (34)
Round 8 :
(15sc, dec)*2 (32)
Round 9 :
(dec, 6sc)*4 (28)
Round 10-13 :
28sc (28) - 4 rounds
Round 14 :
crochet through outer and inner layers joining pieces: 28sc (28)
Round 15-27 :
28sc (28) - 13 rounds
Info :
Crochet additional sc to finish at inner leg where it joins the other leg. Shift point closer to heel so toes face sides. Crochet second leg same pattern
— Body :
Info :
Join legs: make ch7 and insert hook into next stitch on first leg. Crochet 14sc and place marker
Round 1 :
14sc, 7sc along chain, 28sc, 7sc along chain, 14sc (70)
Round 2 :
14sc, inc, 5sc, inc, 28sc, inc, 5sc, inc, 14sc (74)
Round 3 :
5sc, inc, 8sc, inc, 7sc, inc, 8sc, inc, 10sc, inc, 8sc, inc, 7sc, inc, 8sc, inc, 5sc (82)
Round 4-8 :
82sc (82) - 5 rounds
Round 9 :
15sc, inc, 9sc, inc, 56sc (84)
Round 10-21 :
84sc (84) - 12 rounds - change to terracotta on last stitch
Round 22-23 :
84sc (84) - 2 rounds
Round 24 :
into back loops only 84sc (84)
Round 25-28 :
84sc (84) - 4 rounds
Info :
Stuff brown part of body firmly, especially lower part, sides, and belly. Check marker is in middle of body side
Round 29 :
7sc, dec, (11sc, dec)*2, 49sc (81)
Round 30-34 :
81sc (81) - 5 rounds
Round 35 :
(8sc, dec)*3, 51sc (78)
Round 36-46 :
78sc (78) - 11 rounds
Info :
Position arms symmetrically: 7 stitches for first arm, 34 stitches front side, 7 stitches second arm, 30 stitches back side. Thumb facing forward
Round 47 :
7sc along body and inner side of first arm, 34sc along front, 7sc along body and inner side of second arm, 30sc along back (78)
Round 48 :
11sc along outer side of first arm, 34sc along front, 11sc along outer side of second arm, 30sc along back (86)
Round 49-50 :
86sc (86) - 2 rounds
Info :
Form wire frame: bend both wire ends toward each other and twist around main frame. Wrap neck portion with tape
Round 51 :
(10sc, dec, 9sc, dec)*2, 10sc, dec, 7sc, dec, 8sc, dec, 7sc, dec (78)
Round 52 :
(4sc, dec)*13 (65)
Info :
Crochet additional sc to shift marker to middle of arm
Round 54 :
4sc, dec, 21sc, dec, 8sc, dec, (9sc, dec)*2, 4sc (60)
Round 55 :
(2sc, dec, 2sc)*10 (50)
Round 57 :
(3sc, dec)*10 (40)
Round 59 :
(2sc, dec)*10 (30)
Round 61 :
(1sc, dec)*10 (20) - change to skin color on last stitch
Round 62 :
into back loops only 20sc (20)
Round 63 :
(dec, 8sc)*2 (18)
Round 64-66 :
18sc (18) - 3 rounds
Info :
Cut thread leaving tail for sewing
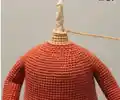
Shirt Layer - Info :
Return to round 23, attach terracotta thread to front loop at middle of back side. Make ch, hold body with legs facing out
Round 2 :
20sc, inc, 41sc, inc, 21sc (86)
Round 3-8 :
86sc (86) - 6 rounds
Info :
Finish with sl st. Cut thread and fasten off. Weave in tail
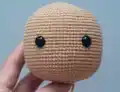
— Head :
Round 1 :
Skin color: 6sc in MR (6)
Round 3 :
(1sc, inc)*6 (18)
Round 4 :
(2sc, inc)*6 (24)
Round 5 :
(3sc, inc)*6 (30)
Round 6 :
(2sc, inc, 2sc)*6 (36)
Round 7 :
(5sc, inc)*6 (42)
Round 8 :
(3sc, inc, 3sc)*6 (48)
Round 9 :
(7sc, inc)*6 (54)
Round 10 :
(4sc, inc, 4sc)*6 (60)
Round 11 :
(9sc, inc)*6 (66)
Round 12 :
(5sc, inc, 5sc)*6 (72)
Round 13-28 :
72sc (72) - 16 rounds
Info :
Insert 10mm safety eyes between rounds 20-21, 14 stitches apart
Round 29 :
(5sc, dec, 5sc)*6 (66)
Round 30 :
(9sc, dec)*6 (60)
Round 31 :
(4sc, dec, 4sc)*6 (54)
Round 32 :
(7sc, dec)*6 (48)
Round 33 :
(3sc, dec, 3sc)*6 (42)
Round 34 :
(5sc, dec)*6 (36)
Round 35 :
(2sc, dec, 2sc)*6 (30)
Round 36 :
(3sc, dec)*6 (24)
Round 37 :
(2sc, dec)*6 (18)
Info :
Cut thread and fasten off, add fiberfill
— Needle Sculpting :
Info :
Use skin color thread. Insert needle at point 1 (under chin, between last and second-to-last rounds), pull out at point 2 (near eye), leave tail for knot
Info :
Insert at point 3 (3 rounds up from point 2), run inside to point 4 (near other eye). Pull thread
Info :
Insert at point 5 (3 rounds down), pull out at point 6 (one stitch right from point 1). Pull carefully so eyes push into fabric
Info :
Tie thread tails with 1-2 tight knots. Weave inside head
— Face Details :
Eye Whites :
Embroider 3 white stitches around outer side of each eye. Fasten off and weave in
Eyelids :
Pull skin thread above eye, make diagonal stitch 4 stitches long, insert skipping 1 stitch from white stitch at eye middle. Eyelid should slightly cover top edge. Make one more stitch to widen. Embroider 2-3 horizontal stitches under eye for lower eyelid
Eyelashes :
Use black thread or divided black yarn. Embroider thin line under eyelid
Eyebrows :
Use dark brown yarn. Embroider thick part leaving 2 rounds up from eyes, make 3 horizontal stitches 4 stitches long. Add 2 more stitches, then one stitch from wide part to corner
— Ears :
Info :
Optional - will be hidden by hair. Crochet in skin color
Right Ear :
Form MR, make ch3, into ring: 2dc, 2hdc, 2sc, pull ring closed, cut leaving sewing tail
Left Ear :
Form MR mirrored: 2sc, 2hdc, 2dc, ch3, join with sl st, pull ring closed, cut leaving tail
Info :
Fix ears on head leaving 7 stitches from eyes. Sew and weave in tails
— Nose :
Round 1 :
Skin color: 6sc in MR (6)
Info :
Crochet 2sc more, place marker
Round 3 :
inc, 1sc, 2hdc inc, 1sc, inc, 3sc (13)
Info :
Cut thread leaving sewing tail. Place nose between eyes with upper point (first hdc inc) one round higher than upper lid. Sew adding fiberfill. Weave in tail
— Hair Attaching :
Info :
Use strong thread (Iris yarn) and thick dark melange yarn divided into separate threads carefully
Info :
Cut yarn into 40cm pieces (20cm doubled). Attach strong thread to head top, form loop by inserting needle into same point, skip 3 stitches and run needle out
Info :
Insert yarn piece into loop, pull thread so it hides between stitches. Attach each strand leaving 3 stitches from previous one
Info :
Distance between strands: 2 rounds on top, 3 rounds on back (optional). Attach hair to 4 rounds on head top. Forehead width from eyebrows to hairline equals 7 rounds
Info :
Continue around face leaving 2 stitches from eyebrows and eyes. Attach beard hair leaving 7 rounds down from nose: 2 rounds on sides, 1 round along chin
Info :
Attach several strands under nose for moustache. Divide strands into separate threads after each round. Trim and style hair
— Vest :
Info :
Chocolate color, crochet top to bottom in turning rows. Make ch and turn after each row. Make ch29, from second ch from hook
Row 1 :
2inc, (2sc, inc)*7, 3sc, 2inc, ch, turn (39)
Row 2:
inc, 11sc, inc, 13sc, inc, 11sc, inc, ch, turn (43)
Row 3 :
(inc, 5sc)*7, inc, ch, turn (51)
Row 4 :
(inc, 6sc)*3, inc, 7sc, inc, (6sc, inc)*3, ch, turn (59)
Row 5 :
(inc, 7sc)*3, inc, 9sc, inc, (7sc, inc)*3, ch, turn (67)
Info :
Try on body, distance between foreparts should be about 7 stitches
Row 6 :
(inc, 8sc)*2, (inc, 9sc)*3, (inc, 8sc)*2, inc, ch, turn (75)
Row 7 :
inc, 73sc, inc, ch, turn (77)
Info :
Cut thread. Crochet foreparts and back separately
First Forepart - Row 1-2 :
12sc, ch, turn (12) - 2 rows
Row 3 :
11sc, inc, ch, turn (13)
Row 4 :
inc, 12sc, ch, turn (14)
Row 5 :
13sc, inc, ch, turn (15)
Row 6 :
inc, 14sc, ch, turn (16)
Row 7-24 :
16sc, ch, turn (16) - 18 rows
Info :
Don't make ch after row 24. Cut and fasten off
Back Side - Info :
Return to row 7 on top part, skip 12 stitches from first forepart. Attach thread to 13th stitch, make ch
Row 1-2 :
29sc, ch, turn (29) - 2 rows
Row 3 :
inc, 27sc, inc, ch, turn (31)
Row 4 :
inc, 29sc, inc, ch, turn (33)
Row 5 :
inc, 31sc, inc, ch, turn (35)
Row 6 :
inc, 33sc, inc, ch, turn (37)
Row 7-14 :
37sc, ch, turn (37) - 8 rows
Row 15 :
inc, 35sc, inc, ch, turn (39)
Row 16-24 :
39sc, ch, turn (39) - 9 rows
Info :
Don't make ch after last row. Cut thread leaving long sewing tail
Second Forepart - Info :
Return to row 7, skip 12 stitches from back side. Attach thread to 13th stitch, make ch
Row 1-2 :
12sc, ch, turn (12) - 2 rows
Row 3 :
inc, 11sc, ch, turn (13)
Row 4 :
12sc, inc, ch, turn (14)
Row 5 :
inc, 13sc, ch, turn (15)
Row 6 :
14sc, inc, ch, turn (16)
Row 7-24 :
16sc, ch, turn (16) - 18 rows
Info :
Don't make ch after last row. Cut thread leaving sewing tail. Make side seams joining foreparts with back. Attach thread to vest bottom corner and crochet sc around piece
— Belt :
Info :
Black color. Make ch123 (length should be 1.5x belly circumference)
Row 1 :
From second ch from hook: inc, 120sc, inc, ch, turn (124)
Row 2 :
dec, 120sc, dec (122)
Info :
Cut and fasten off, weave in tail
Belt Loops :
Make 4 pieces: ch11, from second ch from hook 10sc. Cut leaving sewing tail
Info :
Sew loops to vest wrong side out: 2 on front foreparts, 2 on back. Lower edge between rows 3-4, top edge between rows 9-10 from vest bottom
Plaque :
Run belt through loops. Attach cocoa thread, 5sc along belt top edge, ch4, 5sc along belt lower edge, ch4, join with sl st to start. Cut and weave in tail. Run belt end through both chains
— Coat :
Info :
Copper brown color, turning rows top to bottom. Make ch and turn after each row. Make ch29, from 2nd ch from hook
Row 1 :
inc, 1sc, (2sc, inc)*7, 4sc, inc, ch, turn (37)
Row 2 :
(inc, 4sc)*3, inc, 5sc, (inc, 4sc)*3, inc, ch, turn (45)
Row 3 :
(inc, 5sc)*3, inc, 7sc, (inc, 5sc)*3, inc, ch, turn (53)
Row 4 :
(inc, 6sc)*3, inc, 9sc, (inc, 6sc)*3, inc, ch, turn (61)
Row 5 :
(inc, 7sc)*3, inc, 11sc, (inc, 7sc)*3, inc, ch, turn (69)
Row 6 :
inc, 67sc, inc, ch, turn (71)
Row 7 :
(inc, 8sc)*3, inc, 15sc, (inc, 8sc)*3, inc, ch, turn (79)
Row 8-9 :
79sc, ch, turn (79) - 2 rows
Row 10 :
inc, 77sc, inc, ch, turn (81)
Row 11 :
14sc, inc, 10sc, inc, 29sc, inc, 10sc, inc, 14sc, ch, turn (85)
Row 12 :
inc, 83sc, inc, ch, turn (87)
Row 13 :
16sc, inc, 10sc, inc, 31sc, inc, 10sc, inc, 16sc, ch, turn (91)
Row 14 :
inc, 89sc, inc, ch, turn (93)
Row 15 :
16sc, ch10, skip 14 stitches, from next stitch 33sc, ch10, skip 14 stitches, from next stitch 16sc, ch, turn (85)
Row 16 :
inc, 15sc, 10sc along chain, 33sc, 10sc along chain, 15sc, inc, ch, turn (87)
Row 17-18 :
87sc, ch, turn (87) - 2 rows
Row 19 :
inc, 85sc, inc, ch, turn (89)
Row 20-21 :
89sc, ch, turn (89) - 2 rows
Row 22 :
inc, 87sc, inc, ch, turn (91)
Row 23 :
19sc, inc, 9sc, inc, 31sc, inc, 9sc, inc, 19sc, ch, turn (95)
Row 24 :
95sc, ch, turn (95)
Row 25 :
inc, 93sc, inc, ch, turn (97)
Row 26-27 :
97sc, ch, turn (97) - 2 rows
Row 28 :
inc, 95sc, inc, ch, turn (99)
Row 29 :
22sc, inc, 9sc, inc, 33sc, inc, 9sc, inc, 22sc, ch, turn (103)
Row 30-31 :
103sc, ch, turn (103) - 2 rows
Row 32 :
inc, 101sc, inc, ch, turn (105)
Row 33-34 :
105sc, ch, turn (105) - 2 rows
Row 35 :
inc, 103sc, inc, ch, turn (107)
Row 36-38 :
107sc, ch, turn (107) - 3 rows
Row 39 :
inc, 105sc, inc, ch, turn (109)
Row 40-42 :
109sc, ch, turn (109) - 3 rows
Row 43 :
inc, 107sc, inc, ch, turn (111)
Row 44-46 :
111sc, ch, turn (111) - 3 rows
Row 47 :
inc, 109sc, inc, ch, turn (113)
Row 48-51 :
113sc, ch, turn (113) - 4 rows
Row 52 :
inc, 111sc, inc, ch, turn (115)
Row 53-55 :
115sc, ch, turn (115) - 3 rows
Info :
Don't cut thread. Crochet sc along forepart edges and neckline. Work 3sc into each corner of forepart bottom. Cut and fasten off
— Sleeves :
Info :
Attach thread to lower side of opening, make ch, crochet around opening 26sc (10sc lower side, 1sc corner, 14sc top, 1sc corner)
Rows 1-23 :
26sc per row, sl st into turning ch at row end, turn, make ch, crochet reverse direction (26) - 23 turning rows
Info :
Try coat on doll, add rows if sleeves short. After row 23 cut and fasten off. Weave in tails. Make second sleeve same way
— Pockets :
Info :
Make 2 pieces. Ch14, from second ch from hook
Row 1-12 :
13sc, ch, turn (13) - 12 rows
Info :
Cut leaving sewing tail. Place pockets on foreparts leaving 9 rows up from coat bottom and 9 stitches from forepart edge. Sew and weave in tails
— Lantern Main Part :
Info :
Start cocoa color. When changing colors cut previous thread. Make ch21, from second ch from hook
Row 1 :
20sc, ch, turn (20) - change to light yellow on last stitch
Row 2 :
into front loops only 20sc, ch, turn (20)
Row 3-9 :
into both loops 20sc, ch, turn (20) - 7 rows, change to cocoa on last stitch
Row 10 :
into front loops only 20sc, ch, turn (20) - change to light yellow on last stitch
Row 11 :
into back loops only 20sc, ch, turn (20)
Row 12-18 :
into both loops 20sc, ch, turn (20) - 7 rows, change to cocoa on last stitch
Row 19 :
into back loops only 20sc, ch, turn (20) - change to light yellow on last stitch
Row 20 :
into front loops only 20sc, ch, turn (20)
Row 21-27 :
20sc, ch, turn (20) - 7 rows, change to cocoa on last stitch
Row 28 :
into front loops only 20sc, ch, turn (20) - change to light yellow on last stitch
Row 29 :
into back loops only 20sc, ch, turn (20)
Row 30-36 :
20sc, ch, turn (20) - 7 rows
Info :
Cut leaving sewing tail. Cut 4 cardboard triangles size of yellow windows for reinforcement. Sew two sides inserting needle into edge loops of yellow stitches and cocoa stitches
— Lantern Top & Bottom Parts :
Info :
Cocoa color. Make top part first. Ch11, from second ch from hook
Row 1-10 :
10sc, ch, turn (10) - 10 rows
Info :
Don't cut thread. Place cocoa piece on main piece, crochet sc through both layers, 3sc into each corner. Hold with windows facing down, leave tails inside. Cut and fasten off. Weave in tail
Info :
Insert 4 cardboard pieces and stuff (not too much). Make lower part same pattern, join with main piece working sc through both layers adding fiberfill
Cylinder on Top :
Cocoa color
Round 3 :
(1sc, inc)*6 (18)
Round 5 :
into back loops only 18sc (18)
Round 6-7 :
18sc (18) - 2 rounds
Info :
Cut leaving sewing tail. Attach thread to front loop of round 4, crochet one round slip stitches with hollow facing up. Sew to center of top side
Handle :
Attach cocoa thread to middle of one side, ch35, join to middle of opposite side. Fasten off and cut. Weave in tails
Window Lines :
Take long cocoa thread divided in half. Embroider lines along each window side leaving one round from edge using two threads. Weave in tails inside
— Umbrella Canopy :
Round 1 :
Pink color: 6sc in MR (6)
Round 3-4 :
12sc (12) - 2 rounds
Round 5 :
(inc, 1sc)*6 (18)
Round 6-7 :
18sc (18) - 2 rounds
Round 8 :
(1sc, 2inc)*6 (30)
Round 10 :
(2sc, 2inc, 1sc)*6 (42)
Round 12 :
(3sc, 2inc, 2sc)*6 (54)
Round 14 :
(4sc, 2inc, 3sc)*6 (66)
Round 16 :
(5sc, 2inc, 4sc)*6 (78)
Round 18 :
(6sc, 2inc, 5sc)*6 (90)
Round 20 :
(7sc, 2inc, 6sc)*6 (102)
Round 22 :
(8sc, 2inc, 7sc)*6 (114)
Round 24 :
(9sc, 2inc, 8sc)*6 (126)
Round 26 :
(10sc, 2inc, 9sc)*6 (138)
Info :
Finish with sl st. Cut leaving long sewing tail for folds
Brown End Tip :
Tobacco brown color
Round 2-4 :
6sc (6) - 3 rounds
Info :
Cut leaving sewing tail. Sew to canopy center
— Umbrella Shaft :
Info :
Prepare 15cm wooden stick (measure hand tip to floor), tobacco brown yarn, and Moment Crystal glue
Info :
Apply glue to stick and wind yarn thread around it. Add glue into canopy deepening and insert stick, press with fingers
Info :
Form several folds on canopy and sew with pink thread. Sew smaller folds on top, make several 2-3cm stitches to end tip. Add glue between shaft and folds, press until sets
— Assembly & Finishing :
Painting :
Optional: use hard pastels or cosmetics. Add pink blush to cheeks and dark tint above lower eyelids
Attach Head :
Place head on neck with eyes looking straight. Sew inserting needle between stitches going over stitch body and neck stitch. Avoid catching hair. Add fiberfill if needed
This enchanting giant forester pattern brings a beloved magical character to life in incredible 36cm detail, complete with his signature wild hair, cozy layered clothing, and charming accessories. The pattern combines advanced techniques like wire armature construction, needle sculpting, and innovative hair attachment to create a posable companion brimming with personality and warmth. Every detail has been lovingly crafted, from the working pockets on his copper coat to the glowing lantern and pink umbrella hiding his secret magic wand. Perfect for experienced crocheters ready to challenge themselves with a truly special project! 🧶✨