🧢 Beautiful ✨ Detailed πŸ’ Adorable

Floral Tea Set Pattern

Floral Tea Set Pattern
4.4β˜… Rating
15-20 Hours Time Needed
3.7K Made This
βœ‚οΈ

Intermediate Level

Ideal for those with basic knitting experience, featuring slightly more advanced stitches and techniques to expand your skills.

⏱️

Slow & Steady

A 10-12 hour projectβ€”great for savoring the process over several sessions.

🏑

Cozy Accent

A warm touch for your space that transforms ordinary corners into inviting nooks filled with handmade charm.

About This Floral Tea Set Pattern

This stunning floral tea set pattern creates an entire decorative tea service with intricate petal details. The set includes a beautiful teapot with dimensional rose-like petals, matching teacups with handles, coordinating saucers, and a charming candy bowl. Each piece features layered petals in various pink shades combined with fresh green accents, creating a garden-inspired aesthetic that's both elegant and whimsical.

Floral Tea Set Pattern crochet pattern - detailed view of completed project

The pattern utilizes fishing line to create structure and stability in the cups and saucers, while pipe cleaners provide flexible, poseable handles. Hot glue assembly ensures durability and professional-looking results.

Why You'll Love This Floral Tea Set Pattern

I absolutely love this pattern because it creates a complete decorative set that's both functional and beautiful. The dimensional petal construction gives each piece incredible texture and visual interest, while the color combinations allow for endless creativity. I find the fishing line technique fascinatingβ€”it provides structure while keeping the pieces lightweight. The assembly process, though detailed, is incredibly satisfying as you watch each flower bloom to life. This set makes a stunning display piece or a cherished gift for tea lovers and crochet enthusiasts alike.

Floral Tea Set Pattern step 1 - construction progress Floral Tea Set Pattern step 2 - assembly progress Floral Tea Set Pattern step 3 - details and accessories Floral Tea Set Pattern step 4 - final assembly and finishing

Switch Things Up

I love experimenting with color combinations in this pattern to create completely different moods and aesthetics. Instead of traditional pink florals, I've tried making an elegant all-white version that looks like porcelain, and a vibrant rainbow set that's perfect for a child's playroom.

The petal construction technique can be adjusted too - try making the petals slightly larger or smaller to change the overall flower size and fullness. I've created more compact roses by reducing the final increase rounds, and more open, wild roses by adding extra rounds.

For a seasonal twist, consider autumn colors with burnt orange, deep burgundy, and golden yellow, or create a winter wonderland version in icy blues and silvers. The green elements could be changed to match - darker forest green for autumn, or sage green for a vintage look.

You can also vary the yarn weight for different effects. Using a finer yarn creates a more delicate, dainty tea set, while bulkier yarn makes a bolder statement piece. Just remember to adjust your bottle or ball size accordingly and use a corresponding hook size.

The candy bowl design is incredibly versatile - I've made it with six petals for a fuller flower, or kept it at five for a more stylized look. Some crocheters even add small embroidered details or beads to the petal centers for extra sparkle and dimension that makes each piece truly unique and personalized.

Common Mistakes & How to Fix Them

βœ— Not maintaining consistent tension when working with fishing line, which can cause the cup walls to be either too loose or too tight βœ— Forgetting to stuff the teapot spout adequately before gluing, resulting in a limp appearance instead of a firm sculptural element βœ— Applying too much hot glue to petals at once, causing them to become stiff and lose their natural curved shape βœ— Skipping the step to burn and secure the fishing line ends, which can cause it to slip out and ruin the structure

Floral Tea Set Pattern

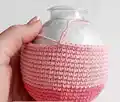
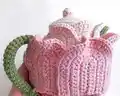
Create an enchanting floral tea set complete with a decorative teapot, delicate teacups with saucers, and a charming candy bowl. This whimsical pattern features beautiful flower petal details in lovely pink shades with green accents, perfect for display or imaginative tea party play. Each piece is adorned with dimensional petals and sepals that bring a garden-fresh aesthetic to your crochet collection.

Intermediate 15-20 Hours

Materials Needed for Floral Tea Set Pattern

β€” Main Fabric

  • 01
    YarnArt Jeans in colors 18 (or 74), 20, 36, 42, 69, 07, 11, 35 - multiple skeins of pink shades
  • 02
    Raspberry yarn (color 42) for teapot base
  • 03
    Pink yarn (color 36) for teapot body
  • 04
    Light pink yarn (color 18 or 74) for teapot top and details
  • 05
    Green yarn (color 69) for handles, spouts, and sepals
  • 06
    Yellow yarn (color 35) for teacup centers

β€” Tools Required

  • 01
    Crochet hook size 2.25mm
  • 02
    Ball-shaped bottle (350ml, 9cm diameter) or 9cm styrofoam ball
  • 03
    Milk bottle cap for teapot
  • 04
    Fishing line (1mm diameter)
  • 05
    Pipe cleaner (30cm chenille wire)
  • 06
    Fiberfill stuffing
  • 07
    Tapestry needle
  • 08
    Hot glue gun with glue sticks
  • 09
    Scissors
  • 10
    Stitch markers
  • 11
    Lighter (for sealing fishing line)

Progress Tracker

0% Complete

β€” Floral Teapot Base :

Round 1 :

6 sc in AR (6)

Round 2 :

Inc every st (12)

Round 3 :

Inc every 2d (18)

Round 4 :

Inc every 3d (24)

Round 5 :

Inc every 4th (30)

Round 6 :

Inc every 5th (36)

Round 7 :

Inc every 6th (42)

Round 8 :

Inc every 7th (48)

Round 9 :

Inc every 8th (54)

Round 10 :

Inc every 9th (60)

Round 11 :

Inc every 10th (66)

Round 12 :

Inc every 11th (72)

Round 13-14 :

Work 2 rounds straight (72)

Round 15-24 :

Change yarn to pink color (36), work 10 rounds straight (72)

Round 25 :

Change yarn to light pink (18 or 74), (10 sc, dec) x 6 times

Round 26 :

(9 sc, dec) x 6 times

Round 27 :

(8 sc, dec) x 6 times, keep decreasing symmetrically to increasing

Info :

When you come close to bottleneck, work straight without decreases

β€” Teapot Spout :

Info :

Work with green yarn (69), Chain 20

Round 1 :

3 sc in 2d ch, 17 sc, 4 sc in last ch, 17 sc on another side of chain

Round 2 :

3 inc, 17 sc, 4 inc, 17 sc

Round 3 :

(1 sc, inc) x 3, 17 sc, (1 sc, inc) x 4, 17 sc

Round 4 :

(2 sc, inc) x 3, 17 sc, (2 sc, inc) x 4, 17 sc

Round 5 :

(3 sc, inc) x 3, 17 sc, 16 inc, 16 sc, sl st

Info :

Stuff the bottom 2/3 with fiberfill and glue it to the base of the teapot. Join the straight sides and sew with a needle

β€” Handle :

Info :

For handle ch 8 and work spiral rounds without inc, 15 cm up

Info :

Fold pipe cleaner in half, insert into handle and sew up the hole. Glue the handle to the pot and additionally sew for reliability

β€” Teapot Cap :

Info :

Work with light pink. Crochet a circle of such size to close the neck (6 rows). Follow the scheme of teapot bottom for circle

Info :

Work 1 round through back loops only and one more round through both loops

Info :

Work 2 rounds straight, stuff and sew the hole with the end of yarn

Info :

For cap handle work 8 sc in AR, work 2 rounds straight, stuff and sew the hole. Sew this ball to the center of the cap

Info :

Put the cap on its place, adding fiberfill under it. Sew on the base

β€” Big Petal (Make 4) :

Info :

Raspberry yarn, Chain 9

Round 1 :

3 sc in 2d ch, 6 sc, 4 sc in last ch, 6 sc on another side of chain. Work spiral rounds

Round 2 :

Inc x 3, 6 sc, inc x 4, 6 sc

Round 3 :

(1 sc, inc) x 3, 6 sc, (1 sc, inc) x 4, 6 sc

Round 4 :

(2 sc, inc) x 3, 6 sc, (2 sc, inc) x 4, 6 sc

Round 5 :

(3 sc, inc) x 3, 6 sc, (3 sc, inc) x 4, 6 sc

Round 6 :

(4 sc, inc) x 3, 6 sc, (4 sc, inc) x 4, 6 sc

Round 7 :

(5 sc, inc) x 3, 6 sc, 24 inc, 5 sc, sl st

β€” Middle Petal (Make 6) :

Info :

Pink yarn, Chain 10. Work back-and-forth rows with turning chain

Round 1 :

8 sc, 4 sc in last ch, 8 sc on another side of chain

Round 2 :

8 sc, 4 inc, 8 sc

Round 3 :

8 sc, (1 sc, inc) x 4, 8 sc

Round 4 :

8 sc, (2 sc, inc) x 4, 8 sc

Round 5 :

8 sc, (3 sc, inc) x 4, 8 sc

Round 6 :

8 sc, 20 inc, 8 sc

β€” Small Petal (Make 6) :

Info :

Light pink yarn, Chain 8. Work back-and-forth rows with turning chain

Round 1 :

6 sc, 4 sc in last ch, 6 sc on another side of chain

Round 2 :

6 sc, 4 inc, 6 sc

Round 3 :

6 sc, (1 sc, inc) x 4, 6 sc

Round 4 :

6 sc, (2 sc, inc) x 4, 6 sc

Round 5 :

6 sc, 16 inc, 6 sc

β€” Assembly :

Info :

Attach all petals with hot glue gun, applying glue on the bottom 2/3 of the petals. Make symmetrically on both sides of the pot

Info :

Small petals are fixed at the level of light pink part of the base. First one in the center, then 2 on the sides with an overlap

Info :

Middle petals are glued first on the sides, then one in the middle. Side petal comes under the handle of the pot

Info :

Large petals stretch wide with your hands so that they fit well on the bottom of the pot, 2 on each side

Info :

Turn down the unglued edges of the petals, giving them beautiful waves. All areas adjacent to the base, fasten with glue gun

β€” Sepal :

Info :

Green yarn. Crochet 7 rounds circle, following the scheme of teapot bottom

Info :

Ch 10, 1 sl st, 1 sc, 1 htc, 6 dc. Skip 2 st, sl st in 3d st of the circle. Repeat around the circle

Info :

Glue the sepal on pots bottom, but leave the tips unglued

Assembly Instructions

  • Attach all petals with hot glue gun, applying glue to the bottom two-thirds of each petal. Work symmetrically on both sides of the teapot.
  • Fix small petals at the level of the light pink section of the base. Place first one in center, then two on the sides with slight overlap, right next to handle and spout.
  • Glue middle petals first on the sides, then one in the middle. The side petal should come under the handle of the pot.
  • Stretch large petals wide with your hands so they fit well on the bottom of the pot, placing two on each side.
  • Turn down the unglued edges of the petals to create beautiful waves. Fasten all areas adjacent to the base with hot glue gun.
  • Crochet a green sepal with seven rounds following the teapot bottom scheme, then create chain loops around for decorative tips.
  • Glue the sepal to the pot's bottom, leaving the tips unglued for dimensional effect.

Important Notes

  • πŸ’‘Use fishing line (1mm diameter) when crocheting teacups and saucers to provide structure and stability to the pieces
  • πŸ’‘Burn the end of fishing line slightly to create a small ball that prevents it from slipping through stitches
  • πŸ’‘Apply hot glue conservatively to petals - too much will make them stiff and lose their natural curved appearance
  • πŸ’‘When working with multiple pink shades, yarn consumption may vary depending on your color combinations
  • πŸ’‘Stuff the teapot spout firmly in the bottom two-thirds before gluing to the base for best shape
  • πŸ’‘Use pipe cleaner (chenille wire) for handles to make them bendable and poseable
  • πŸ’‘If your crochet tension differs from the pattern, adjust the bottle base scheme accordingly - the goal is three approximately equal color sections

This enchanting Floral Tea Set pattern brings garden beauty to your crochet collection with its dimensional petal construction and elegant color combinations. Perfect for display or imaginative play, this complete set showcases intermediate crochet techniques including fishing line structure work, hot glue assembly, and intricate petal shaping. Each piece blooms with personality and charm, making it a treasured handmade creation. πŸŒΈβ˜•βœ¨

You ask,

we answer.

FAQs

Can I use a different type of bottle or ball for the teapot base?

Yes! The pattern provides two options: a 350ml ball-shaped bottle (9cm diameter) or a 9cm styrofoam ball with a milk bottle cap glued on top. Either option works well, just ensure your dimensions are similar for the pattern to fit properly.

Why is fishing line used in this pattern and can I skip it?

Fishing line provides essential structure and stability to the teacups and saucers, helping them hold their shape and creating a flared opening. It's highly recommended not to skip this element, as the pieces may collapse or lose their form without it.

How do I prevent the fishing line from slipping out of my work?

Burn the end of the fishing line slightly with a lighter to create a small ball at the tip. This prevents it from slipping through the stitches. Also, make sure to output the other end to the front side and burn it when finishing.

Can I make this set in different colors?

Absolutely! While the pattern uses various pink shades with green accents, you can choose any color combination you prefer. The pattern specifically notes that main colors can be selected as desired for teacups and candy bowls.

What's the best way to attach the petals without making them too stiff?

Apply hot glue conservatively to the center and lower portions of petals first, leaving edges free. Don't try to glue the entire surface at once. Glue the edges later after positioning, and avoid applying glue within 2mm of the very edge to maintain flexibility.