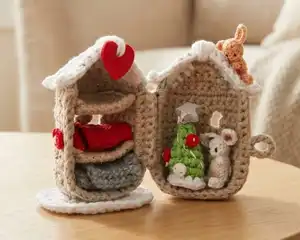
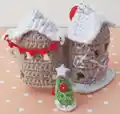
Create your own enchanting miniature world with this detailed dollhouse crochet pattern. This charming three-story dwelling measures approximately 4.5 cm x 4.5 cm x 7 cm and features intricate architectural details including windows, doors, floors, walls, an attic, and a beautiful snow-covered roof. Complete with festive decorations like a Christmas tree, garland, blanket, pillow, and an adorable micro bunny inhabitant, this pattern offers a delightful crafting experience that results in a truly magical handmade keepsake.
Progress Tracker
0% Complete
— Part 1: Main Dollhouse Structure
— Floor (Make 3)
Row 1:
Make a foundation chain of 9 stitches. Single crochet in second chain from hook, sc in each ch across row (8 sc)
Rows 2-4:
ch 1, turn, sc in each ch along row (8)
Trim row:
ch 1, sc 4 evenly spaced along edge to corner; 2 sc into corner, 6 sc in each stitch, 2 sc into next corner, sc 4 evenly spaced from edge to corner (18)
Info:
Fasten off and cut the yarn after having finished 2 details. After having made the 3rd detail DO NOT cut the yarn
— Walls
Row 1:
Ch 1, make 18 sc through back loop of last row (18)
Section 1 Rows 2-4:
ch 1, turn, sc 2 (2)
Section 2 Row 2:
ch 4, skip 2 stitches of bottom walls row, inserting hook into 3rd stitch sc 10 (10)
Section 2 Row 3:
ch 1, turn, sc 9, sc 1 hitching up the loop of ch (10)
Section 2 Row 4:
sl st into the loop of ch, turn, sc 10 (10)
Section 3 Row 2:
ch 4, skip 2 stitches of bottom walls row, inserting hook into 3rd stitch sc 2 (2)
Section 3 Row 3:
ch 1, turn, sc 1, sc 1 hitching up the loop of ch (2)
Section 3 Row 4:
sl st into the loop of ch, turn, sc 2 (2)
Row 5 (along all sections):
ch 1, turn, sc 2 in each stitch, sc 2 into chain, sc 10 in each stitch, sc 2 into chain, sc 2 in each stitch (18)
Row 6:
Turn. Take 1 floor detail. Ch 1, make 18 sc through back loop of walls and back loop of floor detail (18)
Row 7:
ch 1, turn, sc in each stitch of row (18)
Section 1 Rows 8-10:
ch 1, turn, sc 6 in each stitch of row (6)
Section 2 Row 8:
ch 4, skip 2 stitches of bottom walls row, inserting hook into 3rd stitch sc 2 (2)
Section 2 Row 9:
ch 1, turn, sc 1, sc 1 hitching up the loop of ch (2)
Section 2 Row 10:
sl st into the loop of ch, turn, sc 2 (2)
Section 3 Row 8:
ch 4, skip 2 stitches of bottom walls row, inserting hook into 3rd stitch sc 6 (6)
Section 3 Row 9:
ch 1, turn, sc 5, sc 1 hitching up the loop of ch (6)
Section 3 Row 10:
sl st into the loop of ch, turn, sc 6 (6)
Row 11 (along all sections):
ch 1, turn, sc 6 in each stitch, sc 2 into chain, sc 2 in each stitch, sc 2 into chain, sc 6 in each stitch (18)
Row 12:
Turn. Take 2nd floor detail. Ch 1, make 18 sc through back loop of walls and back loop of floor detail (18). Don't fasten off
— Attic
Row 1:
ch 1, turn, 5 sl st, ch 1, sc 8 (8)
Row 2:
ch 1, turn, dec, sc 4, dec (6)
Row 3:
ch 1, turn, dec, sc 2, dec (4)
Row 4:
ch 1, turn, 2 dec (2)
Row 5:
ch 1, turn, dec (1), ch 1, 5 sl st down, 5 sl st along the top of wall. Do not fasten off
— Roof
Row 1:
Make a foundation chain of 7 stitches. Sc in second chain from hook, sc in each ch along row (6)
Row 2:
ch 1, sc 4 through last walls row and previous roof row together, sc 1 through last walls and roof rows hitching up the first attic row too, sc 1 (6)
Row 3:
ch 1, turn, sc 1, sc 1 hitching up the stitch of attic, sc 4 (6)
Row 4:
ch 1, turn, sc 4, sc 1 hitching up stitch of attic, sc 1 (6)
Row 5:
ch 1, turn, sc 1, sc 1 hitching up stitch of attic, sc 4 (6)
Row 6:
ch 1, turn, sc 4, sc 1 hitching up stitch of attic, sc 1 (6)
Row 7:
ch 1, turn, sc 1, sc 1 hitching up stitch of attic, sc 4 (6)
Row 8:
ch 1, turn, sc 4, sc 1 hitching up stitch of attic, sc 1 (6)
Row 9:
ch 1, turn, sc 1, sc 1 hitching up stitch of attic, sc 4 (6)
Row 10:
ch 1, turn, sc 4, sc 1 hitching up stitch of attic, sc 1 (6)
Row 11:
ch 1, turn, sc 1, sc 1 hitching up stitch of attic, sc 4 (6)
Row 12:
ch 1, turn, sc 4, sc 1 hitching up stitch of attic, sc 1 (6)
Row 13:
ch 1, turn, sc 1, sc 5 pulling the thread through the stitches of last walls row (6)
Row 14:
ch 1, turn, sc 6 (6)
Row 15:
ch 1, turn, 6 sl st into previous row, ch 1, 2 sl st along frontal roof border. Do not fasten off
— Frame
Info:
Measure borders of house. Total length approximately 19 cm (7.5 inches). Cut wire of needed length plus 0.5 cm. Join the ends with round nose pliers
Info:
Insert hook in the loop of yarn A (beige) and crochet over frame: 1 ch, sc 6 along 2nd floor, sc 6 along 1st floor, sc 10 along floor into BACK loop, sc 6 along next side of 1st floor, sc 6 along next side of 2nd floor (34). Fasten off
Info:
Insert hook into loop of yarn B (white), sc 6 over frame before place of frame ends joining, sc 6 over frame after place of frame ends joining, 2 sl st along frontal roof border, ch 1, 6 sl st along left side of roof border. Fasten off, weave in all ends
Info:
With needle and yarn hide the place of frame ends joining. Sew decoration button if desired. Decorate with embroidery if desired
— Ground
Row 1:
Work with yarn B. Inserting hook into front loops of FLOOR detail (not frame) sc 28 (28)
Row 2:
Continue working in spiral rows. 1 inc, 8 sc, 2 inc, 2 sc, 2 inc, 8 sc, 2 inc, 2 sc, 1 inc (36)
Row 3:
1 inc, 10 sc, 2 inc, 4 sc, 2 inc, 10 sc, 2 inc, 4 sc, 1 inc (44)
Row 4:
1 inc, 2 sc, 1 hdc, 6 dc, 1 hdc, 2 sc, sl st (14). Fasten off, weave in the end of yarn
— Part 2: Opening Section
— Floor
Row 1:
Use yarn A (beige). Make a foundation chain of 9 stitches. Sc in second ch from hook, sc in each ch along row (8 sc)
Row 2:
ch 1, turn, sc 8 (8)
Trim row:
ch 1, sc 2 evenly spaced along edge to corner; 2 sc into corner, 6 sc in each ch, 2 sc into next corner, sc 2 evenly spaced from edge to corner (14). Don't fasten off
— Walls
Row 1:
Make 14 sc through back loop (14)
Section 1 Rows 2-4:
ch 1, turn, sc 2 (2)
Section 2 Row 2:
ch 4, skip 2 stitches of bottom walls row, inserting hook into 3rd stitch sc 6 (6)
Section 2 Row 3:
ch 1, turn, sc 5, sc hitching up the loop of ch (6)
Section 2 Row 4:
sl st into the loop of ch, turn, sc 6 (6)
Section 3 Row 2:
ch 4, skip 2 stitches of bottom walls row, inserting hook into 3rd stitch sc 2 (2)
Section 3 Row 3:
ch 1, turn, sc 1, sc 1 hitching up the loop of ch (2)
Section 3 Row 4:
sl st into the loop of ch, turn, sc 2 (2)
Row 5 (along all sections):
ch 1, turn, sc 2 in each stitch, sc 2 into chain, sc 6 in each stitch, sc 2 into chain, sc 2 in each stitch (14)
Rows 6-7:
Turn, ch 1, sc 14 (14)
Section 1 Rows 8-10:
ch 1, turn, sc 4 in each stitch of row (4)
Section 2 Row 8:
ch 4, skip 2 stitches of bottom walls row, inserting hook into 3rd stitch sc 2 (2)
Section 2 Row 9:
ch 1, turn, sc 1, sc hitching up the loop of ch (2)
Section 2 Row 10:
sl st into the loop of ch, turn, sc 2 (2)
Section 3 Row 8:
ch 4, skip 2 stitches of bottom walls row, inserting hook into 3rd stitch sc 4 (4)
Section 3 Row 9:
ch 1, turn, sc 3, sc 1 hitching up the loop of ch (4)
Section 3 Row 10:
sl st into the loop of ch, turn, sc 4 (4)
Row 11:
ch 1, turn, sc 4 in each stitch, sc 2 into chain, sc 2 in each stitch, sc 2 into chain, sc 4 in each stitch (14)
Row 12:
Turn, ch 1, sc 14 (14). Don't fasten off
— Attic
Row 1:
ch 1, turn, 3 sl st along last walls row, ch 1, sc 8 (8)
Row 2:
ch 1, turn, dec, sc 4, dec (6)
Row 3:
ch 1, turn, dec, sc 2, dec (4)
Row 4:
ch 1, turn, 2 dec (2)
Row 5:
ch 1, turn, dec (1), ch 1, 5 sl st down, 3 sl st along the top of wall. Do not fasten off
— Roof
Row 1:
Make a foundation chain of 5 stitches. Single crochet in second chain from hook, sc in each ch along row (4)
Row 2:
ch 1, sc 2 through last walls row together with previous roof row, sc 1 through last walls and roof row hitching up first attic row too, sc 1 (4)
Row 3:
ch 1, turn, sc 1, sc 1 hitching up stitch of attic, sc 2 (4)
Row 4:
ch 1, turn, sc 2, sc 1 hitching up stitch of attic, sc 1 (4)
Row 5:
ch 1, turn, sc 1, sc 1 hitching up stitch of attic, sc 2 (4)
Row 6:
ch 1, turn, sc 2, sc 1 hitching up stitch of attic, sc 1 (4)
Row 7:
ch 1, turn, sc 1, sc 1 hitching up stitch of attic, sc 2 (4)
Row 8:
ch 1, turn, sc 2, sc 1 hitching up stitch of attic, sc 1 (4)
Row 9:
ch 1, turn, sc 1, sc 1 hitching up stitch of attic, sc 2 (4)
Row 10:
ch 1, turn, sc 2, sc 1 hitching up stitch of attic, sc 1 (4)
Row 11:
ch 1, turn, sc 1, sc 1 hitching up stitch of attic, sc 2 (4)
Row 12:
ch 1, turn, sc 2, sc 1 hitching up stitch of attic, sc 1 (4)
Row 13:
ch 1, turn, sc 1, sc 3 pulling the thread through the stitches of last walls row (4)
Row 14:
ch 1, turn, sc 4 (4)
Row 15:
ch 1, turn, 4 sl st into previous row, ch 1, 2 sl st along frontal roof border. Do not fasten off
— Frame
Info:
Measure borders of this part. Total length approximately 17 cm (6.7 inches). Cut wire plus 0.5 cm. Join ends with round nose pliers
Info:
Insert hook into loop of yarn B (white), sc 6 over frame before point of frame ends joining, sc 6 over frame after place of joining, 2 sl st along roof border, ch 1, 4 sl st along left side roof border. Fasten off
Info:
Insert hook in the loop of yarn A (beige): Make 1 ch, sc 6 along 2nd floor, make buttonhole loop (ch 9 for 8mm button, sl st into 1st loop of ch), sc 6 along 1st floor, sc 10 along floor into back loop, sc 6 along next side of 1st floor, sc 6 along next side of 2nd floor. Do not fasten off
Info:
Ch 1, sc 10 through borders of both parts to join. Fasten off. With needle and yarn hide the place of frame ends joining. Sew the button between 1 and 2 floors on the outer side of part 1
— Home Decor: Garland
Info:
With hook 1.00mm and thin yarn ch 8 (leaving long tail), sl st into 4th ch from beginning
Info:
Repeat: Ch 8, sl st into 4th ch from previous part, 4 times. Ch 4. Fasten off leaving long tail. Join garland to the roof with hook or needle
— Home Decor: Christmas Tree
Info:
With hook 1.75mm and green yarn make foundation chain of 10 stitches, sl st into 1st ch. Work in spiral rows
Row 3:
[dec, sc 3] x 2 (8)
Row 4:
[dec, sc 2] x 2 (6)
Row 6:
[sl st into opposite stitch from hook] x 2. Fasten off, hide tail, sew decor and embroider if desired
Info:
Take white yarn. Work along foundation chain: ch 1, [inc, sc] x 5 (15). Fasten off, hide the tail
— Home Decor: Blanket
Info:
With hook 1.75mm and corresponding yarn ch 9, beginning from 2nd ch from hook sc 8. [Ch 1, turn, sc 8] x 5 rows. Fasten off, weave in the ends
— Home Decor: Pillow
Info:
Use the same hook and yarn. Ch 5, beginning from 2nd ch from hook sc 4. [Ch 1, turn, sc 4] x 5 rows. Fasten off. Fold it, make slip stitches along 3 sides of borders or join with needle. Hide tails inside
— Micro Bunny
Info:
Hook 1.0mm, yarn 650m/100g or thinner. Work in spiral rows. Use thread in contrast color to mark the rows
Row 1:
6 sc in magic ring (6)
Rows 3-6:
sc into each stitch (12)
Row 7:
Make arms: Make 5 ch, beginning from 2nd ch from body sc 2. Continue along body - sc 5. Make second arm: ch 5, beginning from 2nd ch from body sc 2. Return to row of body - sc 7 (12)
Row 8:
Skip the arms and crochet as usual - each sc into each sc of previous row. Make 12 sc (12)
Rows 9-12:
sc into each stitch (12). Insert a bit of toys filler inside
Row 13:
sc 6, make a leg: Ch 3, inserting hook into 3rd ch from hook make popcorn stitch (5 dc in one chain, join first and last dc with slip stitch). Make 2 chains. Put hook behind the popcorn stitch. Pulling yarn from behind make a loop, crochet 2 loops on hook together. Insert hook through first sc of last row of body and last sc of last row on opposite side of body. Make 6 slip stitches joining opposite sides of body. Repeat leg: make 3 chains, popcorn stitch of 5 dc, 2 chains, tighten the base of popcorn stitch with one more loop from behind and crochet those 2 loops on hook together. Make 1 sl st into body. Fasten off leaving long tail of yarn
Tail:
Turn the work. Choose place for tail. Insert hook through this place, move forward closely to the knot and pull out the yarn left for making tail. Make 2 chains. Insert hook under closest stitch of body, make dc. Then make 2 chains, sl st into base of dc, fasten off and hide the end inside
Neck:
Take a needle and sew thread. Make neck tightening the thread as shown in photos
Eyes:
Make eyes with dark thread as shown in photos
Ears:
Insert hook into place for ear. Pull the yarn, make 3 ch, 3 dc into same place. Ch 3, turn, make 3 dc worked off together. Ch 2, turn, 4 sl st along inner border of ear, sl st into head. Fasten off leaving a long tail for making second ear. Pull the yarn out in opposite side of head, repeat an ear. Hide the tail of yarn inside when finished
Decoration:
Use textile markers, color pencils or kids chalk to decorate bunny
This enchanting Elendan Dollhouse pattern brings together architectural design and crochet artistry to create a truly unique miniature masterpiece. With its innovative wire frame construction, realistic multi-story structure, and charming decorative elements including a micro bunny resident, this pattern offers an advanced crocheting experience that results in a treasured keepsake. The finished dollhouse features functional doors, decorative windows, festive accessories, and a button closure system that allows it to open and reveal its cozy interior. Perfect for display or imaginative play, this pattern pushes your skills while creating something truly magical. Happy crocheting and enjoy building your tiny world! 🧶✨🏡