🧢 Beautiful ✨ Detailed πŸ’ Adorable

Dino's Family Keychain Amigurumi Pattern

Dino's Family Keychain Amigurumi Pattern
4.0β˜… Rating
3-4 Hours Time Needed
2.1K Made This
βœ‚οΈ

Intermediate Level

Ideal for those with basic knitting experience, featuring slightly more advanced stitches and techniques to expand your skills.

⏱️

Weekend Treat

Takes 5-7 hours, making it an enjoyable project to finish over a couple of days.

🧸

Tiny Treasure

Small, sweet, and gift-worthy creations that fit perfectly in the palm of your hand with detailed charm.

About This Dino's Family Keychain Amigurumi Pattern

This adorable Dino's Family pattern brings prehistoric charm to your keychain collection with a pocket-sized dinosaur friend! The pattern expertly guides you through creating a miniature dino with characteristic spikes, a contrasting belly patch, and sweet embroidered features. The construction method involves crocheting the body, head, and tail as connected pieces, then adding dimensional spikes and details for that authentic dinosaur look. With clear round-by-round instructions and helpful photos, you'll create a sturdy little companion that's perfect for everyday carry.

Dino's Family Keychain Amigurumi Pattern crochet pattern - detailed view of completed project

The versatility of this pattern shines through its dual sizing options - create a tiny 10cm keychain version or scale up to a cuddly 21cm plush toy using bulky yarn. Both versions maintain the same adorable proportions and charming character that make these dinos truly special.

Why You'll Love This Dino's Family Keychain Amigurumi Pattern

I absolutely love this pattern because it combines cuteness with practicality in the most delightful way! The construction method is clever - joining the legs, tail, and body seamlessly means fewer ends to weave in and a sturdier finished piece. I especially appreciate how the spikes are worked separately and sewn on, giving you complete control over their placement and creating that perfect dinosaur silhouette. The fact that you can make both a miniature keychain and a larger plush version from the same pattern is incredibly satisfying. Plus, there's something magical about watching such a tiny, detailed creature come to life stitch by stitch!

Dino's Family Keychain Amigurumi Pattern step 1 - construction progress Dino's Family Keychain Amigurumi Pattern step 2 - assembly progress Dino's Family Keychain Amigurumi Pattern step 3 - details and accessories Dino's Family Keychain Amigurumi Pattern step 4 - final assembly and finishing

Switch Things Up

I love experimenting with color combinations to give each little dino its own personality! Try using gradient yarns for the body to create an ombre effect, or go bold with neon colors for a modern twist on this prehistoric friend. You could even make a whole rainbow family of dinosaurs, each in a different vibrant shade.

For the spikes, I've found that using a slightly sparkly or metallic yarn adds such a fun touch without overwhelming the design. Alternatively, you could make the spikes in graduated colors from dark to light along the back for a stunning dimensional effect.

If you're making this as a gift for a child, consider using softer, bulkier yarn for the plush version and skip the keychain attachment. Instead, you could embroider a sweet smile on the face or add felt details like rosy cheeks for extra cuteness.

I also love playing with the tummy patch - instead of a solid color, try using a variegated yarn or even adding simple embroidered details like spots or stripes to make your dino truly one-of-a-kind. The possibilities are endless, and that's what makes this pattern so special!

Common Mistakes & How to Fix Them

βœ— Not stuffing the body evenly as you go can create lumps and weak spots - add small amounts of fiberfill gradually throughout construction βœ— Missing the placement instructions for decreases can distort the body shape - carefully follow which side should have decreases for proper shaping βœ— Sewing spikes without checking symmetry from multiple angles first can create an unbalanced look - always pin and view from above before attaching βœ— Pulling the yarn too tightly when joining the legs and tail to the body can cause puckering - maintain even tension throughout βœ— Forgetting to mark the beginning of rounds during body construction can cause the pattern to shift - use a stitch marker consistently

Dino's Family Keychain Amigurumi Pattern

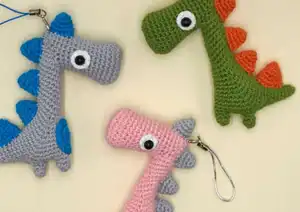
Create your own adorable miniature dinosaur family with this charming keychain pattern! This delightful design features a cute little dino complete with spikes along its back, a rounded tummy, and sweet button eyes. Perfect for personalizing bags, keys, or gifting to dinosaur lovers of all ages. The pattern includes detailed instructions for creating a 10cm dinosaur using fingering weight yarn, plus bonus instructions for making a larger 21cm plush version using bulky yarn.

Intermediate 3-4 Hours

Materials Needed for Dino's Family Keychain Amigurumi Pattern

β€” Main Fabric

  • 01
    Fingering/2ply yarn Alize Bella (50g/180m, 100% cotton) in main color for dinosaur body
  • 02
    Fingering/2ply yarn in contrasting color for spikes and tummy
  • 03
    Small amount of white fingering yarn for eyes
  • 04
    For plush version: Super Bulky/14 ply yarn Himalaya Dolphin Baby or YarnArt Dolce (100% Micropolyester, 100g/120m)

β€” Tools Required

  • 01
    Crochet hook 1.25mm (for keychain version)
  • 02
    Crochet hook 3.5mm (for plush version)
  • 03
    Toy filling/fiberfill
  • 04
    6mm half bead eyes (for keychain)
  • 05
    14mm half bead eyes (for plush version)
  • 06
    Transparent glue for attaching eyes
  • 07
    Scissors
  • 08
    Yarn needle for sewing
  • 09
    Stitch markers
  • 10
    Keychain fastener (loop, carabiner, or cord)
  • 11
    Pins for positioning pieces

Progress Tracker

0% Complete

β€” Tail :

Round 1 :

4 sc in MR (4)

Round 2 :

(inc, sc)*2 (6)

Round 3 :

6 sc (6)

Round 4 :

inc, 4 sc, inc (8)

Round 5 :

8 sc (8)

Round 6 :

inc, 6 sc, inc (10)

Round 7 :

10 sc (10)

Round 8 :

inc, 8 sc, inc (12)

Round 9 :

inc, 4 sc, inc, 5 sc, inc (15), sl st

Info :

Cut the yarn, fasten off. Add fiberfill.

β€” Head :

Round 1 :

ch8, from the second chain on the hook: inc, 5 sc, inc, on the other side of the chain: inc, 5 sc, inc (18)

Round 2 :

(sc, inc, 5 sc, inc, sc)*2 (22)

Round 3-5 :

3 rounds of 22 sc (22)

Info :

Further decreases should go from one side - this will be the bottom.

Round 6 :

dec, 20 sc (21)

Round 7 :

21 sc (21)

Round 8 :

dec, 19 sc (20)

Round 9 :

20 sc (20)

Round 10 :

dec, 18 sc (19)

Round 11 :

19 sc (19)

Round 12 :

dec, 17 sc (18)

Round 13-14 :

2 rounds of 18 sc (18), sl st

Info :

Cut the yarn, fasten off. Add fiberfill.

β€” Legs :

Info :

Make 2. Stuff if desired.

Round 1 :

6 sc in MR (6)

Round 2-3 :

2 rounds of 6 sc (6)

Info :

On the first leg make sl st. Fasten off and cut the yarn. Continue crocheting the body from the second leg, join the first leg and tail.

β€” Body :

Round 1 :

ch4, (from the next sc mark the new beginning of the round), on the first leg 3 sc, starting from any stitch, on the tail, starting from sl st on it: 7 sc, inc, 7 sc, on the first leg 3 sc, along the chain 4 sc, on the second leg 6 sc, on the other side of the chain 4 sc (36)

Info :

Further, the increases should be centered on the back, and the decreases on the sides and from round 12 in the front in the center. If you have a strong shifting, move the marker of the beginning of the round. Stuff as you go.

Round 2 :

2 sc, dec, 14 sc, dec, 16 sc (34)

Round 3 :

2 sc, dec, 6 sc, inc, 5 sc, dec, 16 sc (33)

Round 4 :

dec*2, 5 sc, inc, 5 sc, dec*2, 14 sc (30)

Round 5 :

dec, 6 sc, inc, 5 sc, dec, 14 sc (29)

Round 6 :

dec, 5 sc, inc, 5 sc, dec*2, 10 sc, dec (26)

Round 7 :

dec, 5 sc, inc, 4 sc, dec*2, 8 sc, dec (23)

Round 8 :

dec, 4 sc, inc, 4 sc, dec, 10 sc (22)

Round 9 :

dec, 4 sc, inc, 3 sc, dec, 10 sc (21)

Round 10 :

dec, 3 sc, inc*2, 2 sc, dec*2, 6 sc, dec (19)

Round 11 :

dec, 3 sc, inc*2, 3 sc, dec, 7 sc (19)

Round 12 :

dec, 4 sc, inc, 3 sc, dec, 3 sc, dec, 2 sc (17)

Round 13 :

5 sc, inc, 6 sc, dec*2, sc (16)

Round 14 :

6 sc, inc, 6 sc, dec, sc (16)

Round 15 :

7 sc, inc, 6 sc, dec (16)

Round 16 :

dec, 5 sc, inc*2, 5 sc, dec (16)

Round 17 :

16 sc (16)

Round 18 :

dec, 5 sc, inc*2, 5 sc, dec (16)

Round 19 :

dec, 6 sc, inc, 5 sc, dec (15)

Round 20 :

15 sc (15)

Round 21 :

dec, 5 sc, inc*2, 3 sc, short round

Info :

Finish the round so that when you fold your neck in half, there are 3 sc left to the front fold, since we will crochet the head in front in the center (markers mark six central stitches in front). We also fold the head in half and mark 3 stitches to the sides from the bottom fold (where the end of the round is).

Round 22 :

6 sc with the head (starting from the stitch with the blue marker), next mark the beginning of the round from the first dec - on the neck: dec, 6 sc, dec, on the head 12 sc (20)

Round 23 :

dec, 2 sc, inc, sc, dec*2, 8 sc, dec (17)

Round 24 :

dec, 3 sc, dec, 10 sc (15)

Round 25 :

(3 sc, dec)*3 (12)

Round 26 :

dec*6 (6)

Info :

Tighten the hole through front loops. Fasten off, weave in the ends.

β€” Eyes :

Info :

Make 2 circles in white color.

Round 1 :

9 sc in MR (9), fasten off with sl st

Info :

Leave the yarn tail for sewing.

β€” Spikes :

Info :

Make 4 spikes of smaller size and 1 tail spike larger.

Bigger Spikes (1 pcs) :

Round 1 :

4 sc in MR (4)

Round 2 :

(inc, sc)*2 (6)

Round 3 :

(inc, 2 sc)*2 (8)

Round 4 :

(inc, 3 sc)*2 (10)

Round 5 :

(inc, 4 sc)*2 (12)

Round 6 :

(inc, 5 sc)*2 (14), sl st

Info :

Leave the yarn tail for sewing.

Smaller Spikes (4 pcs) :

Round 1 :

4 sc in MR (4)

Round 2 :

(inc, sc)*2 (6)

Round 3 :

(inc, 2 sc)*2 (8)

Round 4 :

(inc, 3 sc)*2 (10)

Round 5 :

(inc, 4 sc)*2 (12), sl st

Info :

Leave the yarn tail for sewing.

β€” Tummy :

Round 1 :

6 sc in MR (6)

Round 2 :

((3 sc inc)*2, sc)*2 (14)

Round 3 :

(2 sc, inc*2, 3 sc)*2 (18), sl st

Info :

Leave the yarn tail for sewing. To make the end of the round less noticeable, bring the thread to the wrong side under the loops of the next stitch.

Assembly Instructions

  • Sew the white eye circles on the sides of the head slightly shifting down - on one side after round 7, on the other side after round 8 to maintain symmetry. Fix with pins first and check from above and in front before sewing.
  • Insert the needle under both loops of the eye circle, then grab the thread on the head and again under both loops of the same stitch in the opposite direction, continuing to sew in a circle.
  • Glue the 6mm half bead pupils in the center of each white eye circle using transparent glue.
  • Sew the largest spike on the tail after round 4 using the 'over the edge' stitch method through the front loops.
  • Continue sewing 3 smaller spikes along the back after round 1 of the body, spacing them evenly.
  • Sew the last small spike on the top of the head at the very edge.
  • Sew the tummy patch immediately above the front leg in the center using the same method as the eyes were sewn.
  • Attach a keychain fastener (loop, carabiner, or cord) between the upper spikes on the back to complete your Dino keychain.

Important Notes

  • πŸ’‘Use stitch markers consistently throughout construction to track the beginning of rounds, especially during body shaping
  • πŸ’‘Stuff the body gradually as you crochet rather than waiting until the end for better shape control
  • πŸ’‘Pin all spikes and decorative elements in place before sewing to ensure symmetrical placement
  • πŸ’‘Check the positioning of eyes from multiple angles (above and front) before final attachment
  • πŸ’‘For the plush version, use approximately 40g main color, 15g secondary color, and small amount of white yarn
  • πŸ’‘The pattern involves joining multiple pieces (legs, tail, body) so pay careful attention to placement instructions
  • πŸ’‘To make the end of rounds less noticeable on flat pieces, bring the thread to the wrong side under loops

This delightful Dino's Family pattern brings prehistoric charm to life in the most adorable miniature form! Perfect for dinosaur enthusiasts of all ages, this versatile pattern offers both a pocket-sized 10cm keychain version and a cuddly 21cm plush option. The clever construction method joins the body, legs, and tail seamlessly, while dimensional spikes and a sweet tummy patch add authentic dino character. With detailed photo references and clear instructions, you'll create a sturdy little companion that's perfect for decorating bags, keys, or gifting to someone special. Get ready to bring your very own prehistoric friend to life! πŸ¦•πŸ§Άβœ¨

You ask,

we answer.

FAQs

Can I make this pattern larger or smaller?

Yes! The pattern includes instructions for both a 10cm keychain version using fingering weight yarn and a 1.25mm hook, and a 21cm plush version using super bulky yarn and a 3.5mm hook. You can also experiment with other yarn weights and corresponding hook sizes for different dimensions.

Do I need to stuff all the pieces?

The tail and head should definitely be stuffed for structure. For the legs, stuffing is optional - you can choose based on whether you prefer softer or firmer legs. The body should be stuffed gradually as you work for the best shape.

How do I join the legs, tail, and body together?

The pattern has you crochet the legs and tail separately first. Then you continue working from the second leg, using chain stitches to connect to the first leg and tail, working around all pieces to form the body. Detailed instructions are provided in round 1 of the body section.

What if my rounds start shifting or the shaping looks off?

The pattern specifically notes that if you experience strong shifting, you should move your stitch marker to realign the beginning of the round. The increases should be centered on the back, while decreases go on the sides and eventually in the front center from round 12 onward.

Can I use different colors or add my own creative touches?

Absolutely! While the pattern suggests main, additional, and white colors, you can customize your dino with any color combination you like. You could even add more spikes, create different facial expressions, or embellish with additional details to make your dino unique.