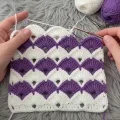
🧶 Beautiful ✨ Detailed 💝 Adorable

Crochet Two-Color Shell Stitch Square Pattern

Crochet Two-Color Shell Stitch Square Pattern
4.1★Rating
1.5-3 HoursTime Needed
2.2KMade This
✂️

Beginner Friendly Level

Perfect for those just starting their crocheting journey, with clear instructions and simple techniques

⏱️

Quick Craft

Fits nicely into a free afternoon — 2 to 5 hours of focused, enjoyable crocheting.

🏡

Cozy Accent

A warm touch for your space that transforms ordinary corners into inviting nooks filled with handmade charm.

About This Crochet Two-Color Shell Stitch Square Pattern

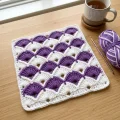
Crochet Two-Color Shell Stitch Square Pattern crochet pattern - detailed view

Use it as a dishcloth, a trivet or a pretty cup coaster, or stitch several together into a pillow cover. It makes a thoughtful housewarming present in any two colors the recipient loves.

Why You'll Love This Crochet Two-Color Shell Stitch Square Pattern

I’m a sucker for any stitch that looks fancy but only needs one repeated shape, and shells are exactly that. Once you’ve done the first two rows, your hands just know what to do. I also love how forgiving it is, since a slightly loose fan still looks like it was meant to be there. And swapping colors is where I really get hooked, because every new row changes the whole mood of the piece.

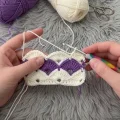
Crochet Two-Color Shell Stitch Square Pattern step 1 Crochet Two-Color Shell Stitch Square Pattern step 2 Crochet Two-Color Shell Stitch Square Pattern step 3 Crochet Two-Color Shell Stitch Square Pattern step 4

Switch Things Up

The first time I tried a two-color shell stitch, I was sure I’d lose track of the colors halfway through. I never did, and the reason is simple: every row is the exact same fan, only the yarn changes. That’s the whole secret behind this square.

My favorite moment comes around Row 4. Up to then it looks like plain stripes, and then the diagonal waves suddenly appear. I always stop and hold it up to the window, because the little eyelets at the base of each fan catch the light so nicely.

One tip I learned the hard way: keep your tension relaxed on the seven dc groups. When I pulled them tight, the fans stood up like little pinecones and the whole panel bowed. Loose, even stitches give you flat, drapey shells. I also carry the spare color up the same edge every time so the sides stay tidy.

If you want to play with color, try navy with cream, or soft peach with sage. A variegated skein for the shell rows and a solid for the others gives a completely different feel, too.

Common Mistakes & How to Fix Them

✗ On the even rows it’s easy to place the sc in the 3rd or 5th dc of a shell instead of the 4th, which tilts the fans sideways, so count all seven dc and use the exact middle one every time.✗ If you skip only 2 stitches instead of 3 on either side of the sc, the shells crowd together and the panel ruffles and cups, so skip exactly 3 stitches before and after every sc and every shell.✗ The half shells at each end of the even rows are easy to forget, but without the ch3 and 3dc at the start and the 4dc in the last sc, the edge pulls in and your count drops below 41.✗ Carrying the spare color up the side too tightly puckers the edge of the panel, so leave the strand relaxed and check that the side lies flat before you start the next row.✗ When working the border, skipping the 3sc in the corner stitch makes the square corners pull in and curl, so always put three stitches in the corner stitch and keep the center one marked on the next round.✗ Pulling the seven dc shells tight makes the fans stand up stiff and bow the whole panel, so keep your tension loose and even on every dc in the shell.

Crochet Two-Color Shell Stitch Square Pattern

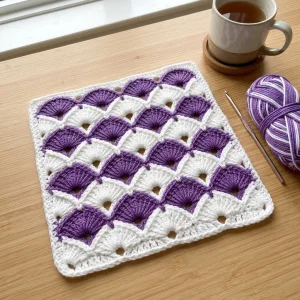
Grab two colors and a small hook, and you’ll watch fan after fan stack into a scalloped fabric that looks far fancier than it is. Each row flips between deep purple and crisp white, so the wave effect builds itself as you go. You’ll work it flat, row by row, then finish with a clean white border that frames the whole square. It’s an easy one to pick up after dinner and finish within a day or two.

Beginner Friendly 1.5-3 Hours

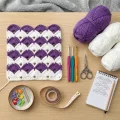
Materials Needed for Crochet Two-Color Shell Stitch Square Pattern

— Main Fabric

  • 01
    Approximately 40 g of DK weight cotton yarn in crisp white for Rows 1, 3, 5 and 7 and the three border rounds
  • 02
    Approximately 30 g of DK weight cotton yarn in deep violet purple for Rows 2, 4, 6 and 8

— Tools Required

  • 01
    4 mm (size G-6) crochet hook, approximately
  • 02
    Tapestry needle for weaving in ends
  • 03
    Sharp scissors
  • 04
    Stitch marker to mark the right side of Row 1 and the corners of the border
  • 05
    Blocking mat
  • 06
    Rust-proof pins for blocking
  • 07
    Measuring tape

Progress Tracker

0% Complete

— 1. Shell Stitch Panel :

Info :

The finished square measures approximately 20 cm (8 in) on each side after blocking, with about 5 shells across. The panel is worked flat in turned rows with 41 stitches in every row. To make it wider, add 8 ch to the foundation chain for each extra shell (foundation ch = 8 x number of shells + 2). To make it taller, add rows in pairs so the last row is a purple row with half shells at each end.

Info :

Change colors on the last yarn over of the last st of each row, then turn and carry on. You can carry the spare color loosely up the side edge, or cut it and weave the ends in later. Each shell is 7 dc worked into one st.

Row 1 :

With white, ch 42. sc in 2nd ch from hook. Then 5 times: skip 3 ch, 7dc in next ch, skip 3 ch, sc in next ch. Change to purple on the last st and turn (41)

Row 2 :

With purple, ch3 (counts as a dc), 3dc in first sc. Then 4 times: skip 3 dc, sc in next dc, skip 3 dc, 7dc in next sc. Skip 3 dc, sc in next dc, skip 3 dc, 4dc in last sc. Change to white on the last st and turn (41)

Row 3 :

With white, ch1, sc in first st. Then 5 times: skip 3 sts, 7dc in next sc, skip 3 sts, sc in next st. Change to purple on the last st and turn (41)

Row 4 :

With purple, ch3 (counts as a dc), 3dc in first sc. Then 4 times: skip 3 dc, sc in next dc, skip 3 dc, 7dc in next sc. Skip 3 dc, sc in next dc, skip 3 dc, 4dc in last sc. Change to white on the last st and turn (41)

Row 5 :

With white, ch1, sc in first st. Then 5 times: skip 3 sts, 7dc in next sc, skip 3 sts, sc in next st. Change to purple on the last st and turn (41)

Row 6 :

With purple, ch3 (counts as a dc), 3dc in first sc. Then 4 times: skip 3 dc, sc in next dc, skip 3 dc, 7dc in next sc. Skip 3 dc, sc in next dc, skip 3 dc, 4dc in last sc. Change to white on the last st and turn (41)

Row 7 :

With white, ch1, sc in first st. Then 5 times: skip 3 sts, 7dc in next sc, skip 3 sts, sc in next st. Change to purple on the last st and turn (41)

Row 8 :

With purple, ch3 (counts as a dc), 3dc in first sc. Then 4 times: skip 3 dc, sc in next dc, skip 3 dc, 7dc in next sc. Skip 3 dc, sc in next dc, skip 3 dc, 4dc in last sc. Fasten off purple (41)

— 2. White Border :

Info :

The border is a simple three-round frame in white that squares up the edges. If you’d like a fancier finish, swap Round 3 for a row of your favorite scallop edging.

Round 1 :

With the right side facing you, join white with a sl st in the last st of Row 8 at one top corner. ch1, 3sc in the same st, sc in each of the next 39 sts, 3sc in the last st of Row 8 (45 across the top, corners included). Work 16 sc evenly down the side, 2 sc per row end. 3sc in the first ch of the foundation edge, sc in each of the next 39 ch, 3sc in the last ch. Work 16 sc evenly up the other side, 2 sc per row end. Join with a sl st to the first sc (122)

Round 2 :

ch1, sc in the first st, 3sc in the next st (corner center), sc in the next st. Then sc in each st along to the center st of the next 3sc corner group, 3sc in that center st, and repeat for the remaining corners. Finish with sc in each st up to the first sc. Join with a sl st to the first sc (130)

Round 3 :

ch2 (does not count as a st), hdc in the first st, 3hdc in the next st (corner center), hdc in the next st. Then hdc in each st along to the center st of the next corner group, 3hdc in that center st, and repeat for the remaining corners. Finish with hdc in each st up to the first hdc. Join with a sl st to the first hdc, then fasten off (138)

Assembly Instructions

  • Weave in the white ends along the side edges of Rows 1, 3, 5 and 7, and the purple ends along Rows 2, 4, 6 and 8, running each tail through the base of the dc stitches for about 5 cm (2 in) before trimming.
  • Dampen the square with a spray bottle or soak it briefly, then lay it flat on a blocking mat and pin each of the four corners to a 20 cm (8 in) square.
  • Pin the border at the center of each side, then pin the tip of every shell along Row 8 and the base of every shell along Row 1 so the scalloped edge lies smooth.
  • Gently open each shell with your fingertips so the small eyelet at the base of every fan shows clearly, then check that the diagonal lines of shells run straight across the panel.
  • Let the square dry completely, ideally overnight, before removing the pins, and trim any stray ends flush with the border.

Important Notes

  • 💡Count to 41 at the end of every row, because the shells sit over the single crochets and one missing stitch shifts every fan after it.
  • 💡Cotton yarn holds the shell shape best and blocks flat, while softer fibers can relax and make the fans spread.
  • 💡Mark the right side of Row 1 with a stitch marker so you always know which side faces you when you pick the border back up.
  • 💡Always change colors on the last yarn over of the last stitch, so the new color starts cleanly and no old color peeks through at the edge.
  • 💡Keep the hook size the same through the panel and border, since a tighter border will pull the shell rows in and curl the corners.
  • 💡Work the 7dc into a single stitch with relaxed tension so the fan opens up and the little eyelet shows at its base.
  • 💡If you carry the spare color up the side, leave a bit of slack and keep it on the same edge every time.

Your purple and white shell square is ready to take its place on the kitchen counter, under a favorite mug, or tucked into a care package for someone who deserves something handmade. Every fan you stitched is proof that a simple repeat can add up to something lovely. Make another in a fresh pair of colors, share the pattern with a crafty friend, and keep that hook moving. Happy crocheting! 🧶✨
You ask,

we answer.

FAQs

Can I make this square bigger or smaller?

Yes. Each extra shell across adds 8 ch to the foundation chain, so ch 50 gives you 6 shells, and ch 34 gives you 4 shells. For height, add or remove rows in pairs so the last row is always a purple half-shell row. Border stitch counts will change, so just place 2 sc per row end on the sides and 1 sc per stitch across the top and bottom.

Can I use a different yarn weight for this pattern?

You can, but the pattern was designed around DK cotton and a hook of approximately 4 mm. Worsted weight makes each shell wider and the square noticeably bigger, while fingering weight gives a smaller, lacier square. Make a small swatch of two shell rows first to see how the fans sit.

How do I handle the color changes without lots of ends?

Change colors in the last yarn over of the last stitch of each row, and carry the spare color loosely up the side edge. Since you only switch at the end of a row, nothing is cut. If you prefer a tidier side, cut the yarn and weave the ends in during finishing.

Why does my panel curl or ripple after I finish the rows?

Usually the shells were worked too tightly or the skipped stitch count was off. Check that you always skip exactly 3 stitches on both sides of each sc. Wet blocking the square and pinning the corners and every shell tip will relax most of the curl.

Is this square beginner friendly?

Yes, it uses only chain, single crochet and double crochet, plus half double crochet in the last border round. The one trick is placing the sc in the exact middle of each shell, so counting the seven dc at first helps. After the first two rows the rhythm is easy to remember.

What can I make with this square besides a dishcloth?

It works nicely as a trivet, a coaster, or a small decorative mat. Joined in a grid of four or six, it becomes a pillow cover or a baby blanket. For joining, use a whipstitch through the border’s back loops with white yarn.