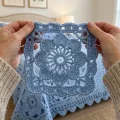
Imagine finishing a long day and walking into a bedroom that already feels like a deep breath. That’s the mood you’re about to stitch. You’ll work one small piece at a time, so there’s always a satisfying finish line within reach, and the whole thing grows from your lap into something you can truly show off. Grab a cup of tea, pick a soft blue you love, and settle in. Each square will make you smile a little more than the last.
Progress Tracker
0% Complete
— 1. Flower Square (make 62: 50 for the bedspread, 12 for two shams) :
Info :
The finished bedspread is approximately 128 x 188 cm (50 x 74 in), each flower square is approximately 17 cm (6.7 in) across once blocked, and each pillow sham is approximately 52 x 69 cm (20.5 x 27 in). The bedspread uses 5 columns of 10 squares with 4 lace strips between them. To make it longer, add 2 squares to every column (12 per column), work the lace strip with a foundation of ch 278, repeat the bracket in Strip Row 2 and Row 4 137 times, and use 275 sc down each long edge in Border Round 1 with the repeat counts from the Border Info. To make it wider, add one more column and one more lace strip, and use 163 sc across each short edge in Border Round 1.
Round 1 :
Ch 4, sl st to the first ch to form a ring. Ch 3 (counts as dc), 11 dc in the ring, sl st to the top of the ch 3 (12 dc).
Round 2 :
Ch 1, sc in the same st, [ch 3, sk 1 dc, sc in next dc] 5 times, ch 3, sk last dc, sl st to the first sc (6 sc, 6 ch-3 sps).
Round 3 :
Sl st in the first ch-3 sp, ch 1, (sc, hdc, 5 dc, hdc, sc) in the same sp. Work (sc, hdc, 5 dc, hdc, sc) in each remaining ch-3 sp. Sl st to the first sc (6 petals, 54 sts).
Round 4 :
Sl st in each of the next 4 sts of the first petal to reach its center dc. Fold the petals forward and work this round behind them. Ch 1, sc in the same st, [ch 7, sk 8 sts, sc in the center dc of the next petal] 5 times, ch 7, sk 8 sts, sl st to the first sc (6 sc, 6 ch-7 sps).
Round 5 :
Ch 3 (counts as dc), 11 dc in the first ch-7 sp, 12 dc in each of the next 5 ch-7 sps, sl st to the top of the ch 3 (72 dc).
Round 6 :
Ch 3 (counts as dc), ch 3, dc in the same st for the first corner. Dc in each of the next 17 sts. [(Dc, ch 3, dc) in next st, dc in each of the next 17 sts] 3 times. Sl st to the top of the ch 3 (76 dc, 4 ch-3 corner sps, 19 dc along each side between corner sps).
Round 7 :
Sl st in the first ch-3 corner sp, ch 3 (counts as dc), ch 2, dc in the same sp. [Dc in next dc, (ch 1, sk 1 dc, dc in next dc) 9 times, (dc, ch 2, dc) in next ch-3 sp] 3 times. Dc in next dc, (ch 1, sk 1 dc, dc in next dc) 9 times, sl st to the top of the ch 3 (48 dc, 36 ch-1 sps, 4 ch-2 corner sps).
Round 8 :
Sl st in the first ch-2 corner sp, ch 1, (sc, ch 2, sc) in the same sp. [Sc in each dc and each ch-1 sp along the side (21 sc), (sc, ch 2, sc) in next ch-2 sp] 3 times. Sc in each dc and each ch-1 sp along the last side (21 sc). Sl st to the first sc and fasten off (92 sc, 4 ch-2 corner sps). Each edge now has 23 sts from corner sc to corner sc.
— 2. Lace Strip (make 4) :
Info :
Each strip is approximately 6 cm (2.4 in) wide and matches the length of one column of 10 squares. Row 1 is worked into the foundation chain, so keep that chain loose.
Row 1 :
Ch 232. Dc in the 4th ch from the hook and in each ch across (230 dc, counting the skipped ch 3 as the first dc).
Row 2 :
Turn, ch 3 (counts as dc), dc in next st, [ch 1, sk 1 st, dc in next st] 114 times (116 dc, 114 ch-1 sps, 230 sts).
Row 3 :
Turn, ch 3 (counts as dc), dc in each dc and each ch-1 sp across (230 dc).
Row 4 :
Turn, ch 3 (counts as dc), dc in next st, [ch 1, sk 1 st, dc in next st] 114 times (116 dc, 114 ch-1 sps, 230 sts).
Row 5 :
Turn, ch 3 (counts as dc), dc in each dc and each ch-1 sp across (230 dc). Fasten off.
— 3. Joining the Bedspread Panel :
Info :
Build the bedspread from five columns of 10 squares each, then join the four lace strips between the columns so that a column sits on each outer side. The 23 edge sts of each square and the 230 sts of each strip edge match one to one.
Column Seam :
Place two squares with wrong sides together and edges aligned. Join yarn in the first edge sc, then sc through the back loops of both squares in each of the 23 edge sts (23 sc). Fasten off. Join further squares the same way until the column has 10 squares. Make 5 columns.
Strip Seam :
Place a strip against a column with wrong sides together, long edges aligned and ends matching. Join yarn at one end and sc through both layers in each of the 230 sts (230 sc). Fasten off. Join the other long edge of the strip to the next column the same way. Continue in the order column, strip, column, strip, column, strip, column, strip, column.
— 4. Bedspread Border :
Info :
The border has 3 rounds and is worked all the way around the joined panel. Short edges are the top and bottom, long edges are the sides. Place a stitch marker in each corner sp. For the longer version with 12 squares per column, use 275 sc down each long edge in Round 1, repeat the mesh bracket 138 times on each long side in Round 2, and work sc, then [5 dc in next ch-1 sp, sc in next ch-1 sp] 69 times on each long side in Round 3. For the wider version, use 163 sc across each short edge, repeat the mesh bracket 82 times on each short side, and work sc, then [5 dc in next ch-1 sp, sc in next ch-1 sp] 41 times on each short side.
Round 1 :
Join yarn in the ch-2 sp of an outer corner square. Ch 1, 3 sc in the corner sp. Sc evenly across the short edge (135 sc: 23 across each square edge and 5 across each strip end, working over the joins without extra sts). 3 sc in the next corner sp. Sc evenly down the long edge (231 sc, working 2 sc in one st near the middle to gain the extra st). 3 sc in the next corner sp. Sc 135 across the next short edge. 3 sc in the next corner sp. Sc 231 up the last long edge. Sl st to the first sc (744 sc).
Round 2 :
Sl st in the next sc (the corner center), ch 3 (counts as dc), ch 2, dc in the same st. [Ch 1, sk 1 st, dc in next st] 68 times, ch 1, sk 1 st, (dc, ch 2, dc) in the corner center st. [Ch 1, sk 1 st, dc in next st] 116 times, ch 1, sk 1 st, (dc, ch 2, dc) in the corner center st. [Ch 1, sk 1 st, dc in next st] 68 times, ch 1, sk 1 st, (dc, ch 2, dc) in the corner center st. [Ch 1, sk 1 st, dc in next st] 116 times, ch 1, sk 1 st, sl st to the top of the ch 3 (376 dc, 372 ch-1 sps, 4 ch-2 corner sps).
Round 3 :
Sl st in the first ch-2 corner sp, ch 3 (counts as dc), 2 dc, ch 2, 3 dc all in the same sp. Sc in next ch-1 sp, [5 dc in next ch-1 sp, sc in next ch-1 sp] 34 times, (3 dc, ch 2, 3 dc) in next ch-2 sp. Sc in next ch-1 sp, [5 dc in next ch-1 sp, sc in next ch-1 sp] 58 times, (3 dc, ch 2, 3 dc) in next ch-2 sp. Sc in next ch-1 sp, [5 dc in next ch-1 sp, sc in next ch-1 sp] 34 times, (3 dc, ch 2, 3 dc) in next ch-2 sp. Sc in next ch-1 sp, [5 dc in next ch-1 sp, sc in next ch-1 sp] 58 times, sl st to the top of the ch 3. Fasten off.
— 5. Pillow Sham Panel (make 2) :
Info :
Each sham front is made from 6 flower squares joined in 3 rows of 2. The back is a simple envelope-style fabric panel so the pillow slips in easily, and you can swap in a crocheted back if you prefer.
Row Seam :
Join 2 squares side by side with wrong sides together, working sc through the back loops of both squares in each of the 23 edge sts (23 sc). Make 3 rows of 2 squares.
Joining Rows :
Place two rows together with wrong sides together and long edges aligned. Sc through both layers in each of the 46 edge sts (46 sc). Join the third row the same way so the panel is 2 squares wide and 3 squares long.
— 6. Pillow Sham Border (make 2) :
Round 1 :
Join yarn in the ch-2 sp of an outer corner square. Ch 1, 3 sc in the corner sp. Sc evenly across the short edge (47 sc). 3 sc in the next corner sp. Sc evenly down the long edge (71 sc). 3 sc in the next corner sp. Sc 47 across the next short edge. 3 sc in the next corner sp. Sc 71 up the last long edge. Sl st to the first sc (248 sc).
Round 2 :
Sl st in the next sc (the corner center), ch 3 (counts as dc), ch 2, dc in the same st. [Ch 1, sk 1 st, dc in next st] 24 times, ch 1, sk 1 st, (dc, ch 2, dc) in the corner center st. [Ch 1, sk 1 st, dc in next st] 36 times, ch 1, sk 1 st, (dc, ch 2, dc) in the corner center st. [Ch 1, sk 1 st, dc in next st] 24 times, ch 1, sk 1 st, (dc, ch 2, dc) in the corner center st. [Ch 1, sk 1 st, dc in next st] 36 times, ch 1, sk 1 st, sl st to the top of the ch 3 (128 dc, 124 ch-1 sps, 4 ch-2 corner sps).
Round 3 :
Sl st in the first ch-2 corner sp, ch 3 (counts as dc), 2 dc, ch 2, 3 dc all in the same sp. Sc in next ch-1 sp, [5 dc in next ch-1 sp, sc in next ch-1 sp] 12 times, (3 dc, ch 2, 3 dc) in next ch-2 sp. Sc in next ch-1 sp, [5 dc in next ch-1 sp, sc in next ch-1 sp] 18 times, (3 dc, ch 2, 3 dc) in next ch-2 sp. Sc in next ch-1 sp, [5 dc in next ch-1 sp, sc in next ch-1 sp] 12 times, (3 dc, ch 2, 3 dc) in next ch-2 sp. Sc in next ch-1 sp, [5 dc in next ch-1 sp, sc in next ch-1 sp] 18 times, sl st to the top of the ch 3. Fasten off.
Every square you finish is a little win, and before long you’ll have a stack of blue blossoms ready to join. Take your time with the seams, block with love, and enjoy watching the scalloped edge appear on your very own bedspread. When it’s finally spread across the bed, you’ll feel proud every time you walk in the room. Happy stitching, and enjoy every cozy moment! 🧶✨