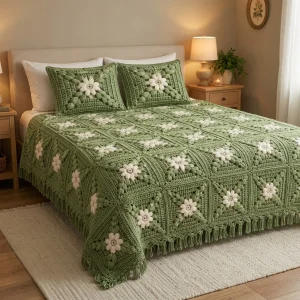
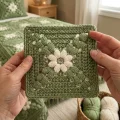
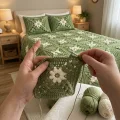
Picture a bed dressed in soft sage green, with a cream flower and a little golden heart in every square. You'll build this bedspread one motif at a time, and each square is small enough to tuck into a tote bag and take along. The raised post stitch rounds give the whole spread a cozy, woven-in texture. The long fringe along the sides and foot finishes it off like a treasured heirloom. There's even a matching sham front, so your whole bed feels pulled together.
Progress Tracker
0% Complete
— 1. Flower Center :
Info :
The finished bedspread is approximately 182 cm (72 in) wide and 208 cm (82 in) long before the fringe. It is made of 56 square motifs (7 across and 8 down), and each square measures approximately 26 cm (10 in). You will also make 8 leaves for every square. To make the spread wider, add one square column for roughly 26 cm (10 in) more width, and add 26 sc to each short edge of the border (25 dc plus 1 seam). To make it longer, add one square row for roughly 26 cm (10 in) more length, and add 26 sc to each long edge of the border.
Round 1 :
With golden yellow, make a mr. Ch 1, work 8 sc into the ring, join with a sl st to the first sc. Pull the tail to close the ring tightly and fasten off (8).
Round 2 :
Join cream with a sl st in any sc of Round 1. Ch 1, sc in the same st, ch 4. *Sc in the next sc, ch 4.* Repeat from * to * 7 times in total. Join with a sl st to the first sc (8 sc and 8 ch-4 sps).
Round 3 :
In each ch-4 sp work (sl st, hdc, 3 dc, hdc, sl st) to make one petal. Make 8 petals in total, then fasten off (8 petals).
Info :
The cream petals will sit in front of the green loops in the next round. Push the petals toward you and work from behind so they stay on top.
Round 4 :
With the petals pushed forward, join sage green with a sl st in any unworked sc of Round 2. Ch 1, sc in the same st, ch 5. *Sc in the next sc of Round 2, ch 5.* Repeat from * to * 7 times in total. Join with a sl st to the first sc (8 sc and 8 ch-5 sps).
— 2. Square Body :
Round 5 :
Sl st into the first ch-5 sp. Ch 3 (counts as a dc), 2 dc in the same sp, ch 2, 3 dc in the same sp (first corner made). 5 dc in the next ch-5 sp. *(3 dc, ch 2, 3 dc) in the next ch-5 sp, 5 dc in the next ch-5 sp.* Repeat from * to * 3 times in total. Join with a sl st to the top of the beginning ch 3 (44 dc and 4 corner ch-2 sps, 11 dc on each side).
Round 6 :
Sl st in each of the next 2 dc, then sl st into the first corner ch-2 sp. Ch 3, 2 dc in the same sp, ch 2, 3 dc in the same sp. *Dc in each of the next 11 dc, (3 dc, ch 2, 3 dc) in the next corner ch-2 sp.* Repeat from * to * 3 times in total. Dc in each of the last 11 dc. Join with a sl st to the top of the beginning ch 3 (68 dc and 4 corner ch-2 sps, 17 dc on each side).
Round 7 :
Sl st in each of the next 2 dc, then sl st into the first corner ch-2 sp. Ch 3, dc in the same sp, ch 2, 2 dc in the same sp. *FPdc in each of the next 17 st, (2 dc, ch 2, 2 dc) in the next corner ch-2 sp.* Repeat from * to * 3 times in total. FPdc in each of the last 17 st. Where a st falls on the ch 3 of the previous round, work a regular dc into the top of that ch 3. Join with a sl st to the top of the beginning ch 3 (84 st and 4 corner ch-2 sps, 21 st on each side).
Round 8 :
Sl st in the next dc, then sl st into the first corner ch-2 sp. Ch 3, dc in the same sp, ch 2, 2 dc in the same sp. *Dc in each of the next 21 st, (2 dc, ch 2, 2 dc) in the next corner ch-2 sp.* Repeat from * to * 3 times in total. Dc in each of the last 21 st. Join with a sl st to the top of the beginning ch 3 and fasten off (100 dc and 4 corner ch-2 sps, 25 dc on each side).
— 3. Leaves (make 8 for each square) :
Info :
The leaves are made separately and sewn on, so you can stitch a big batch while you chat or watch a show. Each leaf is roughly 6 cm (2.4 in) long. If you'd like a fuller look, add a third leaf to each corner with the same instructions.
Foundation :
With sage green, ch 8.
Side 1 :
Sl st in the 2nd ch from the hook, sc in the next ch, hdc in the next ch, dc in each of the next 2 ch, hdc in the next ch.
Tip :
Work 3 sc in the last ch to turn the point of the leaf.
Side 2 :
Working in the free loops on the other side of the foundation ch, hdc in the next loop, dc in each of the next 2 loops, hdc in the next loop, sc in the next loop, sl st in the last loop. Fasten off, leaving a tail of about 20 cm (8 in) for sewing.
— 4. Bedspread Border :
Info :
Work the border after all the squares are joined. Treat the head end (the edge that goes under the pillows) just like the others. You'll add fringe to the foot and the two long sides only.
Round 1 :
With sage green, join with a sl st in any outer corner ch-2 sp. Ch 1, 3 sc in the same sp. *Sc in each dc across the edge and 1 sc at every seam, working through both corner ch-2 sps together, then 3 sc in the next outer corner sp.* Work 181 sc across each short edge and 207 sc along each long edge, with 3 sc in each of the 4 corners. Join with a sl st to the first sc (788 sc).
Round 2 :
Ch 1, sc in the same st and in each sc around, working 3 sc into the center sc of every corner trio. Join with a sl st to the first sc and fasten off (796 sc, with 183 sc across each short edge and 209 sc along each long edge between the corner trios).
— 5. Fringe :
Cut Strands :
Wrap sage green yarn around the cardboard and cut one end to make strands about 24 cm (9.5 in) long. You'll need roughly 600 strands (3 strands for each fringe, about 200 fringes).
Attach Fringe :
Fold 3 strands in half. Insert the hook from the front into a Border Round 2 sc, pull the folded loop through, then pull the tails through the loop and tighten. Repeat in every 3rd sc along the foot and both long sides, leaving the head edge bare. Trim the ends evenly once all the knots are in (about 61 fringes across the foot and about 70 along each long side).
— 6. Matching Sham Front (make 2) :
Info :
Make one motif through Round 8, then add the three extra rounds below. This gives a square of approximately 40 cm (16 in), which fits a standard 40 cm (16 in) pillow form. Sew 8 leaves on as for the bedspread squares, then stitch the finished front to a plain sage green back or a cushion cover.
Round 9 :
Join sage green with a sl st in any corner ch-2 sp. Ch 3, dc in the same sp, ch 2, 2 dc in the same sp. *Dc in each of the next 25 st, (2 dc, ch 2, 2 dc) in the next corner ch-2 sp.* Repeat from * to * 3 times in total. Dc in each of the last 25 st. Join with a sl st to the top of the beginning ch 3 (116 dc and 4 corner ch-2 sps, 29 dc on each side).
Round 10 :
Sl st in the next dc, then sl st into the first corner ch-2 sp. Ch 3, dc in the same sp, ch 2, 2 dc in the same sp. *Dc in each of the next 29 st, (2 dc, ch 2, 2 dc) in the next corner ch-2 sp.* Repeat from * to * 3 times in total. Dc in each of the last 29 st. Join with a sl st to the top of the beginning ch 3 (132 dc and 4 corner ch-2 sps, 33 dc on each side).
Round 11 :
Sl st in the next dc, then sl st into the first corner ch-2 sp. Ch 3, dc in the same sp, ch 2, 2 dc in the same sp. *Dc in each of the next 33 st, (2 dc, ch 2, 2 dc) in the next corner ch-2 sp.* Repeat from * to * 3 times in total. Dc in each of the last 33 st. Join with a sl st to the top of the beginning ch 3 and fasten off (148 dc and 4 corner ch-2 sps, 37 dc on each side).
Every square you finish is a little bit of garden you get to keep. Before long they'll become a cozy sage green bedspread you can spread across your own bed or give to someone dear. Take your time, enjoy the rhythm of petals and leaves, and don't rush the fringe, because it's the finishing touch that makes everyone stop and stare. Happy hooking, and I can't wait to see how yours blooms! 🧶🌿✨