🧶 Beautiful ✨ Detailed 💝 Adorable

Crochet Christmas Tree Table Runner Pattern

Crochet Christmas Tree Table Runner Pattern
4.5★Rating
6-8 HoursTime Needed
1.1KMade This
✂️

Intermediate Level

Ideal for those with basic crocheting experience, featuring slightly more advanced stitches and techniques to expand your skills.

⏱️

All-Day Adventure

Requires 8-10 hours, ideal for a full day of immersive crocheting.

🎄

Holiday Cheer

Festive fun for the season, bringing handmade magic to celebrations and creating new family traditions.

About This Crochet Christmas Tree Table Runner Pattern

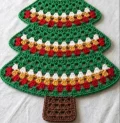
Crochet Christmas Tree Table Runner Pattern crochet pattern - detailed view

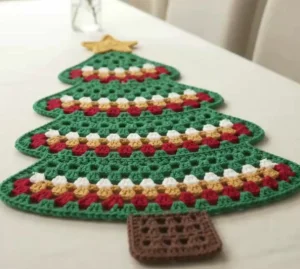
Lay it down the middle of a dinner table, drape it along a sideboard, or wrap it up as a handmade gift for a friend who adores Christmas decor. It looks lovely with a candle or two beside it.

Why You'll Love This Crochet Christmas Tree Table Runner Pattern

Granny clusters are my happy place, and this is the project where I finally got to play with them on a bigger stage. I’m especially fond of the color changes, because switching from white to gold to red feels like unwrapping tiny presents. The first time I laid the finished tree on my table and tucked the star into place, I grinned for a full minute. It’s the kind of make that gets pulled out of the box every December.

Crochet Christmas Tree Table Runner Pattern step 1 Crochet Christmas Tree Table Runner Pattern step 2 Crochet Christmas Tree Table Runner Pattern step 3 Crochet Christmas Tree Table Runner Pattern step 4

Switch Things Up

The first time I stitched this tree, I was convinced the tiers would never line up. I kept holding it up to the window like a nervous baker checking a cake, and then somewhere around the second set of shoulder rows it all just clicked. Those two little rows are what give each tier its soft, swooping curve, so don’t rush them.

Here’s my favorite trick: after every colored row, I run my thumb along the edge and tug the end dc gently so it stands tall. It keeps the sides from curling in and makes the border so much easier later. Keep a small pair of scissors close too, because with four colors you’ll snip more tails than you expect.

If you want to play, try a snowy version with cream, silver and icy blue stripes, or go bold with navy and copper for a modern take. I also like keeping one tier’s band in just red and white for a candy cane look.

Grab your favorite mug, put on a Christmas playlist, and let the clusters pile up. By the last round, you’ll have a tree that looks like it came straight out of a Christmas market stall.

Common Mistakes & How to Fix Them

✗ At the tier shoulders (Rows 10-11, 18-19 and 26-27) it’s easy to forget to sk the first and last sp, so the row stays one cluster too wide and the next tier flares too fast. Count your clusters against the number in parentheses before you move on.✗ Tucking a cl into the turning chain stitch instead of the sp beside it makes the side edges lean outward and wobble. Insert your hook into the gap right next to the turning chain so the edge stays straight and the edging goes on smoothly later.✗ Dark green tails can shadow through the white and gold clusters if you weave them behind the stripe band. Weave each color’s tail only into its own cluster row or into the border so the bright stripes stay clean.✗ Skipping the 3 sc in each bottom corner of the edging makes the base of the tree pinch inward, and the trunk won’t sit flat under it. Work all 3 sc in the corner stitch and count the 91 sc along the bottom edge before you sew the trunk on.✗ Pulling the ch 1 spaces tight in the trunk mesh makes the squares shrink, so the trunk comes out narrower than the 13 sc along its top edge. Keep your chains loose and relaxed so the trunk sits evenly under the tree.✗ If you sew the star down only through its center, the points flop forward and the star tilts. Tack the two lower points and the center ring so the star stands upright on the tip of the tree.

Crochet Christmas Tree Table Runner Pattern

Ready for a festive project that turns into a real showpiece on your table? You’ll start at the very tip of the tree and crochet downward in simple back-and-forth rows, widening a little at a time until the whole thing opens up. The tree itself is one continuous piece, so there’s hardly any sewing. The stripes of changing color keep the rhythm fun from the first row to the last, so grab a cozy drink and settle in.

Intermediate 6-8 Hours

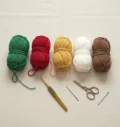
Materials Needed for Crochet Christmas Tree Table Runner Pattern

— Main Fabric

  • 01
    About 110g of DK or light worsted weight cotton yarn in forest green for the whole tree body and the two rounds of edging
  • 02
    About 15g of the same weight yarn in snowy white for the first stripe row of each tier
  • 03
    About 25g of golden yellow yarn for the gold stripe row of each tier and for the star
  • 04
    About 20g of bright Christmas red yarn for the red stripe row of each tier
  • 05
    About 15g of chocolate brown yarn for the mesh trunk and its border

— Tools Required

  • 01
    4 mm (size G-6) crochet hook, or the size that gives you a soft, flexible fabric with your yarn
  • 02
    Tapestry needle for weaving in ends and sewing on the trunk and star
  • 03
    Sharp scissors for cutting yarn at every color change
  • 04
    Stitch markers to mark the first stitch of the edging rounds and the center of the bottom edge
  • 05
    Blocking mat or a thick towel for pinning the tree flat
  • 06
    Rustproof pins for blocking and for positioning the trunk and star
  • 07
    Spray bottle or steamer for wet or steam blocking
  • 08
    Measuring tape for checking the finished size

Progress Tracker

0% Complete

— 1. Top Tier :

Info :

The finished tree measures about 12 in (30 cm) across the bottom tier and about 18 in (45 cm) long including the trunk and star, depending on your yarn and tension. The whole tree is worked in one piece from the tip down, turning at the end of every row. Rows that begin with ch 4 add one cluster, and rows that begin with ch 3 take one away. The foundation chain is only 7 chs and stays that way no matter how large you make the tree, because each row grows by one cluster. To make the runner longer, add a fifth tier after Row 33: work two shoulder rows with 20 cl and then 19 cl, then rows with 20, 21, 22, 23, 24 and 25 cl in green, green, white, gold, red and green. Add 2 sc per side for each extra row end and 4 sc along the bottom for each extra cluster when you edge it.

Row 1 :

In green, ch 7. Sk the first 3 ch (counts as dc), cl in the next ch, sk 2 ch, dc in the last ch (1 cl, 2 sp)

Row 2 :

Ch 4 (counts as dc + ch 1), [cl in next sp, ch 1] 2 times, dc in last dc (2 cl)

Row 3 :

Ch 4 (counts as dc + ch 1), [cl in next sp, ch 1] 3 times, dc in last dc (3 cl)

Row 4 :

Ch 4 (counts as dc + ch 1), [cl in next sp, ch 1] 4 times, dc in last dc (4 cl)

Info :

Color changes: on the last dc of each stripe row, pull the next color through on the final yarn over, then cut the old color and leave a tail to weave in later. The row after the red stripe begins with a fresh strand of green joined in the last dc.

Row 5 :

Ch 4 (counts as dc + ch 1), [cl in next sp, ch 1] 5 times, dc in last dc, changing to white on the last yarn over. Cut green (5 cl)

Row 6 :

In white, ch 4 (counts as dc + ch 1), [cl in next sp, ch 1] 6 times, dc in last dc, changing to gold on the last yarn over. Cut white (6 cl)

Row 7 :

In gold, ch 4 (counts as dc + ch 1), [cl in next sp, ch 1] 7 times, dc in last dc, changing to red on the last yarn over. Cut gold (7 cl)

Row 8 :

In red, ch 4 (counts as dc + ch 1), [cl in next sp, ch 1] 8 times, dc in last dc. Cut red (8 cl)

Row 9 :

Join green in the last dc of Row 8, ch 4 (counts as dc + ch 1), [cl in next sp, ch 1] 9 times, dc in last dc (9 cl)

Row 10 :

Ch 3 (counts as dc), sk first sp, cl in next sp, [ch 1, cl in next sp] 7 times, sk last sp, dc in last dc (8 cl)

Row 11 :

Ch 3 (counts as dc), sk first sp, cl in next sp, [ch 1, cl in next sp] 6 times, sk last sp, dc in last dc (7 cl)

— 2. Second Tier :

Row 12 :

Ch 4 (counts as dc + ch 1), [cl in next sp, ch 1] 8 times, dc in last dc (8 cl)

Row 13 :

Ch 4 (counts as dc + ch 1), [cl in next sp, ch 1] 9 times, dc in last dc, changing to white on the last yarn over. Cut green (9 cl)

Row 14 :

In white, ch 4 (counts as dc + ch 1), [cl in next sp, ch 1] 10 times, dc in last dc, changing to gold on the last yarn over. Cut white (10 cl)

Row 15 :

In gold, ch 4 (counts as dc + ch 1), [cl in next sp, ch 1] 11 times, dc in last dc, changing to red on the last yarn over. Cut gold (11 cl)

Row 16 :

In red, ch 4 (counts as dc + ch 1), [cl in next sp, ch 1] 12 times, dc in last dc. Cut red (12 cl)

Row 17 :

Join green in the last dc of Row 16, ch 4 (counts as dc + ch 1), [cl in next sp, ch 1] 13 times, dc in last dc (13 cl)

Row 18 :

Ch 3 (counts as dc), sk first sp, cl in next sp, [ch 1, cl in next sp] 11 times, sk last sp, dc in last dc (12 cl)

Row 19 :

Ch 3 (counts as dc), sk first sp, cl in next sp, [ch 1, cl in next sp] 10 times, sk last sp, dc in last dc (11 cl)

— 3. Third Tier :

Row 20 :

Ch 4 (counts as dc + ch 1), [cl in next sp, ch 1] 12 times, dc in last dc (12 cl)

Row 21 :

Ch 4 (counts as dc + ch 1), [cl in next sp, ch 1] 13 times, dc in last dc, changing to white on the last yarn over. Cut green (13 cl)

Row 22 :

In white, ch 4 (counts as dc + ch 1), [cl in next sp, ch 1] 14 times, dc in last dc, changing to gold on the last yarn over. Cut white (14 cl)

Row 23 :

In gold, ch 4 (counts as dc + ch 1), [cl in next sp, ch 1] 15 times, dc in last dc, changing to red on the last yarn over. Cut gold (15 cl)

Row 24 :

In red, ch 4 (counts as dc + ch 1), [cl in next sp, ch 1] 16 times, dc in last dc. Cut red (16 cl)

Row 25 :

Join green in the last dc of Row 24, ch 4 (counts as dc + ch 1), [cl in next sp, ch 1] 17 times, dc in last dc (17 cl)

Row 26 :

Ch 3 (counts as dc), sk first sp, cl in next sp, [ch 1, cl in next sp] 15 times, sk last sp, dc in last dc (16 cl)

Row 27 :

Ch 3 (counts as dc), sk first sp, cl in next sp, [ch 1, cl in next sp] 14 times, sk last sp, dc in last dc (15 cl)

— 4. Bottom Tier :

Row 28 :

Ch 4 (counts as dc + ch 1), [cl in next sp, ch 1] 16 times, dc in last dc (16 cl)

Row 29 :

Ch 4 (counts as dc + ch 1), [cl in next sp, ch 1] 17 times, dc in last dc, changing to white on the last yarn over. Cut green (17 cl)

Row 30 :

In white, ch 4 (counts as dc + ch 1), [cl in next sp, ch 1] 18 times, dc in last dc, changing to gold on the last yarn over. Cut white (18 cl)

Row 31 :

In gold, ch 4 (counts as dc + ch 1), [cl in next sp, ch 1] 19 times, dc in last dc, changing to red on the last yarn over. Cut gold (19 cl)

Row 32 :

In red, ch 4 (counts as dc + ch 1), [cl in next sp, ch 1] 20 times, dc in last dc. Cut red (20 cl)

Row 33 :

Join green in the last dc of Row 32, ch 4 (counts as dc + ch 1), [cl in next sp, ch 1] 21 times, dc in last dc (21 cl, 87 sts across). Do not fasten off

— 5. Edging :

Info :

Two rounds of sc give the tree a firm, slightly rope-like outline. Use a stitch marker in the first sc of each round. The top edge has 7 sc, each side has 66 sc, and the bottom has 91 sc including the corners.

Round 1 :

Join green with a sl st in the top right corner of Row 1, ch 1. Sc in each of the 7 foundation chs across the top, 2 sc in each of the 33 row ends down the left side (66), 3 sc in the first st of Row 33, sc in each of the next 85 sts across the bottom, 3 sc in the last st of Row 33, 2 sc in each of the 33 row ends up the right side (66), sl st to first sc (230 sc)

Round 2 :

Ch 1, sc in each sc around, sl st to first sc. Fasten off and weave in the end (230 sc)

— 6. Trunk :

Info :

The trunk is a small mesh square made separately in brown and sewn under the bottom edge of the tree.

Row 1 :

In brown, ch 10. Sc in the 2nd ch from hook and in each ch across (9 sc)

Row 2 :

Ch 4 (counts as dc + ch 1), sk 1 sc, [dc in next sc, ch 1, sk 1 sc] 3 times, dc in last sc (5 dc, 4 sp)

Row 3 :

Ch 4 (counts as dc + ch 1), [dc in next dc, ch 1] 3 times, dc in last dc (5 dc, 4 sp)

Row 4 :

Ch 4 (counts as dc + ch 1), [dc in next dc, ch 1] 3 times, dc in last dc (5 dc, 4 sp)

Row 5 :

Ch 4 (counts as dc + ch 1), [dc in next dc, ch 1] 3 times, dc in last dc (5 dc, 4 sp)

Round 1 :

Ch 1, 3 sc in the last dc of Row 5, sc in each of the next 7 sts, 3 sc in the last st of Row 5 (13 sc across the top), 2 sc in each of the 5 row ends down the side (10), 3 sc in the first foundation ch, sc in each of the next 7 foundation chs, 3 sc in the last foundation ch (13 sc across the bottom), 2 sc in each of the 5 row ends up the other side (10), sl st to first sc (46 sc)

Round 2 :

Ch 1, sc in each sc around, sl st to first sc. Fasten off, leaving a 12 in (30 cm) tail for sewing (46 sc)

— 7. Star :

Round 1 :

In gold, make a MR, ch 1, 10 sc in the ring, sl st to first sc. Pull the ring tight (10 sc)

Round 2 :

Ch 1, (sc, hdc, dc, ch 2, dc, hdc, sc) in the same st as the join, sl st in next sc, *(sc, hdc, dc, ch 2, dc, hdc, sc) in next sc, sl st in next sc; work from * 3 more times, then sl st in the first sc of the first point (5 points, 5 sl sts)

Round 3 :

Ch 1, working in the same st as the join, *sc in each of the next 3 sts, 3 sc in the ch 2 sp, sc in each of the next 3 sts, sc in the sl st; work from * 4 more times, sl st to first sc. Fasten off, leaving a 10 in (25 cm) tail for sewing (50 sc)

Assembly Instructions

  • Weave in every tail from the color changes. Weave white, gold and red tails only into their own cluster rows, and weave green tails into the green rows or the Round 2 border so nothing shadows through the stripes.
  • Wet block the tree: pin it flat on your mat, gently shape each tier shoulder into a soft curve, check that the bottom edge is straight, and let it dry fully before you sew anything on.
  • Block the trunk to a neat square, then center it under the tree. The trunk’s 13 sc top edge should sit against the 40th through 52nd sc of the 91 sc bottom edge, counting from the bottom left corner. Pin it in place.
  • Whip stitch the trunk’s top edge to the tree’s bottom edge with the brown tail, going through the back loops of both pieces so the stitches stay hidden. Weave in the end behind the trunk.
  • Pin the star over the top edge so its center sits above the 4th sc of the 7 sc across Row 1 and the two lower points rest about 1 row down on the tree.
  • With the gold tail, tack the star down through its center and through the tips of the two lower points, then weave in the end and give the whole runner one last gentle steam to relax the stitches.

Important Notes

  • 💡Turn at the end of every row. Rows that begin with ch 4 add a cluster by working into every sp, and rows that begin with ch 3 skip the first and last sp to take one away.
  • 💡Count your clusters at the end of each row against the number in parentheses. Catching a miscount early is much easier than fixing a lopsided tier.
  • 💡Keep your tension relaxed and your clusters loose, as a tight cl makes the tree curl and the shoulders pull inward.
  • 💡Mark the right side with a scrap of yarn so the edging always goes on from the same side.
  • 💡Cotton blocks beautifully and keeps its shape, so always block the tree flat before sewing on the trunk and star.
  • 💡Work a quick swatch of Rows 1-6 first. If it looks much bigger or smaller than you’d like, go down or up a hook size before you commit to the full tree.

There’s something so satisfying about watching a plain green triangle turn into a full tree, stripe by stripe. Once the final end is woven in, you’ll have a piece that looks gorgeous every December and packs flat in a drawer the rest of the year. Try a second one in cream and silver just because. However your tree turns out, it’ll be handmade, warm and unmistakably yours. Happy hooking! 🧶✨
You ask,

we answer.

FAQs

Can I use a different yarn weight for this Christmas tree runner?

You can, but the counts are built around DK or light worsted cotton and a 4 mm hook. Chunkier yarn makes every cluster wider, so the tree comes out much larger without any extra rows. Work Rows 1-6 as a swatch first, and if it’s bigger than you want, drop down a hook size or switch to a lighter yarn.

Why do some rows start with ch 4 and others with ch 3?

Ch 4 rows add a cluster by working into every sp, including the end ones, so the tier widens. Ch 3 rows skip the first and last sp, which takes one cluster away. Those two shoulder rows at the end of each tier are what pull the edge back in and create the scalloped look.

Do I have to cut the yarn at every color change?

Yes. The white, gold and red rows each end on alternating sides, so carrying a color up the edge would pull the border and show through the clusters. Cut each color at the end of its row, leave a short tail, and weave it into its own row later.

How do I make the runner longer?

Add a fifth tier after Row 33. Work two shoulder rows with 20 and 19 cl, then rows with 20, 21, 22, 23, 24 and 25 cl in green, green, white, gold, red and green. The foundation chain at the top stays at 7, but your edging counts will grow, so add 2 sc per extra row end and 4 sc per extra cluster along the bottom.

My tree is curling at the edges. How do I flatten it?

Wet block it. Pin the tree flat on a mat, shape each tier shoulder into a gentle curve, and let it dry completely. Curling usually means the clusters were pulled tight, so keep your tension loose on the next one.

I’ve never worked granny clusters or changed colors. Can I still make this?

A confident beginner can manage it if they’re comfortable with dc and slip stitches. The cluster rows repeat the same pattern, so you’ll feel the rhythm by Row 5. Take the color changes slowly, and pull the new yarn through only on the last yarn over of the final dc.