About This Crochet Christmas Angel Ornament Pattern
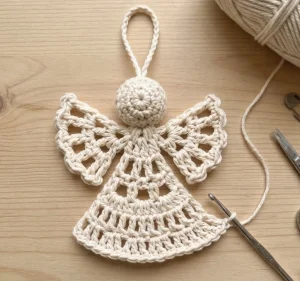
Make a handful for a farmhouse tree, tuck one into a card for a neighbor, or tie them onto holiday parcels. They tuck away in a small box between seasons, ready for next year.
Ideal for those with basic crocheting experience, featuring slightly more advanced stitches and techniques to expand your skills.
Fits nicely into a free afternoon — 2 to 5 hours of focused, enjoyable crocheting.
Festive fun for the season, bringing handmade magic to celebrations and creating new family traditions.
Make a handful for a farmhouse tree, tuck one into a card for a neighbor, or tie them onto holiday parcels. They tuck away in a small box between seasons, ready for next year.
I made my first one on a gray afternoon and couldn’t stop at one. What gets me is how much it looks like delicate lace when it’s really just dc, a few chain arches and a row of little shells. I love the moment the fan comes off the hook and you can already tell it’s going to be an angel. Sewing the wings on is my favorite part, because that’s when she suddenly gets personality.
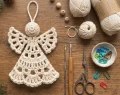
The first angel I ever crocheted came out looking more like a tiny lampshade, and I laughed so hard I almost kept her that way. The wings were sewn too low and the skirt was cupped like a bell. What fixed it was blocking. I pinned the fan out flat, tugged each shell point until it sat just right, and let it dry overnight. The change was unreal.
Since then I’ve made these in every spare minute of December. My favorite trick is finishing the head after the skirt, because by then I know exactly how big everything turned out and I can stuff the sphere to match. A firm head makes the whole angel stand up straighter on a branch.
If you want to play around, try a soft sage cotton for the wings and keep the skirt cream, or work the hem shells in a thin gold thread for a little sparkle. I also like hanging a few at different lengths in a window so they catch the morning sun. Honestly, a small basket of them by the front door has started more conversations with my neighbors than any wreath ever has.
This little angel is made for slow winter evenings. You’ll crochet each piece in soft cream cotton, then stitch everything together into an ornament that looks right at home beside pinecones and wooden beads. Hang her on the tree, a window latch or a curtain rod and she’ll catch every bit of light in the room. The rows are short and the stitches are friendly, so you’ll see progress every few minutes at the hook.
The finished angel measures approximately 14 cm (5.5 in) tall without the loop and about 14 cm (5.5 in) wide across the wings. The skirt is worked from the neck down in turned rows, and the ch 3 at the start of each row counts as the first dc. Turn at the end of every row except the last one. You’ll make 1 skirt, 2 wings, 1 head and 1 hanging loop.
Make a MR. ch 3 (counts as dc), 6 dc in the MR. Pull the ring snug. Turn. (7 dc)
ch 3 (counts as dc), dc in the same st, 2 dc in each of the next 5 sts, dc in the last st. Turn. (13 dc)
ch 3 (counts as dc), [ch 2, sk 1 st, dc in the next st] x 6. Turn. (7 dc and 6 ch-2 sp)
ch 3 (counts as dc), [2 dc in the next ch-2 sp, dc in the next dc] x 6. Turn. (19 dc)
ch 3 (counts as dc), [ch 2, sk 1 st, dc in the next st] x 9. Turn. (10 dc and 9 ch-2 sp)
ch 3 (counts as dc), [2 dc in the next ch-2 sp, dc in the next dc] x 9. Turn. (28 dc)
ch 3 (counts as dc), dc in each of the next 27 sts. Turn. (28 dc)
ch 3 (counts as dc), [ch 3, sk 2 sts, dc in the next st] x 9. Turn. (10 dc and 9 ch-3 sp)
ch 3 (counts as dc), [3 dc in the next ch-3 sp, dc in the next dc] x 9. Turn. (37 dc)
ch 1, sc in the first st, [sk 1 st, 3 dc in the next st, sk 1 st, sc in the next st] x 9. Do not turn. Fasten off and weave in the end. (10 sc and 27 dc, 37 sts worked)
I left the two straight sides of the skirt plain so the lace stays light and airy. If you’d like a slightly firmer edge, work a row of sc along each side before blocking.
Make two identical wings. They mirror each other naturally once you sew them on, so there’s no need to reverse anything. Each wing measures approximately 6 cm (2.4 in) long.
Make a MR. ch 3 (counts as dc), 6 dc in the MR. Pull the ring snug. Turn. (7 dc)
ch 3 (counts as dc), dc in the same st, 2 dc in each of the next 5 sts, dc in the last st. Turn. (13 dc)
ch 3 (counts as dc), [ch 2, sk 1 st, dc in the next st] x 6. Turn. (7 dc and 6 ch-2 sp)
ch 3 (counts as dc), [2 dc in the next ch-2 sp, dc in the next dc] x 6. Turn. (19 dc)
ch 1, sc in the first st, [sk 2 sts, 5 dc in the next st, sk 2 sts, sc in the next st] x 3. Fasten off, leaving a 25 cm tail for sewing. (4 sc and 15 dc, 19 sts worked)
The head is worked in continuous rounds without joining. Place a stitch marker in the first st of each round and move it up as you go.
Make a MR. 6 sc in the MR. (6)
inc in each st around. (12)
[sc in the next st, inc in the next st] x 6. (18)
[sc in the next 2 sts, inc in the next st] x 6. (24)
[sc in the next 3 sts, inc in the next st] x 6. (30)
sc in each st around, 3 rounds total. (30)
[sc in the next 3 sts, sc2tog] x 6. (24)
[sc in the next 2 sts, sc2tog] x 6. (18)
Stuff the head firmly now, packing the fiberfill into a round ball. You can add a little more through the opening in the next round if it needs it.
[sc in the next st, sc2tog] x 6. (12)
sc2tog x 6. (6) Fasten off, leaving a short tail. Thread the tail through the front loops of the last 6 sts, pull tight and weave in the end.
Leaving a 12 cm tail, ch 31.
sl st in the 2nd ch from the hook and in each ch across. Fasten off, leaving a 12 cm tail. (30 sl st)
Now it’s your turn to bring a little glow to the holiday season! 🧶 Grab your cream cotton, put on something cozy and let the fan grow row by row until your angel is ready to fly. Hang her on the tree, a doorknob or a bare branch in a vase, and enjoy the quiet sparkle she adds to your space all season long. Make one, then make five, because they go quickly once you find the rhythm. Happy crocheting, and merry stitching to you and yours! ✨
The angel was designed around fine to DK weight cotton and a hook of roughly 2.5 mm. Cotton keeps the arches crisp and holds its shape after blocking. If you use thicker yarn the ornament grows, and a worsted weight version will be noticeably larger and heavier on the tree.
Adding rows changes the stitch multiples, so the arch rows won’t line up anymore. The easiest way to get a bigger angel is to use a thicker yarn with a larger hook and follow the pattern as written. You can also repeat Rows 8 and 9 once more, but you’d need to work out new stitch counts first.
Block the wings flat and pin each shell point, then give them a light spray of starch before they dry. When you sew them on, stitch along Wing Rows 1 and 2 and add a second small stitch at the base of Wing Row 3. Sewing them too low is the usual cause of drooping.
It suits someone who is comfortable with dc, sc and a magic ring. The skirt is just dc and chain arches, but the head uses decreases and you’ll sew the pieces together. If the magic ring feels tricky, you can start the skirt and wings with ch 4 joined with a sl st instead.
Yes, white, soft gold or a pale sage green all work well. Keep the skirt and wings in the same weight of yarn so the arches match, and try a contrast color on the hem shells or wings if you want extra detail.
Pack it until it feels springy and round, about the firmness of a small ball. Stuff in small pieces after Round 10 and before closing in Round 12. A soft head tends to tilt forward once it is sewn onto the skirt.