About This Chunky Puff Stitch Crochet Bedspread Pattern
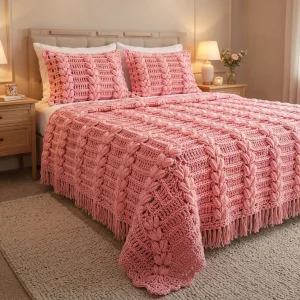
A wonderful gift for a wedding or housewarming, and just as lovely styled in a guest room where it makes the whole bed look finished and inviting.
Ideal for those with basic crocheting experience, featuring slightly more advanced stitches and techniques to expand your skills.
A 10-12 hour project—great for savoring the process over several sessions.
A warm touch for your space that transforms ordinary corners into inviting nooks filled with handmade charm.
A wonderful gift for a wedding or housewarming, and just as lovely styled in a guest room where it makes the whole bed look finished and inviting.
I fell for how forgiving this one is. Once you’ve worked your first puff row, the rhythm takes over and you can happily watch a show while the columns grow. The plain dc rows between the puffs give your hands a little breather, so it never feels tiring. And honestly, nothing beats tossing a handmade bedspread over a freshly made bed and standing back to admire it.
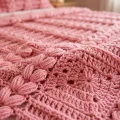
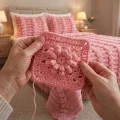
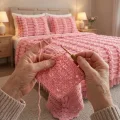
I started this bedspread on a rainy week when I wanted something big and soft to hide under while I worked. The first puff column felt a little fiddly, I’ll admit, because I was yanking my loops way too tight. Once I relaxed my grip and let each puff sit tall, the whole thing started to flow, and by row twenty I could do the columns without looking.
Here’s the tip I wish I’d had at the start: pick one spot on your hook, like the thickest part of the shaft, and pull every loop up to that same point. Your puffs end up matching and the columns look like they were stamped on.
The moment that sold me was spreading it across the bed for the first time. The fringe swung, the scallops lay flat at the foot, and the whole bedroom looked finished. I made mine in a dusty rose, but I keep daydreaming about a soft cream or a deep sage version.
If you want a quicker win, make the pillow shams first. They use the exact same stitch pattern, so they work as a warm-up swatch before you commit to the big one.
Picture pulling back a bedspread in soft rose pink that looks like it came from a boutique hotel, except you made every stitch yourself. Rows of plump puff columns run down the length of the bed, with airy ladder stripes giving your eyes a place to rest between them. A scalloped foot edge and swinging fringe along the sides finish it off, and two matching pillow shams pull the whole bed together. You’ll love how the rhythm of puffs and stripes turns into a calm, meditative make.
The finished bedspread measures approximately 200 cm (79 in) wide by 225 cm (89 in) long before the fringe is added. It’s worked in one piece from side to side, so the puff columns run down the length of the bed. Expect a gauge of roughly 8 sts and 3 rows to 10 cm (4 in) over dc. To make it wider, add 16 chs to the foundation chain for every extra repeat (each adds roughly 20 cm, or 8 in) and add one more bracketed mesh-and-column repeat to every row. The foundation chain for any width is 16 x the number of repeats + 6. To make it longer, work the 8-row sequence once more for every extra 25 cm (10 in).
ch 166.
dc in 4th ch from hook (the skipped chs count as the first dc) and in each ch across (164). Turn.
Puff: yo, insert hook in the st, pull up a loop, then yo, insert hook in the same st and pull up a loop two more times (7 loops on hook). yo and pull through all 7 loops, then ch 1 to close. The puff counts as 1 st and the closing ch does not count. On the next row, work your dc into the top of each puff (the closing ch). The last dc of every row always goes into the top of the turning ch 3 of the row below. Each ch 1 space counts as 1 st in the totals.
ch 3 (counts as dc), puff in next st, puff in next st, dc in next st. Then work [ (dc in next st, ch 1, sk 1 st) 6 times, dc in next st, puff in next st, puff in next st, dc in next st ] 10 times. Turn (164).
ch 3 (counts as dc), dc in each st and each ch 1 space across, working into the top of each puff (164). Turn.
ch 3 (counts as dc), puff in next st, puff in next st, dc in next st. Then work [ dc in next 12 sts, dc in next st, puff in next st, puff in next st, dc in next st ] 10 times. Turn (164).
ch 3 (counts as dc), dc in each st across, working into the top of each puff (164). Turn.
Repeat Rows 1-8 until you have worked the 8-row sequence 9 times in total. That gives 73 rows altogether including Row 1, and you’ll end on a plain dc row so the foot edge is flat and ready for the scallops. Fasten off after your final Repeat Row 8.
The scallops are worked across the final row only. The two long sides get fringe instead, and the head end stays plain because it tucks under the pillows.
With RS facing, join yarn in the first st of the last row. ch 1, sc in same st. Then work [ sk next 2 sts, 5 dc in next st, sk next 2 sts, sc in next st ] 27 times, sc in last st. Fasten off (27 shells, 29 sc, all 164 sts used).
Wrap yarn about 440 times around a piece of cardboard 30 cm (12 in) wide, then cut along one edge to make strands about 60 cm (24 in) long. You’ll use 3 strands per bundle for 146 bundles. Do this after blocking the bedspread.
Fold 3 strands in half. With RS facing, push the hook from front to back through the edge of a row end, catch the folded loop and pull it through, then pull the loose ends through the loop and tighten. Repeat in the end of every row down both long sides (73 bundles per side, 146 in total). Trim the fringe even at about 28 cm (11 in).
Each sham front measures approximately 45 cm (18 in) wide and 50 cm (20 in) tall, with three puff columns and two mesh panels. It uses the same puff and dc rhythm as the main panel.
ch 38.
dc in 4th ch from hook and in each ch across (36). Turn.
ch 3 (counts as dc), puff in next st, puff in next st, dc in next st. Then work [ (dc in next st, ch 1, sk 1 st) 6 times, dc in next st, puff in next st, puff in next st, dc in next st ] 2 times. Turn (36).
ch 3 (counts as dc), dc in each st and each ch 1 space across, working into the top of each puff (36). Turn.
ch 3 (counts as dc), puff in next st, puff in next st, dc in next st. Then work [ dc in next 12 sts, dc in next st, puff in next st, puff in next st, dc in next st ] 2 times. Turn (36).
ch 3 (counts as dc), dc in each st across, working into the top of each puff (36). Turn.
Work Repeat Rows 1-8 one more time, so the 8-row sequence is worked twice in total. That makes 17 rows including Row 1. Fasten off.
ch 38.
dc in 4th ch from hook and in each ch across (36). Turn.
ch 3 (counts as dc), dc in each st across (36). Turn. Fasten off after Row 17.
Place a front and a back together with wrong sides facing each other and the edges lined up. The top edge (Row 17) stays open so you can slip in the pillow insert.
Join yarn through both layers at the top right corner. ch 1, 2 sc in the corner, work 17 sc down the side (one sc per row end), 3 sc in the bottom corner, sc in each of the 36 foundation chs across the bottom, 3 sc in the next bottom corner, 17 sc up the other side (one per row end), 2 sc in the top corner. Do not fasten off (80 sc).
Insert the pillow insert. Do not turn. sc in each of the 36 sts across the top, working through both layers. sl st to the first sc to join. Fasten off (36).
Your bed is about to get the coziest upgrade ever 🧶 Take your time with the puff columns, enjoy the ladder stripes in between, and don’t stress if your first few puffs look a little uneven, because they settle in beautifully after a row or two. When you spread the finished piece out and run your fingers through that fringe, you’ll feel every hour was worth it ✨ Add the matching shams and you’ll have a bedroom set that looks straight out of a boutique, made entirely by you 🧵
You can, but the pattern was designed around chunky yarn and a 9 mm hook. A thinner yarn makes the puffs smaller and the whole piece narrower, so you’d need a longer foundation chain. Work a swatch first and use the formula of 16 x repeats + 6 to rebuild the chain for your gauge.
The width comes from the number of 16-st repeats. For a twin of about 100 cm (39 in) wide, use 5 repeats and ch 86. For a king of about 245 cm (96 in) wide, use 12 repeats and ch 198. Change the bracketed repeats in every row to match, and work the 8-row sequence more or fewer times for length.
They’re easier than they look. You’re just pulling up three loops in the same stitch and closing them off with one pull-through. Practice a few on the sham swatch first, keep your loops even, and the columns will quickly become the relaxing part of the pattern.
Expect roughly 3.5 to 4 kg for the bedspread alone in chunky yarn, so it’s a real weight. Follow the care label on your yarn, wash gently or by hand, and always dry it flat so the puffs and the fringe keep their shape.
Wavy sides usually mean a stitch was added or lost at the row ends. Check that the first dc of each row is the ch 3 and that the last dc goes into the top of the previous turning ch 3. Also check that your stitch count is 164 after the open mesh rows.
Yes, you can skip the fringe and finish the sides with a row of sc instead. The scallops are worked only on the foot row, so you can replace them with a simple sc row. Just remember that the fringe adds about 28 cm (11 in) of overhang, so size your bedspread a little larger if you drop it.
