๐Ÿงถ Beautiful โœจ Detailed ๐Ÿ’ Adorable

Chubby Donut Cat Amigurumi Pattern

Chubby Donut Cat Amigurumi Pattern
4.8โ˜…Rating
3-5 HoursTime Needed
2.1KMade This
โœ‚๏ธ

Intermediate Level

Ideal for those with basic crocheting experience, featuring slightly more advanced stitches and techniques to expand your skills.

โฑ๏ธ

Quick Craft

Fits nicely into a free afternoon โ€” 2 to 5 hours of focused, enjoyable crocheting.

๐Ÿฐ

Whimsical Buddy

Playful characters full of personality, designed to spark imagination and become cherished playtime favorites.

About This Chubby Donut Cat Amigurumi Pattern

Chubby Donut Cat Amigurumi Pattern crochet pattern - detailed view

This pattern makes a beautiful handmade gift โ€” thoughtful enough for someone special, but quick enough to make a few before the holidays. It looks amazing on display in a nursery or as a desk buddy.

Why You'll Love This Chubby Donut Cat Amigurumi Pattern

I honestly could not stop smiling while making this little one. The way the ears are formed by just crocheting across the top of the body is so clever โ€” no extra sewing for the ears! Plus, using plush yarn means the project grows really fast, giving you that instant gratification we all crave as crafters.

Chubby Donut Cat Amigurumi Pattern step 1 Chubby Donut Cat Amigurumi Pattern step 2 Chubby Donut Cat Amigurumi Pattern step 3 Chubby Donut Cat Amigurumi Pattern step 4

Switch Things Up

I have always had a soft spot for 'chonky' amigurumi. There is just something about a round, squishy shape that makes a crochet toy feel ten times more huggable! When I first sat down to design this cat, I wanted to create a piece that felt substantial but did not require hours of tedious assembly. Using velvet yarn was a total game-changer for me. It works up so quickly, and the texture hides those little imperfections we all have in our tension.

My favorite part of this whole process is definitely the donut. I remember trying to figure out how to make it look 'just right' without it being too bulky for the cat to hold. The key is in the BLO round โ€” it creates that perfect little edge that makes it look like a real pastry. If you are feeling adventurous, try adding some tiny beads for sprinkles instead of embroidery! I usually make these while catching up on my favorite podcasts; it is the perfect 'autopilot' project for a rainy Sunday afternoon. Seeing the little face come together with just a few stitches of black yarn always feels like magic. I can't wait to see the color combinations you choose for your kitties!

Common Mistakes & How to Fix Them

โœ— When you get to the ears in Round 34, make sure your body is folded perfectly flat or the ears will end up sitting lopsided on the head.โœ— If you are using a glue gun for the eyes, be very careful with the amount; too much can seep through the plush yarn and create a hard, unsightly lump.โœ— The donut hole can sometimes disappear if you stuff the ring too firmly โ€” keep the stuffing light inside the donut to maintain that classic shape.โœ— When embroidering the whiskers and stripes, do not pull the black yarn too tight or it will sink into the fluffy fabric and become invisible.

Chubby Donut Cat Amigurumi Pattern

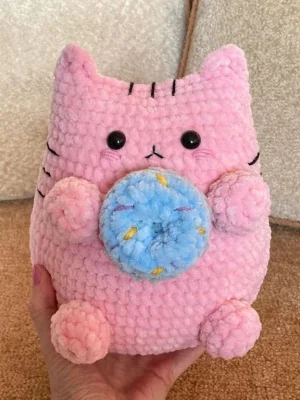
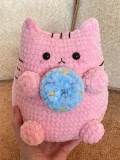
There is nothing quite as cozy as a squishy, plush cat, especially one that comes with its own sweet treat! I designed this little friend to be the ultimate cuddle companion for your home. You will love how the velvet yarn makes every stitch feel like a soft cloud, and that tiny donut? It is just the cherry on top. It is a quick make that brings so much joy to any shelf or bedside table, and I can't wait to see yours.

Intermediate 3-5 Hours

Materials Needed for Chubby Donut Cat Amigurumi Pattern

โ€” Main Fabric

  • 01
    Approximately 1 to 1.5 skeins of super bulky velvet yarn like Himalaya Dolphin Baby in your primary cat color
  • 02
    Small amounts of the same velvet yarn in two contrasting colors to create the donut and frosting
  • 03
    Fine weight cotton or acrylic yarn in black for the facial details and body stripes
  • 04
    Pink embroidery thread for the little nose

โ€” Tools Required

  • 01
    4mm crochet hook
  • 02
    10mm black safety eyes or flat-back eyes
  • 03
    High-quality fiberfill stuffing
  • 04
    Yarn needle with a large eye for the plush yarn
  • 05
    Hot glue gun if you are using glue-on eyes
  • 06
    Sharp scissors
  • 07
    Stitch markers

Progress Tracker

0% Complete

โ€” 1. Main Body :

Round 1 :

Start by making 2 ch, then work 6 sc into the second ch from your hook (6)

Round 2 :

Work 1 inc into every stitch around (12)

Round 3 :

Repeat a pattern of 1 sc and 1 inc 6 times (18)

Round 4 :

Repeat a pattern of 2 sc and 1 inc 6 times (24)

Round 5 :

Repeat a pattern of 3 sc and 1 inc 6 times (30)

Round 6 :

Repeat a pattern of 4 sc and 1 inc 6 times (36)

Round 7 :

Repeat a pattern of 5 sc and 1 inc 6 times (42)

Round 8 :

Repeat a pattern of 6 sc and 1 inc 6 times (48)

Round 9 :

Repeat a pattern of 3 sc and 1 inc 12 times (60)

Round 10 :

Repeat a pattern of 4 sc and 1 inc 12 times (72)

Round 11 :

Work 1 sc into each stitch around (72)

Round 12 :

Work 1 sc into each stitch around (72)

Round 13 :

Work 1 sc into each stitch around (72)

Round 14 :

Work 1 sc into each stitch around (72)

Round 15 :

Work 1 sc into each stitch around (72)

Round 16 :

Work 1 sc into each stitch around (72)

Round 17 :

Work 4 sc then 1 dec, repeating this sequence 12 times around (60)

Round 18 :

Work 1 sc into each stitch around (60)

Round 19 :

Work 1 sc into each stitch around (60)

Round 20 :

Work 1 sc into each stitch around (60)

Round 21 :

Work 1 sc into each stitch around (60)

Round 22 :

Repeat a pattern of 8 sc and 1 dec 6 times (54)

Round 23 :

Work 1 sc into each stitch around (54)

Round 24 :

Work 1 sc into each stitch around (54)

Round 25 :

Repeat a pattern of 7 sc and 1 dec 6 times (48)

Round 26 :

Work 1 sc into each stitch around (48)

Round 27 :

Work 1 sc into each stitch around (48)

Round 28 :

Repeat a pattern of 6 sc and 1 dec 6 times (42)

Round 29 :

Work 1 sc into each stitch around (42)

Round 30 :

Work 1 sc into each stitch around (42)

Round 31 :

Work 1 sc into each stitch around (42)

Round 32 :

Work 1 sc into each stitch around (42)

Round 33 :

Work 1 sc into each stitch around (42)

Round 34 :

Fold the top of the body flat and crochet through both layers to close: 3 dc, 14 sl st, 3 dc. Fasten off and weave in the tail.

โ€” 2. Arms & Legs (Make 4) :

Round 1 :

Make 2 ch, then work 6 sc into the second ch from the hook (6)

Round 2 :

Work 1 inc into every stitch around (12)

Round 3 :

Work 1 sc into each stitch around (12)

Round 4 :

Work 1 sc into each stitch around (12). Leave a long tail for sewing.

โ€” 3. Tail :

Round 1 :

Make 2 ch, then work 6 sc into the second ch from the hook (6)

Round 2 :

Work 1 inc into every stitch around (12)

Round 3 :

Work 1 sc into each stitch around (12)

Round 4 :

Work 1 sc into each stitch around (12)

Round 5 :

Repeat a pattern of 1 sc and 1 dec 4 times (8)

Round 6 :

Work 1 sc into each stitch around (8)

Round 7 :

Work 1 sc into each stitch around (8)

Round 8 :

Work 1 sc into each stitch around (8)

Round 9 :

Work 1 sc into each stitch around (8)

Round 10 :

Work 1 sc into each stitch around (8)

Round 11 :

Work 1 sc into each stitch around (8)

Round 12 :

Work 1 sc into each stitch around (8)

Round 13 :

Work 1 sc into each stitch around (8). Leave a long tail for sewing.
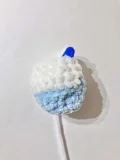
โ€” 4. Donut :

Round 1 :

Ch 12 and join with a sl st to form a ring, then work 12 sc into the ring (12)

Round 2 :

Repeat a pattern of 1 sc and 1 inc 6 times (18)

Round 3 :

Work 1 sc into each stitch around (18)

Round 4 :

Work 1 sc into each stitch around using BLO only (18)

Round 5 :

Repeat a pattern of 1 sc and 1 dec 6 times (12)

Round 6 :

Work 1 sc into each stitch around (12). Fasten off, leaving a tail.

Info :

Stuff the donut lightly as you sew the first and last rounds together to form the torus shape.

Assembly Instructions

  • Position the eyes between Rounds 5 and 6, leaving about 5 stitches of space between them for a cute look.
  • Embroider a small 'v' shaped mouth right between the eyes using your black thread.
  • Stitch the arms onto the body about 8 rounds down from the ears, spacing them 8 stitches apart.
  • Attach the legs near the bottom at Rounds 11 and 12, ensuring they are centered with the arms.
  • Secure the donut between the two arms, sewing it directly to the 'paws' so the cat appears to be holding it.
  • Sew the tail to the back of the body around Rounds 10 and 11, centering it between the legs.
  • Add three horizontal stripes to each side of the body and three small vertical stripes on top of the head.

Important Notes

  • ๐Ÿ’กPlush yarn can be tricky to see stitches in, so I highly recommend using a stitch marker for the first stitch of every round.
  • ๐Ÿ’กIf you find the 4mm hook is leaving gaps where stuffing shows through, try dropping down to a 3.5mm hook for a tighter fabric.
  • ๐Ÿ’กWhen sewing the parts together, use a matching piece of thinner cotton yarn instead of the plush yarn; it is much stronger and won't break when pulled.
  • ๐Ÿ’กStuff the body firmly at the bottom but leave the very top near the ears a bit softer so it lays flat when joined.

I am so excited for you to finish your little donut-loving kitty! There is something so satisfying about seeing those little stripes and whiskers come to life at the very end. Don't forget to play around with different donut 'flavors' โ€” maybe a strawberry pink or a chocolate brown? Every cat you make will have its own unique little personality. I hope this project brings a bit of handmade magic to your day and puts a smile on your face. Happy stitching, and enjoy your new squishy friend! ๐Ÿงถ โœจ

You ask,

we answer.

FAQs

Can I use safety eyes instead of gluing them?

Absolutely! If you prefer safety eyes, just make sure to insert them and secure the backings before you start stuffing and closing up the body.

My ears look rounded instead of pointy, what happened?

This usually happens if the slip stitches in the middle of Round 34 are too loose. Try to keep those slip stitches tight to pull the center down and make the double crochet 'ears' pop up more.

How do I prevent the plush yarn from shedding?

Plush yarn sheds most at the cut ends. A little trick I use is to briefly singe the very tip of the yarn tail with a lighter to seal the fibers together.

Is this cat safe for small children?

If making this for a baby, I recommend embroidering the eyes with black yarn instead of using plastic eyes or glue, just to be extra safe.