🧢 Beautiful ✨ Detailed πŸ’ Adorable

Christmas Ornament Embroidery Pattern

Christmas Ornament Embroidery Pattern
4.8β˜… Rating
3-4 Hours Time Needed
4.1K Made This
βœ‚οΈ

Beginner Friendly Level

Perfect for those just starting their embroidery journey, with clear instructions and simple techniques

⏱️

Bite-Sized Project

Complete in under 5 hoursβ€”quick, fun, and perfect for a little creative escape.

πŸŽ„

Holiday Cheer

Festive fun for the season, bringing handmade magic to celebrations and creating new family traditions.

About This Christmas Ornament Embroidery Pattern

This Christmas ornament embroidery pattern combines traditional needlework techniques with festive holiday spirit. Designed for all skill levels, it guides you through creating a beautiful hoop art piece using seven classic embroidery stitches including satin stitch, backstitch, French knots, and woven wheel stitch. The pattern features charming Christmas elements that come together to form a delightful seasonal decoration perfect for gifting or adorning your own home.

Christmas Ornament Embroidery Pattern crochet pattern - detailed view of completed project

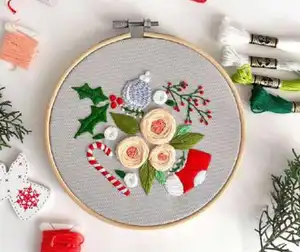
With detailed stitch diagrams and a comprehensive color guide using DMC threads, you'll master essential embroidery techniques while creating a treasured holiday keepsake that captures the warmth and joy of the festive season.

Why You'll Love This Christmas Ornament Embroidery Pattern

I absolutely love this pattern because it teaches you multiple essential embroidery stitches in one beautiful project. It's incredibly satisfying to watch the design come to life with each stitch, and the festive theme makes it perfect for creating heartfelt handmade gifts. The finished piece looks impressive whether you're a complete beginner or an experienced stitcher, and there's something magical about working with traditional hand embroidery techniques during the holiday season. Plus, the pattern is forgiving and encourages creativity with color choices.

Christmas Ornament Embroidery Pattern step 1 - construction progress Christmas Ornament Embroidery Pattern step 2 - assembly progress Christmas Ornament Embroidery Pattern step 3 - details and accessories Christmas Ornament Embroidery Pattern step 4 - final assembly and finishing

Switch Things Up

I love experimenting with different color palettes for this pattern to match various holiday themes. Instead of traditional red and green, try a winter wonderland theme with blues, silvers, and whites for an elegant icy look. You could also go for a rustic aesthetic using warm browns, creams, and burnt oranges that complement farmhouse dΓ©cor beautifully.

Another fun variation is scaling up the pattern to a larger hoop size like 20cm or 25cm to create a statement wall piece. The beauty of embroidery is its flexibility - you can add extra French knots for texture, incorporate metallic threads for sparkle, or even personalize it with names or dates using backstitch.

For a modern twist, consider stitching the design on colored fabric like navy blue or forest green instead of traditional white canvas. This creates stunning contrast and makes the embroidery pop. You can also mix different stitch types - try replacing some satin stitch areas with long and short stitch for a more textured dimensional effect that catches the light beautifully.

Common Mistakes & How to Fix Them

βœ— Pulling thread too tight when working satin stitch can cause fabric puckering - maintain even gentle tension throughout βœ— Not securing the fabric tightly enough in the hoop leads to loose uneven stitches - ensure drum-tight fabric before starting βœ— Wrapping French knots too many times creates bulky knots that don't sit flat - stick to two wraps maximum βœ— Skipping the carbon paper transfer step and freehand drawing can result in uneven asymmetrical designs - always transfer accurately

Christmas Ornament Embroidery Pattern

Create beautiful festive ornaments with this delightful embroidery pattern perfect for beginners and experienced stitchers alike. This comprehensive guide includes seven essential embroidery stitches to bring charming holiday designs to life on a 15cm hoop. Transform simple fabric into stunning handmade decorations featuring classic Christmas motifs with detailed stitch-by-stitch instructions and a complete color guide using DMC threads.

Beginner Friendly 3-4 Hours

Materials Needed for Christmas Ornament Embroidery Pattern

β€” Main Fabric

  • 01
    100% cotton or linen canvas fabric (two layers recommended)
  • 02
    DMC embroidery threads in colors: 666 (red), BLANC (white), 700 (green), 3841 (pale blue), 702 (light green), 954 (mint green), 352 (coral), 353 (peach)

β€” Tools Required

  • 01
    15 cm embroidery hoop (wood, plastic or bamboo)
  • 02
    Embroidery needle
  • 03
    100% cotton embroidery threads (DMC recommended)
  • 04
    Fabric marker or simple pen
  • 05
    Carbon paper for pattern transfer
  • 06
    Scissors for handmade crafts
  • 07
    Felt or craft cardboard for finishing
  • 08
    Pattern PDF for printing

Progress Tracker

0% Complete

β€” Pattern Transfer

Step 1:

Print the embroidery scheme from the PDF pattern

Step 2:

Transfer pattern to fabric using carbon paper, or use window/tablet light method with tape to secure

β€” Embroidery Stitches Guide

Backstitch:

Create straight lines - bring needle up (1), down behind to create small stitch (2), up ahead with gap, down where previous stitch started

Satin Stitch:

Filler stitch for smooth surfaces - bring needle up at outer edge (1), insert opposite side (2), repeat beside first stitch until shape filled

Fishbone Stitch:

Slanted diagonal stitches for leaves - up from back (1), down opposite side (2), up at point (3) next to start, down again (4)

Chain Stitch:

Stitch up at point A, down same hole without pulling through, up at B through loop, tighten, continue catching each loop

French Knot:

Pull needle up through fabric, wrap thread around needle two times, put needle back near same hole

Woven Wheel Stitch:

Draw circle, make 5 evenly spaced straight stitches, come up beside center, weave under and over spokes until circle filled

β€” Color & Stitch Application

Red Elements:

Satin Stitch DMC 666 for main ornament bodies and accent areas

White Elements:

Satin Stitch DMC BLANC for contrast areas, French Knot Stitch BLANC for decorative dots, Woven wheel stitch BLANC for flowers

Green Elements:

Satin Stitch DMC 700, Backstitch DMC 700 for outlines, Fishbone Stitch DMC 700, 702, and 954 for leaf details

Accent Details:

Chain Stitch DMC 3841 for decorative lines, French Knot DMC 666 and 352 for texture, Woven wheel DMC 353 for flowers

Assembly Instructions

  • Complete all embroidery work following the color and stitch guide provided in the pattern
  • Remove fabric from hoop and trim excess fabric leaving approximately 2-3 inches around the inner hoop edge
  • Cut a circle of felt or craft cardboard according to the size of the inner hoop to create backing
  • Place fabric back in hoop with embroidery centered, pull fabric taut and gather excess fabric at back
  • Pin felt backing circle to the gathered fabric on the reverse side of the hoop
  • Use overstitch technique to sew the two fabric layers together by passing needle through gathered fabric then felt and back out
  • Continue overstitching around the entire circumference leaving small gaps between stitches for neat finish

Important Notes

  • πŸ’‘Keep fabric drum-tight in the hoop throughout stitching to prevent puckering and ensure even tension
  • πŸ’‘Use two layers of fabric as recommended for better stability and professional finished appearance
  • πŸ’‘Separate DMC thread strands and use appropriate number of strands for each stitch type (usually 2-3 strands)
  • πŸ’‘Transfer pattern accurately using carbon paper to ensure symmetrical balanced design
  • πŸ’‘Practice each new stitch type on scrap fabric before working on your main project piece
  • πŸ’‘Work from the pattern center outward to prevent accidentally stitching over completed areas

This delightful Christmas ornament embroidery pattern brings the warmth of traditional needlework to your holiday celebrations. Perfect for creating personalized gifts or festive home dΓ©cor, this pattern teaches you seven essential embroidery stitches while producing a beautiful heirloom-quality piece. The detailed instructions and color guide make it accessible for beginners while offering enough variety to keep experienced embroiderers engaged. Hang your finished hoop art on the tree, display it on a wall, or gift it to someone special. πŸŽ„βœ¨ Happy stitching! 🧡

You ask,

we answer.

FAQs

What size embroidery hoop should I use for this pattern?

This pattern is designed for a 15cm (approximately 6 inch) embroidery hoop. You can use wood, plastic, or bamboo, though wooden hoops are recommended for their natural aesthetic and stability.

Can I use different thread colors than the DMC colors specified?

Absolutely! The DMC colors listed are recommendations to achieve the look shown in the pattern. Feel free to customize with any colors that match your personal style or holiday dΓ©cor scheme.

Do I need to use two layers of fabric as mentioned in the materials list?

Using two layers provides better stability and prevents the fabric from showing through between stitches, especially with satin stitch. However, one layer of quality cotton or linen canvas can work if it's substantial enough.

I've never done embroidery before - is this pattern suitable for complete beginners?

Yes! This pattern includes detailed diagrams for each stitch type and is designed for beginners. Take time to practice each stitch on scrap fabric first, and follow the step-by-step instructions carefully.

How do I finish the back of the hoop to make it look professional?

The pattern includes finishing instructions using felt or craft cardboard. Simply cut a circle to fit inside the hoop, pin it to the gathered fabric backing, and overstitch around the edge for a clean professional finish.