About This Boho Wood Bead Crochet Tote Bag Pattern

This bag makes an incredible, high-end gift for anyone who loves natural textures, or a gorgeous statement piece to wear with your favorite summer sundress.
Ideal for those with basic crocheting experience, featuring slightly more advanced stitches and techniques to expand your skills.
Takes 5-7 hours, making it an enjoyable project to finish over a couple of days.
An elegant detail to elevate any look, combining traditional techniques with contemporary design sensibilities.
This bag makes an incredible, high-end gift for anyone who loves natural textures, or a gorgeous statement piece to wear with your favorite summer sundress.
I am absolutely obsessed with how tactile this project is! Sliding those smooth wooden beads onto the cord and locking them in with stitches is incredibly satisfying and rhythmic. Plus, because we crochet the handles right onto the bag, there is barely any sewing at the end—which is always a huge win in my book!

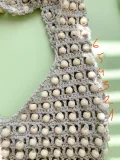
I still remember the first time I saw a beaded crochet bag in a boutique window—it had this gorgeous, vintage-yet-modern vibe that I just couldn't stop thinking about. I knew right then and there that I had to design my own version! When I was making this sample, I fell completely in love with the rhythmic flow of sliding a bead up, locking it in with a double crochet, and watching the pattern emerge. It is almost meditative once you get into the zone.
If you want to put your own creative spin on this beauty, try playing around with color contrast! A dark charcoal cord paired with light maple wood beads looks incredibly modern and striking. Or, if you want something more whimsical, you could even dye your wooden beads beforehand using fabric dye or watercolor washes. Just make sure they are completely dry before you string them onto your cord. I can't wait to see how yours turns out!
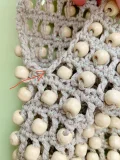
There is nothing quite like the texture of wooden beads paired with sturdy crochet cord. I designed this gorgeous tote to be your ultimate go-to bag for market days, beach trips, or just adding a touch of natural, bohemian style to your everyday outfits. You'll love watching the beautiful beaded mesh come together row by row, creating a sturdy yet flexible fabric that turns heads wherever you go. Grab your favorite cord and let's make your new favorite accessory together!
Start by making a foundation chain of 72 ch.
Working into the second chain from your hook, make 69 sc. In the very first chain of your foundation, work 3 sc to round the corner. Working back along the opposite side of the chain, make 69 sc. Work 2 sc in the 71st chain, and finish with 1 sl st into the 72nd chain to join. (143)
To transition between rounds, use an ecs (or ch 3) to reach the height of your next stitch.
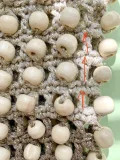
Work the bead placement round: (ch 1, skip next stitch, 1 dc with a wood bead threaded on, ch 1, skip next stitch, 1 dc without a bead) repeat 36 times. Join with 1 sl st, then ch 1. You should have exactly 36 beads in this round.
Work the solid single crochet round: (1 sc in the chain space of the row below, 1 sc in the top of the beaded dc, 1 sc in the next chain space, 1 sc in the top of the unbeaded dc) repeat 35 times. Work 1 sc in the next chain space, 1 sc in the beaded dc, 1 sc in the next chain space, join with 1 sl st, then work 1 ecs. (143)
Repeat the previous two rounds (the bead round and the solid sc round) 18 to 20 times to build the height of your bag. In this example, we repeat them for 20 pairs of rounds. After your final solid sc round, finish with 1 sl st, cut your cord, and weave in the end securely.
Lay your bag flat on a table. Locate the double crochet without a bead along the right-hand fold. This is your starting point.
Attach your cord over the designated right side unbeaded dc. Holding both the working yarn and the tail together, work ch 3 to secure. Drop the tail and continue with the single strand: (ch 1, 1 dc with a bead, ch 1, 1 dc without a bead) repeat 7 times. Work ch 1, then 1 sl st into the beaded dc of the round below. Turn. (30)
Work 30 sc across, turn, then work 1 ecs.
(ch 1, 1 dc with a bead, ch 1, 1 dc without a bead) repeat 6 times. Work ch 1, then 1 sl st into the unbeaded dc of the previous row. Turn. (26)
Work 26 sc across, turn, then work 1 ecs.
(ch 1, 1 dc with a bead, ch 1, 1 dc without a bead) repeat 5 times. Work ch 1, then 1 sl st into the unbeaded dc of the previous row. Turn. (22)
Work 22 sc across, turn, then work 1 ecs.
(ch 1, 1 dc with a bead, ch 1, 1 dc without a bead) repeat 4 times. Work ch 1, then 1 sl st into the unbeaded dc of the previous row. Turn. (18)
Work 18 sc across, turn, then work 1 ecs.
(ch 1, 1 dc with a bead, ch 1, 1 dc without a bead) repeat 3 times. Work ch 1, then 1 sl st into the unbeaded dc of the previous row. Turn. (14)
Work 14 sc across, turn, then work 1 ecs.
(ch 1, 1 dc with a bead, ch 1, 1 dc without a bead) repeat 3 times. Turn, then ch 1. (11)
Work 11 sc across, turn, then work 1 ecs.
Repeat the Row 11 and Row 12 pair an additional 8 times to create the strap length. Cut your cord and weave in the ends.
Find the unbeaded double crochet on the left side. Count 8 beads toward the center. This is where we will attach the yarn.
Insert your hook above the dc with the 8th bead, pulling up a loop. Work ch 1 with both strands of yarn, then work 1 dc into the unbeaded dc of the previous round. Drop the tail and continue with a single strand: (ch 1, 1 dc with a bead, ch 1, 1 dc without a bead) repeat 7 times. Work ch 1, then turn.
Work 28 sc across, making sure your final sc is worked into the first unbeaded dc of the previous row. Turn. (28)
Work ch 1, 1 dc, then (ch 1, 1 dc with a bead, ch 1, 1 dc without a bead) repeat 6 times. Work ch 1, then turn.
Work 24 sc across, making sure your last sc is worked into the first unbeaded dc of the previous row. Turn. (24)
Work ch 1, 1 dc, then (ch 1, 1 dc with a bead, ch 1, 1 dc without a bead) repeat 5 times. Work ch 1, then turn.
Work 20 sc across, making sure your last sc is worked into the first unbeaded dc of the previous row. Turn. (20)
Work ch 1, 1 dc, then (ch 1, 1 dc with a bead, ch 1, 1 dc without a bead) repeat 4 times. Work ch 1, then turn.
Work 16 sc across, making sure your last sc is worked into the first unbeaded dc of the previous row. Turn. (16)
Work ch 1, 1 dc, then (ch 1, 1 dc with a bead, ch 1, 1 dc without a bead) repeat 3 times. Work ch 1, then turn.
Work 12 sc across, turn, then work 1 ecs. (12)
(ch 1, 1 dc with a bead, ch 1, 1 dc without a bead) repeat 3 times. Work ch 1, then turn.
Work 11 sc across, turn, then work 1 ecs. (11)
Repeat the Row 11 and Row 12 pair an additional 8 times. Cut your cord and weave in the ends.
Turn the bag over to the other side. Repeat all the steps for both the right and left handles exactly as done on the first side.
I hope you absolutely love making and wearing your new beaded bag! It is such a rewarding project, and the finished texture is truly something special. Whether you take it to your local farmer's market or wear it out for a sunny brunch, it is bound to get endless compliments. Don't forget to play around with different bead colors or cord shades to make it uniquely yours. Happy crocheting, my lovely friends! 🧶✨
Yes, but make sure the inner hole of the bead is at least 3 mm wide so your 2-3 mm cord can pass through easily. If you use larger beads, you may need to adjust your stitch counts to prevent the fabric from buckling.
Wrap a small piece of tape tightly around the end of your cord to create a stiff, needle-like tip. This makes threading all 950 beads quick and painless!
Crochet cord is much sturdier than standard yarn, which helps minimize stretching. However, because it is a mesh design, some natural stretch will occur. Using a non-elastic polyester or tightly spun cotton cord is key to keeping its shape.
Absolutely! You can easily adjust the strap length by adding or subtracting repeats of the final 11-stitch pair of rows on each handle before joining them.
