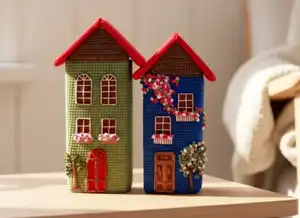
Create charming decorative houses with this detailed crochet pattern! Perfect for home décor or as unique handmade gifts, these adorable houses feature intricate embroidered details including windows, doors, flowering trees, and sweet balconies. The pattern includes instructions for two different house designs with removable roofs, complete with cardboard reinforcement for structure and stability. Each house stands approximately 17.5-19.5 cm tall and combines traditional crochet techniques with beautiful embroidery work to create stunning keepsake pieces that will brighten any space.
Progress Tracker
0% Complete
— HOUSE No.1 (Outer Part) :
Info :
Place a stitch marker in the 2nd stitch (3 sc) in order not to lose the corner
Rnd 2 :
1 sc, (3 sc in 1 stitch), 1 sc, (3 sc in 1 stitch), 1 sc, (3 sc in 1 stitch), 1 sc, (3 sc in 1 stitch) (16)
Rnd 3 :
2 sc, (3 sc in 1 stitch), 3 sc, (3 sc in 1 stitch), 3 sc, (3 sc in 1 stitch), 3 sc, (3 sc in 1 stitch) (24)
Rnd 4 :
4 sc, (3 sc in 1 stitch), 5 sc, (3 sc in 1 stitch), 5 sc, (3 sc in 1 stitch), 5 sc, (3 sc in 1 stitch) (32)
Rnd 5 :
6 sc, (3 sc in 1 stitch), 7 sc, (3 sc in 1 stitch), 7 sc, (3 sc in 1 stitch), 7 sc, (3 sc in 1 stitch) (40)
Rnd 6 :
8 sc, (3 sc in 1 stitch), 9 sc, (3 sc in 1 stitch), 9 sc, (3 sc in 1 stitch), 9 sc, (3 sc in 1 stitch) (48)
Rnd 7 :
10 sc, (3 sc in 1 stitch), 11 sc, (3 sc in 1 stitch), 11 sc, (3 sc in 1 stitch), 11 sc, (3 sc in 1 stitch) (56)
Rnd 8 :
12 sc, (3 sc in 1 stitch), 13 sc, (3 sc in 1 stitch), 13 sc, (3 sc in 1 stitch), 13 sc, (3 sc in 1 stitch) (64)
Rnd 9 :
14 sc, (3 sc in 1 stitch), 15 sc, (3 sc in 1 stitch), 15 sc, (3 sc in 1 stitch), 15 sc, (3 sc in 1 stitch) (72)
Rnd 10 :
16 sc, (3 sc in 1 stitch), 17 sc, (3 sc in 1 stitch), 17 sc, (3 sc in 1 stitch), 17 sc, (3 sc in 1 stitch) (80)
Rnd 11 :
18 sc, (3 sc in 1 stitch), 19 sc, (3 sc in 1 stitch), 19 sc, (3 sc in 1 stitch), 19 sc, (3 sc in 1 stitch) (88)
Info :
Crochet the next round through the posts between stitches. To do this, insert the hook in the first stitch and draw it out in the second stitch grabbing the working yarn and making sc
Rnd 12 :
88 sc (between the posts)
Info :
Crochet all the next rounds through both loops
Rnds 13-15 :
88 sc (3 rounds)
Info :
Trace the bottom of the square on the cardboard and cut it out. If you use thin cardboard then cut two squares
Rnds 16-60 :
88 sc (45 rounds)
Info :
Insert the cardboard template into the bottom of the house. Do not cut yarn
Info :
Prepare the cardboard for the walls of the house. Measure one side with a ruler, glue the cardboard and insert the template into the crocheted part. Complete crocheting the required number of sc to the corner of the house - 4 sc (guide on your part)
Info :
Mark the corners of the house with markers. Count 22 stitches from four sides. Attach brown yarn (Alize Cotton Gold No. 493). Cut green yarn. Work in back and forth rows
Info :
From the next round, incomplete 1 sc to decrease the row
Info :
Break yarn. Attach brown yarn to the marked point on the opposite side of the house. Work in back and forth rows similarly
Info :
Insert the cardboard template into the crocheted part. Trace the perimeter of the roof with a pencil. Cut out the cardboard template slightly smaller than the crocheted piece by 0.5 cm (0.2 inches) from the edge. Insert the cardboard template
— HOUSE No.1 (Inner Part) :
Rnd 2 :
1 sc, (3 sc in 1 stitch), 1 sc, (3 sc in 1 stitch), 1 sc, (3 sc in 1 stitch), 1 sc, (3 sc in 1 stitch) (16)
Rnd 3 :
2 sc, (3 sc in 1 stitch), 3 sc, (3 sc in 1 stitch), 3 sc, (3 sc in 1 stitch), 3 sc, (3 sc in 1 stitch) (24)
Rnd 4 :
4 sc, (3 sc in 1 stitch), 5 sc, (3 sc in 1 stitch), 5 sc, (3 sc in 1 stitch), 5 sc, (3 sc in 1 stitch) (32)
Rnd 5 :
6 sc, (3 sc in 1 stitch), 7 sc, (3 sc in 1 stitch), 7 sc, (3 sc in 1 stitch), 7 sc, (3 sc in 1 stitch) (40)
Rnd 6 :
8 sc, (3 sc in 1 stitch), 9 sc, (3 sc in 1 stitch), 9 sc, (3 sc in 1 stitch), 9 sc, (3 sc in 1 stitch) (48)
Rnd 7 :
10 sc, (3 sc in 1 stitch), 11 sc, (3 sc in 1 stitch), 11 sc, (3 sc in 1 stitch), 11 sc, (3 sc in 1 stitch) (56)
Rnd 8 :
12 sc, (3 sc in 1 stitch), 13 sc, (3 sc in 1 stitch), 13 sc, (3 sc in 1 stitch), 13 sc, (3 sc in 1 stitch) (64)
Rnd 9 :
14 sc, (3 sc in 1 stitch), 15 sc, (3 sc in 1 stitch), 15 sc, (3 sc in 1 stitch), 15 sc, (3 sc in 1 stitch) (72)
Rnd 10 :
16 sc, (3 sc in 1 stitch), 17 sc, (3 sc in 1 stitch), 17 sc, (3 sc in 1 stitch), 17 sc, (3 sc in 1 stitch) (80)
Info :
Crochet the next round through the posts between stitches. Insert the hook in the first stitch and draw it out in the second stitch, grabbing the working yarn and making sc
Rnd 11 :
80 sc (between the posts)
Info :
Crochet all the next rounds through both loops. Draw the yarn tail to the right side
Rnds 12-56 :
80 sc (45 rounds)
Info :
Insert the inner part into the outer part. Check if the height of both parts matches. Adjust the height, completing or unraveling the row if needed. Complete crocheting the required stitches to the corner of the house. Break yarn
Info :
Insert the inner part of the house into the outer part. Divide the top round into 22 and 18 stitches using the pins. The 18 stitches are the left and right sides of the house, and 22 stitches are the front and back sides of the house. Take off the inner part of the house. Attach brown yarn (Alize Cotton Gold No.493). Work in back and forth rows
Info :
From the next row, incomplete 1 sc to decrease the row
Info :
Break yarn. Attach yarn to the opposite side of the house. Work in back and forth rows similarly. Draw the yarn tails out to the outer side
— Joining Both Parts :
Info :
Insert the inner part of the house into the outer part. Hide all yarn tails between the parts
Info :
Crochet 15 sc, (chain 1 on the top of the house) through both parts along the edge of the top of the house with brown yarn. Move downward, crocheting 15 sc through both parts. Hide the yarn tail inside the part and cut the excess yarn
Info :
Join both parts of the house on the opposite side. Crochet 15 sc, (chain 1 on the top of the house) through both parts to the top. Move downward, crocheting 15 sc through both parts. Hide the yarn tail inside the part and cut the excess yarn
Info :
Sew the left and right parts of the house with the yarn tail 50 cm (20 inches) long. Sew the last stitches on the outer part of the house into one stitch of the inner part. Hide the yarn tail inside the house. Cut the excess yarn
— House Design :
Windows & Door Templates :
Make the templates from a sheet of paper for four windows, a front door, and two trapeziums for flowerpots
Cutting Felt :
Put the template of the front door on the red felt and trace around it. Cut it out. Draw all vertical and horizontal lines on red felt with a pencil. Put all templates of four windows on brown felt and trace around them. Trace around small trapeziums on the light brown felt
Embroidering Front Door :
Embroider the marked horizontal and vertical lines with brown thread. Also, embroider the upper semicircular part of the door. Fasten the thread on the backside of the part. Cut the excess thread
Embroidering Windows :
Before starting, split the embroidery thread into three parts. Use two threads. Embroider vertical and horizontal stitches. Fasten the thread on the backside of the part. Cut the excess thread. Embroider the upper windows of the houses similarly
Embroidering Tree Trunk :
Pin the parameters of the front door and the lower window, for a guideline of embroidering the height of the tree. Take off the windows and doors. Attach brown thread at the point of the front door. Draw the needle out to the bottom of the house, embroider the tree trunk with three stitches. Embroider the roots of the tree
Tree Branches :
Pass the needle behind the embroidered tree trunk, and insert the needle into the loop, tighten the knot gently. Make a stitch to the right. Draw the needle out behind the tree trunk to its lower part. Embroider the second root similarly. Make one stitch to the left from the tree trunk and draw the needle out to the upper part of the tree trunk to embroider the tree branches
Tree Crown :
Embroider the crown of the tree with two shades of green. Attach green yarn at the point of the front door. Draw the needle to the upper part of the tree branch, make a small stitch (length of the stitch is 0.5 sc). Wrap four turns of thread on the needle, pull out the needle and pierce the needle towards another knot. Repeat the action several times. Continue embroidering with the other shade of green. Secure thread. Cut the excess thread
Flowers on Felt :
Place the front door and windows on the house. Glue them to the house except for the light brown felt details. Embroider the knots on the light brown felt. Insert the needle from the back of the part to the front side, make a small stitch, wrap three turns of thread on the needle and pierce it back. Embroider the knots in a chaotic order with the threads of different shades. If the bottom edge of the felt is a little fuzzy, trim it with scissors. Embroider the embroidered part to the bottom part of the window
— Roof (Make 2) :
Starting Chain :
Chain 23. Start crocheting in the second chain from hook - 1 inc, 20 sc, 4 sc in the last stitch. Continue crocheting on the other side of the chain foundation - 20 sc, 1 inc (48)
Rnds 2-23 :
48 sc (22 rounds)
Info :
Insert the cardboard template. Complete crocheting the required number of stitches to the edge - 2 sc (guide on your part). Break yarn
Second Part :
Crochet the second part similarly. Insert the cardboard template. Complete crocheting the required number of stitches to the edge - 2 sc. Break yarn
— Joining Roof Parts :
Step 1 :
Fold the parts with the holes facing upward
Step 2 :
Sew the inner sides of the roof with red thread
Step 3 :
Put the roof on the house
Step 4 :
Crochet one round through the outer sides of the parts in a circle
Step 5 :
Join the parts with sc. Break yarn. Hide the yarn tails inside the part
— HOUSE No.2 (Outer Part) :
Info :
Place a stitch marker in the 2nd stitch (3 sc) in order not to lose the corner
Rnd 2 :
1 sc, (3 sc in 1 stitch), 1 sc, (3 sc in 1 stitch), 1 sc, (3 sc in 1 stitch), 1 sc, (3 sc in 1 stitch) (16)
Rnd 3 :
2 sc, (3 sc in 1 stitch), 3 sc, (3 sc in 1 stitch), 3 sc, (3 sc in 1 stitch), 3 sc, (3 sc in 1 stitch) (24)
Rnd 4 :
4 sc, (3 sc in 1 stitch), 5 sc, (3 sc in 1 stitch), 5 sc, (3 sc in 1 stitch), 5 sc, (3 sc in 1 stitch) (32)
Rnd 5 :
6 sc, (3 sc in 1 stitch), 7 sc, (3 sc in 1 stitch), 7 sc, (3 sc in 1 stitch), 7 sc, (3 sc in 1 stitch) (40)
Rnd 6 :
8 sc, (3 sc in 1 stitch), 9 sc, (3 sc in 1 stitch), 9 sc, (3 sc in 1 stitch), 9 sc, (3 sc in 1 stitch) (48)
Rnd 7 :
10 sc, (3 sc in 1 stitch), 11 sc, (3 sc in 1 stitch), 11 sc, (3 sc in 1 stitch), 11 sc, (3 sc in 1 stitch) (56)
Rnd 8 :
12 sc, (3 sc in 1 stitch), 13 sc, (3 sc in 1 stitch), 13 sc, (3 sc in 1 stitch), 13 sc, (3 sc in 1 stitch) (64)
Rnd 9 :
14 sc, (3 sc in 1 stitch), 15 sc, (3 sc in 1 stitch), 15 sc, (3 sc in 1 stitch), 15 sc, (3 sc in 1 stitch) (72)
Rnd 10 :
16 sc, (3 sc in 1 stitch), 17 sc, (3 sc in 1 stitch), 17 sc, (3 sc in 1 stitch), 17 sc, (3 sc in 1 stitch) (80)
Info :
Crochet the next round through the posts between stitches. Insert the hook in the first stitch and draw it out in the second stitch, grabbing the working yarn and making sc
Rnd 11 :
80 sc (between the posts)
Info :
Crochet all the next rounds through both loops
Rnds 12-14 :
80 sc (3 rounds)
Info :
Trace the bottom of the square on the cardboard and cut it out. If you use thin cardboard, then cut two squares
Rnds 15-52 :
80 sc (38 rounds)
Info :
Insert the cardboard template into the bottom of the house. Do not cut yarn. Prepare the cardboard for the walls of the house. Measure one side with a ruler, glue the cardboard and insert it into the crocheted part. Complete crocheting the required number of sc to the corner of the house - 5 sc (guide on your part)
Info :
Mark the corners of the house with markers. Count 22 stitches from four sides. Attach brown yarn (Alize Cotton Gold No.493). Cut blue yarn. Work in back and forth rows
Info :
From the next row, incomplete 1 sc to decrease the row
Info :
Break yarn. Attach brown yarn to the marked point on the opposite side of the house. Work in back and forth rows similarly. Insert the cardboard template into the crocheted part. Trace the perimeter of the roof with a pencil. Cut out the cardboard template slightly smaller than the crocheted piece by 0.5 cm (0.2 inches) from the edge. Insert the template inside
— HOUSE No.2 (Inner Part) :
Rnd 2 :
1 sc, (3 sc in 1 stitch), 1 sc, (3 sc in 1 stitch), 1 sc, (3 sc in 1 stitch), 1 sc, (3 sc in 1 stitch) (16)
Rnd 3 :
2 sc, (3 sc in 1 stitch), 3 sc, (3 sc in 1 stitch), 3 sc, (3 sc in 1 stitch), 3 sc, (3 sc in 1 stitch) (24)
Rnd 4 :
4 sc, (3 sc in 1 stitch), 5 sc, (3 sc in 1 stitch), 5 sc, (3 sc in 1 stitch), 5 sc, (3 sc in 1 stitch) (32)
Rnd 5 :
6 sc, (3 sc in 1 stitch), 7 sc, (3 sc in 1 stitch), 7 sc, (3 sc in 1 stitch), 7 sc, (3 sc in 1 stitch) (40)
Rnd 6 :
8 sc, (3 sc in 1 stitch), 9 sc, (3 sc in 1 stitch), 9 sc, (3 sc in 1 stitch), 9 sc, (3 sc in 1 stitch) (48)
Rnd 7 :
10 sc, (3 sc in 1 stitch), 11 sc, (3 sc in 1 stitch), 11 sc, (3 sc in 1 stitch), 11 sc, (3 sc in 1 stitch) (56)
Rnd 8 :
12 sc, (3 sc in 1 stitch), 13 sc, (3 sc in 1 stitch), 13 sc, (3 sc in 1 stitch), 13 sc, (3 sc in 1 stitch) (64)
Rnd 9 :
14 sc, (3 sc in 1 stitch), 15 sc, (3 sc in 1 stitch), 15 sc, (3 sc in 1 stitch), 15 sc, (3 sc in 1 stitch) (72)
Info :
Crochet the next round through the posts between stitches. Insert the hook in the first stitch and draw it out in the second stitch grabbing the working yarn and making sc
Rnd 10 :
72 sc (between the posts)
Info :
Crochet all the next rounds through both loops. Draw the yarn tail to the right side
Rnds 11-48 :
72 sc (38 rounds)
Info :
Insert the inner part into the outer part. Check if the height of both parts matches. Adjust the height, completing or unraveling the row if needed. Complete crocheting the required stitches to the corner of the house. Break yarn
Info :
Insert the inner part of the house into the outer part. Divide the top round into 20 and 16 stitches using the pins. The 16 stitches are the left and right sides of the house, and 20 stitches are the front and back sides of the house. Take off the inner part of the house. Attach brown yarn (Alize Cotton Gold No.493). Work in back and forth rows
Info :
From the next row, incomplete 1 sc to decrease the row
Info :
Break yarn. Attach yarn to the opposite side of the house. Work in back and forth rows similarly. Draw the yarn tails out to the outer side
— Joining House No.2 Parts :
Info :
Insert the inner part of the house into the outer part. Hide all yarn tails between the parts
Info :
Crochet 13 sc, (chain 1 on the top of the house) through both parts along the edge of the top of the house with brown yarn. Move downward, crocheting 13 sc through both parts. Hide the yarn tail inside the part and cut the excess yarn
Info :
Join both parts of the house on the opposite side. Crochet 13 sc, (chain 1 on the top of the house) through both parts to the top. Move downward, crocheting 13 sc through both parts. Hide the yarn tail inside the part and cut the excess yarn
Info :
Sew the left and right parts of the house with the yarn tail 50 cm (20 inches) long. Hide the yarn tail inside the house and cut the excess yarn
— House No.2 Design :
Templates :
Make the templates from a sheet of paper for two windows and a front door
Cutting & Preparation :
Put the template of the front door on the brown felt and trace around it. Cut it out. Before starting, split the embroidery thread into three parts. Use two threads. To embroider the door, choose a thread slightly lighter in shade than the door itself. Sew vertical and horizontal stitches on the door
Positioning Parts :
Place all parts from the felt (windows and door) on the house. Pin the bottom part of the window and the right side of the door. Take off the felt
Tree Trunk Embroidery :
Embroider the tree trunk with brown thread. Make two stitches (the length of the stitch is approximately 8 rows upward) and wrap along the entire length of the stitch with the same thread. Continue to embroider two stitches and wrap along the entire length until you get the desired shape of the trunk
Tree Crown Embroidery :
Prepare threads in white, green, and several different shades of pink. Having pierced the needle in the right point for embroidering a knot, do not leave the needle for wrapping, but pull it out completely and wrap thread on the needle 3-4 turns. After that, pierce the needle towards another knot. Complete embroidering of the crown of the tree by knots of white and light pink shades
Door Details :
Add some detail to the front door by drawing vertical and horizontal lines with a white permanent marker (use a permanent marker only)
Decorative Flowers :
Place the windows and front door on the house. DO NOT GLUE! Mark the parameters of the upper window with pins. The middle pin on the window is a mark to start embroidering knots on the left and right sides. Embroider the knots randomly. Alternate the shades of the thread and distribute the knots from the window up to the roof of the house. Add some green knots. Embroider a few knots on the right side too. Glue the windows and front door
— Balconies :
Preparation :
Cut out two small rectangles, slightly wider than the windows from white felt
Embroidery :
Split the brown embroidery thread into three parts. Use two threads. Always insert the needle from the bottom up, wrapping the bottom edge of the felt with a thread. Embroider two horizontal stitches. Secure thread on the backside. Cut the excess thread
Flower Details :
Embroider a few knots in the upper part of the felt with threads of different shades of pink. Fasten the thread on the backside and cut the excess thread. Glue the ready balconies to the house
— Roof for House No.2 (Make 2) :
Starting Chain :
Chain 23. Start crocheting in the second chain from hook - 1 inc, 20 sc, 4 sc in the last stitch. Continue crocheting on the other side of the chain foundation - 20 sc, 1 inc (48)
Rnds 2-21 :
48 sc (20 rounds)
Info :
Insert the cardboard template. Complete crocheting the required number of stitches to the edge - 2 sc. Break yarn. Crochet the second part similarly. Insert the cardboard template. Complete crocheting the required number of stitches to the edge - 2 sc. Break yarn
— Joining Roof Parts for House No.2 :
Step 1 :
Fold the parts with the holes facing upward
Step 2 :
Sew the inner sides of the roof with red thread
Step 3 :
Put the roof on the house
Step 4 :
Crochet one round through the outer sides of the parts in a circle
Step 5 :
Join the parts with sc. Break yarn. Hide the yarn tails inside the part. Install the roof on the house
These enchanting Big Crochet Houses bring the warmth of handmade charm into your home décor! With their sturdy cardboard-reinforced structure and beautifully embroidered details, these houses are designed to be treasured keepsakes that showcase your advanced crochet skills. The combination of precise crochet work and delicate embroidery creates dimensional pieces full of character and personality. Each house tells its own story through flowering trees, charming windows, and sweet balconies that make them truly special decorative accents. 🏡 Happy crocheting and enjoy creating your miniature neighborhood! 🧶✨