🧢 Beautiful ✨ Detailed πŸ’ Adorable

Barbie Roller Skating Amigurumi Pattern

Barbie Roller Skating Amigurumi Pattern
4.5β˜… Rating
8-10 Hours Time Needed
1.9K Made This
βœ‚οΈ

Intermediate Level

Ideal for those with basic knitting experience, featuring slightly more advanced stitches and techniques to expand your skills.

⏱️

All-Day Adventure

Requires 8-10 hours, ideal for a full day of immersive knitting.

🧸

Cute Companion

An adorable friend to cherish, handcrafted with love to bring comfort and joy for years to come.

About This Barbie Roller Skating Amigurumi Pattern

This Barbie Roller Skating amigurumi pattern captures the essence of fun and fashion in a handmade creation. Featuring vibrant colors and intricate details like flowing blonde hair strands, a stylish visor, and functional-looking roller skates with individual wheels, this pattern brings the beloved fashion icon to life. The doll stands at approximately 22 cm tall and includes detailed instructions for creating every element from head to toe.

Barbie Roller Skating Amigurumi Pattern crochet pattern - detailed view of completed project

Working with tight stitches and continuous spiral rounds, you'll craft a sturdy yet adorable doll perfect for display or gentle play. The pattern includes special techniques for creating realistic hair with individual strands and bangs, plus charming accessories that complete the roller skating look.

Why You'll Love This Barbie Roller Skating Amigurumi Pattern

I absolutely love how this pattern brings together so many fun elements in one project! The hair-making technique creates such a realistic flowing effect that makes the doll come alive, and I'm particularly fond of the attention to detail in the roller skates with their tiny wheels. What really makes this pattern special is how it captures Barbie's iconic style while remaining achievable for intermediate crocheters. I find the process of building each component and then watching them come together during assembly incredibly satisfying, and the finished doll always brings a smile to my face.

Barbie Roller Skating Amigurumi Pattern step 1 - construction progress Barbie Roller Skating Amigurumi Pattern step 2 - assembly progress Barbie Roller Skating Amigurumi Pattern step 3 - details and accessories Barbie Roller Skating Amigurumi Pattern step 4 - final assembly and finishing

Switch Things Up

I love experimenting with this pattern to create different Barbie-inspired looks! One of my favorite modifications is changing the hair color completelyβ€”try using brown, black, or even fun fantasy colors like pink or purple to give your doll a unique personality. You could also adjust the hair length by making shorter or longer chain strands, or even create different hairstyles like braids or buns by manipulating how you attach and arrange the strands.

The outfit is another area where I get really creative. Instead of the swimsuit, you can design a completely different wardrobe by modifying the body patternβ€”add sleeves for a top, extend the bottom portion for a dress, or create separates like a skirt and crop top. I've made versions with sparkly metallic yarn for evening gowns and soft pastels for casual daywear.

For the roller skates, I sometimes swap the lime green for neon colors or even add glitter yarn for extra sparkle. You could also modify the accessories entirelyβ€”replace the visor with a sun hat, add a tiny crocheted purse, or create miniature jewelry pieces. I've even experimented with different facial expressions by changing the placement and size of the safety eyes, or adding embroidered details like freckles or makeup.

The possibilities are truly endless with this versatile base pattern!

Common Mistakes & How to Fix Them

βœ— Forgetting to stuff the head gradually while decreasing rounds, which makes it difficult to achieve proper shaping and can leave lumpy areas βœ— Not using tight enough tension when crocheting the body and limbs, resulting in visible gaps where stuffing shows through the stitches βœ— Placing safety eyes incorrectly or at different heights between rounds eighteen and nineteen, creating an asymmetrical or cross-eyed appearance βœ— Rushing through the hair strand attachment without proper planning and pinning, leading to uneven distribution and a messy hairstyle that's hard to fix

Barbie Roller Skating Amigurumi Pattern

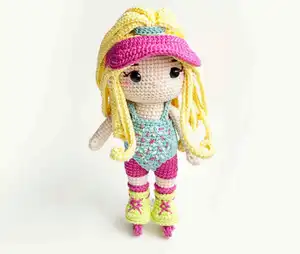
Create your own fashionable Barbie doll on roller skates with this delightful amigurumi pattern! Standing approximately 22 cm tall, this charming design features a detailed blonde ponytail hairstyle, a trendy swimsuit outfit, and adorable roller skates complete with wheels. Perfect for Barbie fans and crochet enthusiasts alike, this pattern combines classic doll-making techniques with playful accessories that bring the iconic character to life in yarn form.

Intermediate 8-10 Hours

Materials Needed for Barbie Roller Skating Amigurumi Pattern

β€” Main Fabric

  • 01
    Lion Brand 24/7 Cotton yarn in beige color for skin
  • 02
    Lion Brand 24/7 Cotton yarn in lemon yellow for hair
  • 03
    Lion Brand 24/7 Cotton yarn in rose pink for clothing and accessories
  • 04
    Lion Brand 24/7 Cotton yarn in succulent green for swimsuit details and pony holder
  • 05
    Lion Brand 24/7 Cotton yarn in lime green for roller skates

β€” Tools Required

  • 01
    Crochet hook size 2.5mm or 2.75mm
  • 02
    Pair of 12mm safety eyes
  • 03
    Tapestry needle
  • 04
    Stitch marker
  • 05
    Stuffing
  • 06
    Fabric glue (optional)
  • 07
    Pins for assembly

Progress Tracker

0% Complete

β€” Head :

Rnd 1 :

6 sc in a magic ring [6]

Rnd 2 :

6 Inc [12]

Rnd 3 :

(1 sc, Inc) 6x [18]

Rnd 4 :

(2 sc, Inc) 6x [24]

Rnd 5 :

(3 sc, Inc) 6x [30]

Rnd 6 :

(4 sc, Inc) 6x [36]

Rnd 7 :

(5 sc, Inc) 6x [42]

Rnd 8 :

(6 sc, Inc) 6x [48]

Rnd 9 :

(7 sc, Inc) 6x [54]

Rnd 10 :

(8 sc, Inc) 6x [60]

Rnd 11-22 :

60 sc (12 rounds) [60]

Info :

Don't forget to stuff with stuffing as you go. Eyes location between Rnd 18 and 19, distance 5 sts apart

Rnd 23 :

(8 sc, Dec) 6x [54]

Rnd 24 :

(7 sc, Dec) 6x [48]

Rnd 25 :

(6 sc, Dec) 6x [42]

Rnd 26 :

(5 sc, Dec) 6x [36]

Rnd 27 :

(4 sc, Dec) 6x [30]

Rnd 28 :

(3 sc, Dec) 6x [24]

Rnd 29 :

(2 sc, Dec) 6x [18]

Rnd 30 :

(1 sc, Dec) 6x [12]

Rnd 31 :

(Dec) 6x [6]

Info :

Cut the yarn. Fasten off.

β€” Ears (Make 2) :

Rnd 1 :

In a magic ring, Ch 2, 5 Dc. Pull tight to close. Leave a long yarn to sew.

Info :

Sew between Rnd 18-20
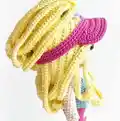
β€” Hair Base :

Rnd 1 :

6 sc in a magic ring [6]

Rnd 2 :

6 Inc [12]

Rnd 3 :

(1 sc, Inc) 6x [18]

Rnd 4 :

FLO (2 sc, Inc) 6x [24]

Info :

Do not cut the yarn, continue to hair strands

β€” Hair Strands :

Instructions :

Ch 41. Start from 2nd chain from hook, 1 sc, 38 Hdc, 1 sc along the chain, Slst to the next st. of the hair base. Do this 16 times.

β€” Hair Bangs :

Instructions :

Ch 41. Start from 2nd chain from hook, 1 sc, 39 Hdc, along the chain, Skip 1 st., Slst to the next st. of the hair base. Do this 4 times.

Info :

Position the bangs to the front side of the face. Fasten off and leave a long yarn to sew.

β€” Top Hair Strands :

Instructions :

Flip the hair and insert your hook in to the back loop of Rnd 4. Ch 41. Start from 2nd chain from hook, 1 sc, 38 Hdc, 1 sc along the chain, Slst to the next st. of the hair base. Do this 18 times.

Info :

Fasten off and leave a long yarn to sew. You can also use a fabric glue

β€” Pony (Work in Rows) :

Row 1 :

Ch 36, turn and work along the chain

Row 2 :

1 Slst, 1 sc, 31 Hdc, 1 sc, 1 Slst

Info :

Fasten off, cut the yarn.

β€” Wheels (Make 12) :

Instructions :

Make 6 sc in a magic ring. Fasten off and cut the yarn.

Info :

Glue two wheels together, resulting in 6 wheels.

β€” Legs (Make 2) :

Rnd 1 :

Ch 5, turn and work with 3 sc along the chain, 4 sc into the last st. Continue to the other side of the chain, make 2 sc and 3 sc into the last st. [12]

Rnd 2 :

Inc, 2 sc, 3 Inc, 4 sc, 2 Inc [18]

Rnd 3 :

5 Hdc, 6 Hdc Inc, 7 Hdc [24]

Rnd 4 :

BLO 24 sc [24]

Rnd 5 :

24 sc [24]

Rnd 6 :

6 sc, 6 Dec, 6 sc [18]

Rnd 7 :

5 sc, Dec, (1 sc, Dec) 2x, 5 sc [15]

Rnd 8-10 :

15 sc (3 rounds) [15]

Rnd 11 :

BLO 15 sc [15] (Switch to Rose)

Rnd 12 :

15 sc [15]

Rnd 13 :

BLO 15 sc [15] (Switch to Beige)

Rnd 14-15 :

15 sc [15]

Rnd 16 :

(4 sc, Inc) 3x [18]

Rnd 17 :

BLO 18 Slst [18] (Switch to Rose)

Rnd 18 :

BLO 18 sc [18]

Rnd 19 :

18 sc [18]

Info :

Fasten off and cut the yarn for Leg 1. Start stuffing the Leg.

Rnd 1-19 (Leg 2) :

Repeat Leg 1, but do not cut the yarn.

Info :

With feet facing away, sc some more until you reach the side center. Join Leg 2 to Leg 1 with 1 sc.

Rnd 20 :

17 sc to leg 1. 18 sc in leg 2. [36] Add your stitch mark, this is the new end of the round.

Infos :

Turn the leg upside down and join Lime yarn to the front loops of round 10. Slst all around. Cut the yarn. Fasten off. Insert your hook into the front loops of round 12 with Rose yarn. Slst around. Cut the yarn. Fasten off.

β€” Body :

Rnd 21 :

36 sc [36]

Rnd 22 :

(5 sc, Inc) 6x [42]

Rnd 23-24 :

42 sc (3 rounds) [42]

Rnd 25 :

(5 sc, Dec) 6x [36]

Rnd 26 :

36 sc [36]

Rnd 27 :

(16 sc, Dec) 2x [34]

Rnd 28 :

34 sc [34]

Rnd 29 :

(15 sc, Dec) 2x [32]

Rnd 30 :

BLO 32 Slst [32] (Switch to Beige)

Rnd 31 :

BLO 32 sc [32]

Rnd 32 :

(14 sc, Dec) 2x [30]

Rnd 33 :

30 sc [30]

Rnd 34 :

(13 sc, Dec) 2x [28]

Rnd 35 :

28 sc [28]

Rnd 36 :

(12 sc, Dec) 2x [26]

Rnd 37 :

26 sc [26]

Rnd 38 :

(11 sc, Dec) 2x [24]

Info :

Fasten off and leave a long yarn to sew.

β€” Arms (Make 2) :

Rnd 1 :

5 sc in magic ring [5]

Rnd 2 :

5 Inc [10]

Rnd 3 :

10 sc [10]

Rnd 4 :

1 sc, 1 Buble stitch, 8 sc [10]

Rnd 5-19 :

10 sc (15 rounds) [10]

Info :

Fasten off. Leave a long yarn to sew.

β€” Swimsuit (Work in Rows) :

Row 1 :

Ch 8, start from the 2nd ch from hook, Dec, 3 sc, Dec. Ch 1, turn

Row 2 :

Dec, 1 sc, Dec. Ch 1, turn

Row 3-10 :

3 sc. Ch 1, turn (8 rows)

Row 11 :

Inc, 1 sc, Inc. Ch 1, turn

Row 12 :

Inc, 3 sc, Inc. Ch 1, turn

Row 13 :

Inc, 5 sc, Inc. Ch 8. Insert hook into the first chain of row 1, work across with Inc, 5 sc, Inc. Ch 8. 1 sc into the first st of row 11

Row 14 :

4 sc, Dec, 2 sc, 8 sc across the chain. 9 sc to row 11, 8 sc across the other chain.

Row 15 :

(10 sc, Inc) 3x [36]

Row 16 :

36 sc [36]

Row 17 :

(16 sc, Dec) 2x [34]

Row 18 :

34 sc [34]

Info :

Wear the swimsuit at this point

Row 19 :

(15 sc, Dec) 2x [34]

Row 20 :

32 sc [32]

Row 21 :

(14 sc, Dec) 2x [30]

Row 22 :

(13 sc, Dec) 2x [28]

Row 23 :

28 sc [28]

Row 24 :

(12 sc, Dec) 2x [26]

Info :

Fasten off and cut the yarn.

β€” Swimsuit Straps :

Instructions :

Insert your hook with Succulent yarn. Make Ch 15 and work along the chain with 14 Slst. Sc on rnd 24. Continue with 6 sc across. Make another Ch 15 and turn, 14 slst along the chain. Slst on rnd 24 to finish.

Info :

Fasten off. Leave a long yarn to sew.

β€” Visor :

Rnd 1 :

Ch 50. Join last st. to the first st.

Rnd 2-4 :

50 sc (3 rounds)

Rnd 5 :

Slst, 6 sc, 2 Inc, 6 sc. Ch 1, turn.

Rnd 6 :

(1 sc, Inc) 2x, 10 sc, (Inc, 1 sc) 2x, Slst on rnd 4. Ch 1, turn

Rnd 7 :

2 sc, Inc, (8 sc, Inc) 2x, 2 sc, Slst on rnd 4. Ch 1, turn

Rnd 8 :

3 sc, Inc, (9 sc, Inc) 2x, 3 sc, Slst on rnd 4. Ch 1, turn

Rnd 9 :

4 sc, Inc, 5 sc, Inc, 9 sc, Inc, 5 sc, Inc, 4 sc, Slst on rnd 4. Ch 1, turn

Rnd 10 :

36 sc, Slst on rnd 4, turn

Rnd 11 :

36 Slst

Info :

Fasten off. Leave a long yarn to sew.

Assembly Instructions

  • Sew the head securely to the body, ensuring the neck opening aligns properly with the body opening.
  • Attach the ears to the sides of the head between rounds 18-20, positioning them symmetrically.
  • Pin the hair base to the top of the head and sew it in place, arranging hair strands evenly around the head before securing with glue or stitching.
  • Tie the hair into a ponytail using the pony piece, positioning it at the back of the head.
  • Sew the arms to the sides of the body at shoulder level, ensuring they can move freely.
  • Attach the swimsuit straps at the back by sewing them securely between the shoulder blades.
  • Glue or sew three wheels to each roller skate foot, positioning them evenly along the bottom of each foot.

Important Notes

  • πŸ’‘Crochet with tight stitches throughout the pattern to avoid gaps and holes in your work
  • πŸ’‘Use stitch markers consistently to track the beginning of each round, especially during color changes
  • πŸ’‘Stuff the head and body firmly but gradually as you decrease to maintain a smooth, even shape
  • πŸ’‘Pin all hair strands before sewing or gluing to ensure even distribution and desired hairstyle
  • πŸ’‘When joining the legs, make sure feet are facing away from each other before connecting
  • πŸ’‘Use fabric glue sparingly if choosing that method for hair attachment to avoid visible residue
  • πŸ’‘Test the placement of safety eyes before securing them permanently to ensure symmetrical positioning

This charming Barbie Roller Skating amigurumi pattern brings together classic doll-making with modern fashion flair! Standing at 22 cm tall, this delightful creation features intricate details like flowing blonde hair made with individual strands, a trendy swimsuit outfit, and adorable roller skates complete with tiny wheels. Perfect for displaying on a shelf or gifting to Barbie enthusiasts, this pattern offers an enjoyable challenge that results in a stunning handmade keepsake. Get ready to roll into your next crochet adventure! 🧢✨

You ask,

we answer.

FAQs

What yarn weight works best for this Barbie doll pattern?

The pattern recommends Lion Brand 24/7 Cotton yarn, which is a DK weight (category 3) yarn. This weight creates a doll approximately 22 cm tall with a 2.5-2.75mm hook. You can substitute with any DK weight cotton or acrylic yarn in your preferred colors.

How do I prevent holes from showing in the amigurumi?

Use tight tension throughout your work and consider using a smaller hook size than normally recommended for your yarn weight. The pattern specifically notes to crochet with tight stitches to avoid holes. Working in continuous spiral rounds without slip stitches also helps create a seamless appearance.

Can I make the hair differently if the strand method seems too complex?

Yes! While the pattern creates realistic flowing hair with individual chain strands, you can simplify by crocheting a basic wig cap and attaching yarn pieces differently, or even using craft hair or embroidery floss. However, the strand method gives the most authentic Barbie-like flowing hair effect.

How do I attach the roller skate wheels securely?

The pattern instructs you to glue two small crocheted wheels together to create each wheel, resulting in 6 wheels total. Use strong fabric glue or hot glue to attach three wheels evenly along the bottom of each foot. Let dry completely before handling.

Is this pattern suitable for children to play with?

While the doll is adorable, the 12mm safety eyes and small wheel pieces could pose a choking hazard for young children. If making this for a child under 3, consider embroidering the eyes instead and securely stitching all small parts. For older children who won't put toys in their mouths, it should be safe with proper construction.

Why does the pattern call for working in continuous spiral rounds?

Working in continuous spirals without joining each round creates a seamless look without visible seams running up the body parts. This technique is standard for amigurumi and creates a much smoother, more professional appearance than joining with slip stitches after each round.