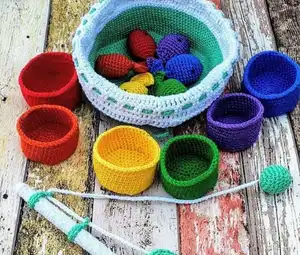
Create an enchanting interactive fishing set perfect for little ones! This delightful pattern includes six colorful crocheted fish with magnetic mouths, matching rainbow bowls for sorting and storage, a functional fishing rod with working reel, and a spacious storage basket to keep everything organized. Each fish features adorable safety eyes and uses magnets to 'catch' onto the rod, making playtime both educational and entertaining. The set teaches colors, coordination, and provides endless imaginative play opportunities while being completely handmade with love.
Progress Tracker
0% Complete
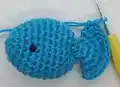
— I. Fish (Make 6) :
R3 :
(1 sc + 1 inc) X 6 => 18
R5 :
(2 sc + 1 inc) X 6 => 24
Infos :
Place safety eyes between rows 5 and 6, in the 3rd and 6th increases. Place magnet with consistent side facing exterior, test with another magnet. Stuff lightly, form fish shape by pressing thumb and index against eyes.
R12 :
(2 sc + 1 dec) X 6 => 18
R13 :
(1 sc + 1 dec) X 6 => 12
Info :
Add more fiberfill, continue forming fish shape
R17 :
(1 sc + 1 inc) X 6 => 18
R18 :
(2 sc + 1 inc) X 6 => 24
R19 :
Fold tail parts together and crochet 12sc through both layers. Cut yarn and hide.
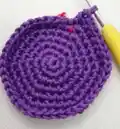
— II. Bowls :
a. Smaller Bowl (Make 3: orange, green, purple) :
R3 :
(1 sc + 1 inc) X 6 => 18
R4 :
(2 sc + 1 inc) X 6 => 24
R5 :
(3 sc + 1 inc) X 6 => 30
R6 :
(4 sc + 1 inc) X 6 => 36
R7 :
(5 sc + 1 inc) X 6 => 42
R16 :
SL X 42. Close with slip stitch in first slip stitch, hide thread.
b. Bigger Bowl (Make 3: red, yellow, blue) :
R3 :
(1 sc + 1 inc) X 6 => 18
R4 :
(2 sc + 1 inc) X 6 => 24
R5 :
(3 sc + 1 inc) X 6 => 30
R6 :
(4 sc + 1 inc) X 6 => 36
R7 :
(5 sc + 1 inc) X 6 => 42
R8 :
(6 sc + 1 inc) X 6 => 48
R17 :
SL X 48. Close with slip stitch in first slip stitch, hide thread.
— III. Storage Basket :
R3 :
(1 sc + 1 inc) X 6 => 18
R4 :
(2 sc + 1 inc) X 6 => 24
R5 :
(3 sc + 1 inc) X 6 => 30
R6 :
(4 sc + 1 inc) X 6 => 36
R7 :
(5 sc + 1 inc) X 6 => 42
R8 :
(6 sc + 1 inc) X 6 => 48
R9 :
(7 sc + 1 inc) X 6 => 54
R10 :
(8 sc + 1 inc) X 6 => 60
R11 :
(9 sc + 1 inc) X 6 => 66
R12 :
(10 sc + 1 inc) X 6 => 72
R13 :
(11 sc + 1 inc) X 6 => 78
R14 :
(12 sc + 1 inc) X 6 => 84
R15 :
(13 sc + 1 inc) X 6 => 90
R16 :
(14 sc + 1 inc) X 6 => 96
R17 :
(15 sc + 1 inc) X 6 => 102
R18 :
(16 sc + 1 inc) X 6 => 108
R19 :
(17 sc + 1 inc) X 6 => 114
R20 :
(18 sc + 1 inc) X 6 => 120
Info :
Change to white yarn leaving last sc unfinished, pull white through to complete. Work over both yarn tails.
R33 :
chain 3 + tr X 120 + sc in chain 3 => 120
R34-R37 :
chain 3, tr X120, sc in chain 3 => 120
R38 :
Change to green. chain 3, tr X120, sc in chain 3 => 120
R39 :
SL X 120. Close with slip stitch, hide thread.
Drawstring :
Chain 200 with green yarn. Insert string in R35, weaving over 2 tr, under 2 tr around.
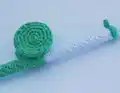
— IV. Rod :
a. The Rod :
Info :
Work around stick (25mm diameter). Adjust sc count for thicker sticks. Test fit every 10 rows.
R1 (Green) :
MR + 6sc => 6
R31 (White) :
BLO X 6 => 6
Finishing :
Slip stitch in first stitch. Thread needle through front loops only from wrong side, pull tight, hide yarn inside.
b. The Guides (Make 2) :
R1 :
chain X 12, slip stitch in first chain. Test fit over rod.
R2 :
sc X 12, slip stitch in first sc, then one more through sc 1 and 12. Chain 8, slip stitch last chain to first. Leave long tail for sewing to rod at rows 65 and 85.
c. The Reel :
i. The Sides (Make 4, sew in pairs) :
R3 :
(1 sc + 1 inc) X 6 => 18
R4 :
(2 sc + 1 inc) X 6 => 24
R5 :
(3 sc + 1 inc) X 6 => 30. Slip stitch in first sc, leave long tails.
Info :
Place sides together with front parts exterior, row ends joined. Sew each pair.
ii. The Middle Part :
Info :
Attach first side between rows 3-4 of side piece. Stuff middle part, attach second side. Sew reel to rod at row 30.
d. The String :
Instructions :
Chain 60 (twice rod length). Sew to reel middle where it meets rod. Pass string over reel once, sew again to secure. Insert string through guides.
e. The Hook :
R1 :
MR + 6sc => 6. Insert string in middle of MR and make knot.
R3 :
(1 sc + 1 inc) X 6 => 18
R5 :
(2 sc + 1 inc) X 6 => 24
R7 :
(2 sc + 1 dec) X 6 =>18
R8 :
sc X 18 => 18. Start stuffing.
R9 :
(2 sc + 1 dec) X 6 =>12. Slip stitch in first sc, leave long tail.
Info :
Stuff firmly, leave space for magnets. Place 1-3 magnets depending on strength. Test polarity with fish. Sew over magnets to secure, hide yarn.
This enchanting Baby Toys Fish Set pattern creates a complete interactive play system that combines learning with fun! From the magnetic fishing mechanism to the rainbow sorting bowls, every element is thoughtfully designed for little hands and growing minds. The pattern uses straightforward techniques that intermediate crocheters will enjoy, while the finished result looks impressively professional. Watch your little ones develop fine motor skills, learn colors, and engage in imaginative play with this handcrafted treasure. 🎣🌈 Happy crocheting! 🧶✨