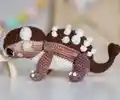
Create your own adorable armored friend with this charming Ankylosaurus Bruno crochet pattern! This delightful dinosaur features incredible details including movable spikes, articulated plates along his back, and a poseable tail with an optional wire armature. Standing at 7cm tall and 12cm long, Bruno combines the fierce appearance of a prehistoric tank with an irresistibly cute personality. The pattern includes advanced techniques like thread-bracing for sturdy limbs and a cotter pin system for head movement, making this project both challenging and rewarding. Perfect for dinosaur lovers and amigurumi enthusiasts who want to create a truly special handmade companion.
Progress Tracker
0% Complete
— HEAD :
Yarn A
Starting chain foundation
Row 1 :
11 loops, turning, 10sc starting from 2nd loop from hook (10l)
Row 2 :
1 loop, turning, inc, 8sc, inc (12l)
Row 3 :
1 loop, turning, 12sc (12l)
Row 4 :
1 loop, turning, inc, 10sc, inc (14l)
Row 5 :
1 loop, turning, 14sc only through front loops (14l)
Row 6-7 :
1 loop, turning, 14sc (14l)
Row 8 :
1 loop, turning, dec, 10sc, dec (12l)
Row 9 :
1 loop, turning, 12sc only through front loops (12l)
Row 10-11 :
1 loop, turning, 12sc (12l)
Row 12 :
1 loop, turning, inc, 10sc, inc (14l)
Row 13 :
1 loop, turning, 14sc only through front loops (14l)
Row 14-15 :
1 loop, turning, 14sc (14l)
Row 16 :
1 loop, turning, dec, 10sc, dec (12l)
Row 17 :
1 loop, turning, 12sc only through front loops (12l)
Row 18 :
1 loop, turning, dec, 8sc, dec (10l)
Row 19 :
1 loop, turning, [dec]x2, 2sc, [dec]x2 (6l)
Row 20 :
1 loop, turning, 6sc (6l)
Row 21 :
1 loop, turning, 6sc only through front loops (6l)
Row 22 :
1 loop, turning, dec, 2sc, dec (4l)
Info :
Change to yarn B. Crochet part of sc half with yarn A and half with yarn B for beautiful color transition
Row 23 :
Crochet around perimeter counter-clockwise from start point: 22sc up, 10sc straight, 22sc down, 4sc straight (58l)
Info :
Cut yarn A, continue with yarn B only
Round 24 :
4sc, dec, 10sc, dec, 18sc, dec, 10sc, dec, 8sc (54l)
Round 28 :
[7sc, dec]x6 (48l)
Round 29 :
[6sc, dec]x6 (42l)
Round 30 :
[5sc, dec]x6 (36l)
Round 31 :
[sc, dec]x12 (24l)
— MUZZLE :
Round 1 :
5 loops, turning, 4sc starting from 2nd loop from hook, 4sc from back of chain (8l)
Round 2 :
[sc, inc]x4 (12l)
Round 3 :
12sc, sl st in 1st sc (12l)
Info :
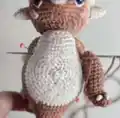
Cut and fix thread leaving long end for sewing. Sew muzzle to head as shown in photo
Infos :
Insert safety eyes between rounds 26-27, approximately 12 stitches apart. Do not fix yet. Using black thread mouline, embroider loose stitch above eye, then fasten in middle. Add second loose stitch 1mm higher for oval shape. Using white thread mouline, embroider loose stitch below eye. Press eye to embroidered line and fasten. Embroider nostrils and mouth with black thread. Cut 2 pieces black thread 0.5cm long, attach to forehead symmetrically and embroider eyebrows
— CHEEKS (Make 2) :
Pink thread mouline, hook 1.5mm
Crocheting cheeks
Round 1 :
2 loops, 6sc in 2nd loop from hook (magic ring), sl st in 1st sc (6l)
Info :
Cut and fix thread leaving long end. Sew cheeks to head with wrong side outward. Start stuffing head with fiberfill
Info :
Completely fill head. Insert cotter pin into shim. Place cotter pin between rounds 31-32 of head
Info :
Trim thread. Pass thread through all loops with yarn needle. Tighten and secure
— SPIKES :
Yarn C, hook 1.5mm
Split yarn C in half
Small Spikes (Make 2) :
Round 1: 2 loops, 4sc in 2nd loop (4l)
Round 4 :
[3sc, inc]x2 (10l)
Round 6 :
[4sc, inc]x2 (12l)
Info :
Cut and fix thread leaving long end. Slightly stuff spikes with fiberfill and sew to head
Big Spikes (Make 2) :
Round 1: 2 loops, 3sc in 2nd loop (3l)
Round 2 :
sc, inc, sc (4l)
Round 3 :
[sc, inc]x2 (6l)
Round 5 :
[2sc, inc]x4 (16l)
Round 7 :
[7sc, inc]x2 (18l)
Info :
Cut and fix thread leaving long end. Slightly stuff spikes and sew to head
— TAIL :
Yarn A
Tail club crocheted in two identical details
First Detail - Round 1 :
2 loops, 6sc in 2nd loop from hook (6l)
Round 2 :
[sc, inc]x3 (9l)
Info :
Cut and fix thread. Crochet second detail same way, do not cut thread
Round 6 (incomplete) :
Connect details by inserting hook into first detail (inside to outside), then into second detail (outside to inside). Crochet 3sc of first detail together with 3sc of second detail, then 6sc along second detail
Round 7 :
Crochet 6sc on first part, 6sc on second part (12l)
Round 6 :
[4sc, dec]x2 (10l)
Info :
Slightly stuff tail with fiberfill
Round 7 :
[3sc, dec]x2 (8l)
Round 8 :
[2sc, dec]x2 (6l)
Round 11 :
sc, [inc]x2, 3sc (8l)
Round 13 :
2sc, [inc]x2, 4sc (10l)
Round 15 :
3sc, [inc]x2, 5sc (12l)
Round 16 :
5sc, [inc]x2, 5sc (14l)
Round 17 :
7sc, [inc]x2, 5sc (16l)
Round 18 :
8sc, [inc]x2, 6sc (18l)
Infos :
Optional: Cut wire approximately 12cm. Twist one end into loop, other end into ring equal to tail opening using pliers. Wrap twisting place with electrical tape. Insert crocheted tail onto wire. Crochet and fix wire at three points to tail every 6th sc in next round. If not using wire, stuff tail with fiberfill
Info :
Cut and fix thread. Mark with pin where tail connects to back - move pin to 12th loop right from beginning of round
— BODY - BACK :
Yarn A
Starting back section
Row 1 :
14 loops, turning, 13sc starting from 2nd loop from hook (13l)
Row 2 :
1 loop, turning, 13sc (13l)
Row 3 :
1 loop, turning, inc, 11sc, inc (15l)
Row 4 :
1 loop, turning, 15sc only through front loops (15l)
Row 5 :
1 loop, turning, inc, 13sc, inc (17l)
Row 6 :
1 loop, turning, 17sc (17l)
Row 7 :
1 loop, turning, inc, 15sc, inc (19l)
Row 8 :
1 loop, turning, 19sc only through front loops (19l)
Row 9-11 :
1 loop, turning, 19sc (19l)
Row 12 :
1 loop, turning, 19sc only through front loops (19l)
Row 13 :
1 loop, turning, 19sc (19l)
Row 14 :
1 loop, turning, dec, 15sc, dec (17l)
Row 15 :
1 loop, turning, 17sc (17l)
Row 16 :
1 loop, turning, 17sc only through front loops (17l)
Row 17 :
1 loop, turning, dec, 13sc, dec (15l)
Row 18 :
1 loop, turning, dec, 11sc, dec (13l)
Row 19 :
1 loop, turning, dec, 9sc, dec (11l)
Row 20 :
1 loop, turning, dec, 7sc, dec only through front loops (9l)
Row 21 :
1 loop, turning, dec, 5sc, dec (7l)
Row 22 :
1 loop, turning, dec, 3sc, dec (5l)
Info :
Connect back with tail. Insert hook into tail (inside to outside), then into back (outside to inside)
Row 23 :
1 loop, turning, crochet 5sc of back together with 5sc of tail
Info :
Change to yarn B. Crochet part of sc half with yarn A and half with yarn B for beautiful color transition
Round 24 :
Crochet around perimeter counter-clockwise from start: 22sc, 13sc, 22sc on back; 13sc on tail (70l)
Info :
Sew holes between tail and back using extra thread. Cut yarn A, continue with yarn B only
Round 28 :
[5sc, dec]x10 (60l)
Round 29 :
[8sc, dec]x6 (54l)
— NECK :
Yarn C
Starting neck section
Row 1 :
5 loops, turning, 4sc starting from 2nd loop from hook (4l)
Row 2 :
1 loop, turning, inc, 2sc, inc (6l)
Row 3 :
1 loop, turning, inc, 4sc, inc (8l)
Row 4 :
1 loop, turning, inc, 6sc, inc (10l)
Round 10 :
Crochet around perimeter counter-clockwise from start: 8sc down, 4sc straight, 8sc up, 10sc straight (30l)
Info :
Mark where neck connects to body - move pin 1 loop right from beginning of round. Cut and fix thread. Change to yarn C
Info :
Connect body with neck. Insert hook into neck (inside to outside), then into body (outside to inside)
Round 30 :
Crochet 9sc, dec, 7sc along body; crochet 10sc of body together with 10sc of neck; then 2sc, dec, [9sc, dec]x2 along body (60l)
Info :
Insert cotter pin between rows 6-7 of neck in middle. Put disk on cotter pin and wrap ends in rings with pliers
Round 34 :
[3sc, dec]x12 (48l)
Round 35 :
[2sc, dec]x12 (36l)
Info :
Start stuffing body with fiberfill
Round 36 :
[sc, dec]x12 (24l)
Round 37 :
[2sc, dec]x6 (18l)
Round 38 :
[sc, dec]x6 (12l)
Infos :
Completely fill body. Important: Neck should be stuffed very tightly so dinosaur holds head well. Tip: Cut circle of white felt slightly larger than hole. Insert into hole so fiberfill doesn't cling to hook during closing
Info :
Trim thread. Pass thread through all loops with yarn needle. Tighten and secure. Sew holes between neck and body using extra thread
— PLATES :
Yarn C, hook 1.5mm
Split yarn C in half
Small Plates (Make 8) :
Round 1: 2 loops, 4sc in 2nd loop (4l)
Round 2 :
[sc, inc]x2 (6l)
Info :
Cut and fix thread leaving long end for sewing
Middle Plates (Make 10) :
Round 1: 2 loops, 6sc in 2nd loop (6l)
Round 2 :
[2sc, inc]x2 (8l)
Round 4 :
[3sc, inc]x2 (10l)
Info :
Cut and fix thread leaving long end for sewing
Big Plates (Make 4) :
Round 1: 2 loops, 6sc in 2nd loop (6l)
Round 2 :
[sc, inc]x3 (9l)
Round 3 :
[2sc, inc]x3 (12l)
Info :
Slightly stuff plates with fiberfill. Cut and fix thread leaving long end. Sew plates to back, placing them on lines of remaining back loops in checkerboard pattern
— LEGS :
Front Legs (Make 2) - Yarn B
Starting front leg
Round 1 :
5 loops, turning, 4sc starting from 2nd loop from hook, 4sc from back of chain (8l)
Round 2 :
3sc in next loop, 6sc, 3sc in next loop (12l)
Round 3 :
Only through back loops 12sc (12l)
Round 4-5 :
[inc]x2, 3sc, sc3tog, 4sc (12l)
Round 6 :
[dec]x2, 3sc, [inc]x2, 3sc (12l)
Info :
Start stuffing leg with fiberfill
Round 8 :
[dec]x2, 3sc, [inc]x2, 3sc (12l)
Round 15 :
[sc, dec]x4 (8l)
Info :
Completely fill leg
Round 16 :
[2sc, dec]x2 (6l)
Info :
Trim thread. Pass through all loops with yarn needle. Tighten and secure
Back Legs (Make 2) - Yarn B
Starting back leg
Round 1 :
5 loops, turning, 4sc starting from 2nd loop from hook, 4sc from back of chain (8l)
Round 2 :
3sc in next loop, 6sc, 3sc in next loop (12l)
Round 3 :
Only through back loops 12sc (12l)
Round 4-5 :
[inc]x2, 3sc, sc3tog, 4sc (12l)
Round 6 :
[dec]x2, 3sc, [inc]x2, 3sc (12l)
Info :
Start stuffing leg with fiberfill
Round 8 :
[dec]x2, 3sc, [inc]x2, 3sc (12l)
Round 13 :
[sc, dec]x4 (8l)
Info :
Completely fill leg
Round 14 :
[2sc, dec]x2 (6l)
Info :
Trim thread. Pass through all loops with yarn needle. Tighten and secure
Toes (Make 3 on each leg) :
Yarn C in two folds - Embroider 3 toes on each leg with French knot
— BONUS - POPCORN BUCKET :
Bucket - Yarn C
Starting bucket
Round 1 :
2 loops, 10sc in 2nd loop from hook (10l)
Round 3 :
[4sc, inc]x4 (24l)
Round 4 :
24sc only through back loops (24l)
Round 5 :
[5sc, inc]x4 (28l)
Round 6 :
[6sc, inc]x4 (32l)
Round 7 :
[7sc, inc]x4 (36l)
Round 9 :
[8sc, inc]x4 (40l)
Round 11 :
[9sc, inc]x4 (44l)
Round 13 :
[10sc, inc]x4 (48l)
Round 14 :
48sc only through back loops (48l)
Infos :
Embroider red stripes using red yarn in 2 folds. Insert needle into each loop from bottom and through one from top. Embroider white stripes between red ones using Yarn C in 2 folds. Cut circle from white cardboard with diameter equal to bucket height plus bottom, make cuts from 2 sides. Push through bottom line using needle back and coin. Fold cardboard and place inside bucket
Bucket Top - Yarn C
Starting top section
Round 1 :
2 loops, 6sc in 2nd loop from hook (6l)
Infos :
Cut and fix thread leaving very long end for sewing. Sew top to bucket. While sewing, slightly stuff bucket with fiberfill. Put together strand of yarn C and yellow yarn and embroider popcorn with French knots on surface. Circle coin with pencil on white felt. Embroider word POPCORN with black thread inside circle. Cut out circle and glue to bucket with superglue
This charming Ankylosaurus Bruno pattern brings prehistoric wonder to life with incredible attention to detail and advanced construction techniques. From his embroidered facial expressions to his articulated plated back and optional poseable tail, every element has been thoughtfully designed to create a character bursting with personality. The bonus popcorn bucket accessory adds a delightful storytelling element that makes Bruno even more special. While this pattern challenges your skills with cotter pins, thread-bracing, and intricate assembly, the reward is an heirloom-quality amigurumi that will be treasured for years to come. 🦕✨