๐Ÿงถ Beautiful โœจ Detailed ๐Ÿ’ Adorable

Adorable Winter Waxwing Amigurumi Pattern

Adorable Winter Waxwing Amigurumi Pattern
4.3โ˜… Rating
6-8 Hours Time Needed
3.7K Made This
โœ‚๏ธ

Intermediate Level

Ideal for those with basic knitting experience, featuring slightly more advanced stitches and techniques to expand your skills.

โฑ๏ธ

Weekend Treat

Takes 5-7 hours, making it an enjoyable project to finish over a couple of days.

๐Ÿงธ

Cute Companion

An adorable friend to cherish, handcrafted with love to bring comfort and joy for years to come.

About This Adorable Winter Waxwing Amigurumi Pattern

This delightful waxwing pattern brings one of winter's most charming birds to life in soft yarn. Named for the waxy red tips on their feathers, waxwings are known for their love of fruit and their polite eating habits. This pattern captures their distinctive coral crest, beige body, and colorful wing markings with carefully planned color changes and spike stitches that add beautiful texture. The finished bird stands proudly with its cute scarf and hat, ready to brighten your winter decor.

Adorable Winter Waxwing Amigurumi Pattern crochet pattern - detailed view of completed project

Working from the top down, you'll create the head and body as one piece, then add separately crocheted wings, tail, legs, and crest. The pattern includes helpful tips for color changes and embroidery details to make your waxwing truly special.

Why You'll Love This Adorable Winter Waxwing Amigurumi Pattern

I absolutely love this pattern because it combines interesting color work with charming details that make each bird unique. The spike stitch technique creates wonderful texture on the body and wings, while the small touches like the embroidered cheeks and decorative wing stitches let you add your personal creative flair. Watching this sweet bird come together round by round is pure joy, and the final result with its jaunty hat and cozy scarf never fails to make me smile.

Adorable Winter Waxwing Amigurumi Pattern step 1 - construction progress Adorable Winter Waxwing Amigurumi Pattern step 2 - assembly progress Adorable Winter Waxwing Amigurumi Pattern step 3 - details and accessories Adorable Winter Waxwing Amigurumi Pattern step 4 - final assembly and finishing

Switch Things Up

I love experimenting with different color combinations to create unique waxwings that reflect my personal style. While the pattern calls for coral and beige, I've made versions in soft pastels for spring, vibrant jewel tones for a bold look, and even monochromatic color schemes that look incredibly sophisticated. The spike stitch technique works beautifully with variegated yarns too, creating unexpected and delightful color transitions that make each bird one-of-a-kind.

For the accessories, I often switch up the scarf and hat colors to match seasonal themes or color palettes. A red and green combo makes perfect Christmas ornaments, while purple and gold creates regal-looking birds. I've even made tiny versions using embroidery floss and a steel hook for miniature ornaments that are absolutely precious.

Don't be afraid to add your own embellishments either - I've used tiny buttons for eyes on some birds, added sequins to wings for sparkle, and even created little felt accessories like tiny scarves with fringe or hats with different textures. The pattern is wonderfully adaptable and encourages creativity, so let your imagination soar and make these birds truly your own.

Common Mistakes & How to Fix Them

โœ— Forgetting to add spike stitches in the designated rounds which creates the textured color transitions essential to the waxwing's distinctive appearance โœ— Not stuffing the head firmly enough before decreasing which can result in a saggy or misshapen bird lacking proper structure and form โœ— Placing safety eyes too early before sewing the beak which makes it difficult to achieve proper facial proportion and symmetry โœ— Skipping the embroidery details on wings and belly which are crucial for capturing the waxwing's characteristic markings and authentic bird appearance

Adorable Winter Waxwing Amigurumi Pattern

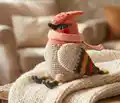
Create a charming winter waxwing bird with this delightful crochet pattern. This festive design features beautiful color work combining coral, beige, cream, dark gray, mustard yellow, and red yarns to capture the distinctive markings of these lovely birds. Perfect for seasonal decorations or as a heartfelt handmade gift, this pattern includes detailed instructions for creating an adorable bird complete with a cozy scarf, cheerful hat with pompom, and intricate wing details.

Intermediate 6-8 Hours

Materials Needed for Adorable Winter Waxwing Amigurumi Pattern

โ€” Main Fabric

  • 01
    Coral yarn for head and crest
  • 02
    Beige yarn for body
  • 03
    Cream yarn for wings
  • 04
    Dark Gray yarn for face mask and legs
  • 05
    Mustard Yellow yarn for body sections and legs
  • 06
    Red yarn for wing accents and cheeks
  • 07
    Peach yarn for scarf
  • 08
    Black yarn for beak
  • 09
    Scraps of yarn or embroidery floss in various colors for decorative details

โ€” Tools Required

  • 01
    Crochet hooks suitable for your chosen yarn weight
  • 02
    Toy stuffing
  • 03
    Safety eyes (4mm x 3mm plastic eyes recommended) or black yarn for embroidered eyes
  • 04
    Tapestry needle for sewing and embroidery
  • 05
    Pins for positioning parts before sewing
  • 06
    Stitch markers
  • 07
    Scissors
  • 08
    Hot glue gun (optional, for attaching small details like cheeks and eyes)

Progress Tracker

0% Complete

โ€” Head and Body :

Info :

This part is crocheted from the top down. Start in Coral.
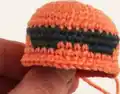
Round 1 :

6 sc in a MR (6)

Round 2 :

inc x 6 (12)

Round 3 :

[sc, inc] x 6 (18)

Round 4 :

[sc, inc, sc] x 6 (24)

Round 5 :

[3 sc, inc] x 6 (30)

Round 6 :

[2 sc, inc, 2 sc] x 6 (36)

Round 7-8 :

sc in each st around (36)

Infos :

Rounds 9-11 are crocheted in Coral and Dark Gray to create the face mask; the color that's currently in use is indicated in curly brackets.

Round 9 :

{coral} 9 sc, {dark gray} 18 sc, {coral} 9 sc (36)

Round 10 :

{coral} 11 sc, {dark gray} 14 sc, {coral} 11 sc (36)

Round 11 :

{coral} 12 sc, {dark gray} 4 sc, {coral} 4 sc, {dark gray} 4 sc, {coral} 12 sc (36)

Info :

Cut the Dark Gray yarn, continue in Coral.

Round 12 :

sc in each st around (36)

Round 13 :

[5 sc, inc] x 6 (42)

Round 14-16 :

sc in each st around (42)

Info :

If you're a safety eyes user, you may want to insert them between Rnds 11 and 12, approx. 8-10 sts apart from each other, but we really recommend to do it after sewing the beak to the head.

Round 17 :

8 sc, [3 sc, inc] x 6, 10 sc (48)

Round 18-21 :

sc in each st around (48)

Info :

Change to Beige, cut the Coral yarn.

Round 22 :

[sc, spike st] x 24 (48)

Round 23 :

[sc, inc] x 6, 24 sc, [sc, inc] x 6 (60)

Round 24-27 :

sc in each st around (60)

Info :

Stuff the head and keep gradually stuffing your work as you go.

Round 28 :

[9 sc, inc] x 6 (66)

Round 29-38 :

sc in each st around (66)

Round 39 :

[9 sc, dec] x 6 (60)

Round 40 :

[4 sc, dec, 4 sc] x 6 (54)

Round 41 :

[7 sc, dec] x 6 (48)

Round 42 :

[3 sc, dec, 3 sc] x 6 (42)

Round 43 :

[5 sc, dec] x 6 (36)

Round 44 :

[2 sc, dec, 2 sc] x 6 (30)

Round 45 :

[3 sc, dec] x 6 (24)

Round 46 :

[sc, dec, sc] x 6 (18)

Round 47 :

dec x 9 (9)

Info :

Check if the body is stuffed very firmly; it should be as stiff as a tennis ball. Add more stuffing using a bamboo skewer, if needed.

Info :

Finish off and cut the yarn leaving a 10 cm tail, thread a tapestry needle and pass it through each of the 9 front loops of the last round; pull tight to close the hole and weave in the end.

โ€” Wings (make 2) :

Info :

Start in Cream. Do not stuff.

Round 1 :

6 sc in a MR (6)

Round 2 :

inc x 6 (12)

Round 3 :

[sc, inc] x 6 (18)

Round 4 :

[sc, inc, sc] x 6 (24)

Round 5 :

[7 sc, inc] x 3 (27)

Round 6 :

[4 sc, inc, 4 sc] x 3 (30)

Round 7-11 :

sc in each st around (30)

Info :

Change to Beige, cut the Cream yarn.

Round 12 :

[sc, spike st] x 15 (30)

Round 13-15 :

sc in each st around (30)

Info :

Change to Dark Gray, cut the Beige yarn.

Round 16 :

[sc, spike st] x 15 (30)

Round 17 :

[4 sc, dec, 4 sc] x 3 (27)

Round 18 :

sc in each st around (27)

Info :

Change to Mustard Yellow, but don't cut Dark Gray, leave it hanging in the inside of your work.

Round 19 :

sc in each st around (27)

Round 20 :

[7 sc, dec] x 3 (24)

Round 21 :

sc in each st around (24)

Info :

Change back to Dark Gray, cut Mustard Yellow yarn.

Round 22 :

sc in each st around (24)

Round 23 :

[3 sc, dec, 3 sc] x 3 (21)

Round 24 :

sc in each st around (21)

Info :

Change to Red, but don't cut Dark Gray; again, leave it hanging in the inside of your work.

Round 25 :

sc in each st around (21)

Round 26 :

[5 sc, dec] x 3 (18)

Round 27 :

sc in each st around (18)

Info :

Change back to Dark Gray, cut Red yarn.

Round 28 :

sc in each st around (18)

Round 29 :

[2 sc, dec, 2 sc] x 3 (15)

Round 30 :

sc in each st around (15)

Round 31 :

dec x 2, 9 sc, dec (12)

Round 32 :

dec, 8 sc, dec (10)

Round 33 :

dec, 8 sc (9)

Round 34 :

dec, 7 sc (8)

Round 35 :

dec, 4 sc, dec (6)

Info :

Finish off and cut the yarn leaving a tail about 10 cm long. Using a tapestry needle, pass it through the front loop of each stitch of the last round and pull tight to close the hole. Weave in the end.

โ€” Tail :

Info :

Start in Mustard Yellow. Do not stuff.

Info :

Ch 12, start crocheting from the 2nd ch from hook.

Round 1 :

10 sc, 3 sc in the bottom ch; don't turn your work, crochet along the opposite side of the foundation chain: 9 sc, inc in the last st (24)

Round 2-4 :

sc in each st around (24)

Info :

Change to Dark Gray, cut Mustard Yellow yarn.

Round 5 :

[sc, spike st] x 12 (24)

Round 6 :

[3 sc, dec, 3 sc] x 3 (21)

Round 7-9 :

sc in each st around (21)

Info :

Change to Beige, cut Dark Gray yarn.

Round 10 :

sc in each st around (21)

Round 11 :

[5 sc, dec] x 3 (18)

Round 12-17 :

sc in each st around (18)

Info :

Make a sl st and finish off leaving a long tail for sewing.

โ€” Legs (make 2) :

Info :

These legs are made the same way as the Kingfisher's, but they're a little bit smaller. Start in Dark Gray.

Info :

Ch 4, start from the 2nd ch from hook.

Round 1 :

2 sc, 3 sc in the bottom ch; don't turn your work, crochet along the opposite side of the foundation chain: sc, inc in the last st (8)

Round 2 :

inc, sc, inc x 3, sc, inc x 2 (14)

Round 3 :

Working in BLO, sc in each st around (14)

Round 4 :

4 sc, dec x 3, 4 sc (11)

Round 5 :

4 sc, dec x 2, 3 sc (9)

Round 6-8 :

sc in each st around (9)

Info :

Change to Mustard Yellow, but don't cut the Dark Gray yarn, leave it hanging on the outside as you're going to need it later.

Info :

Stuff the lower part of the leg (the boot).

Round 9 :

BLO [dec, sc] x 3 (6)

Round 10-12 :

sc in each st around (6)

Info :

Change to Beige, cut the Mustard Yellow yarn.

Round 13 :

FLO inc x 6 (12)

Round 14 :

[inc, sc] x 6 (18)

Round 15 :

sc in each st around (18)

Info :

Make a sl st and finish off leaving a tail for sewing.

Info :

Go back to Rnd 8 and crochet a sl st in each unworked front loop of the round. Finish off, cut the yarn and hide the tail inside the leg.

โ€” Crest :

Info :

In Coral. Do not stuff.

Round 1 :

6 sc in a MR (6)

Round 2 :

inc x 6 (12)

Round 3 :

[sc, inc] x 6 (18)

Round 4 :

[5 sc, inc] x 3 (21)

Round 5-11 :

sc in each st around (21)

Round 12 :

[5 sc, dec] x 3 (18)

Round 13-14 :

sc in each st around (18)

Round 15 :

[2 sc, dec, 2 sc] x 3 (15)

Round 16-17 :

sc in each st around (15)

Round 18 :

[3 sc, dec] x 3 (12)

Round 19-20 :

sc in each st around (12)

Round 21 :

[sc, dec, sc] x 3 (9)

Round 22-23 :

sc in each st around (9)

Round 24 :

[dec, sc] x 3 (6)

Info :

Finish off and cut the yarn leaving a tail about 10 cm long. Using a tapestry needle, pass it through the front loop of each stitch of the last round and pull tight to close the hole. Weave in the end.

Info :

Flatten the crest and, using a scrap of red yarn, embroider a few random stitches on its front (top) part.

โ€” Beak :

Info :

In Black. Stuff, if needed. We didn't as it was very small.

Round 1 :

4 sc in a MR (4)

Round 2 :

inc, 3 sc (5)

Round 3 :

inc, 4 sc (6)

Round 4 :

inc, 5 sc (7)

Round 5 :

inc, 6 sc (8)

Round 6 :

inc, 7 sc (9)

Info :

Make a sl st and finish off leaving a tail for sewing.

โ€” Cheeks (make 2) :

Info :

In Red.

Round 1 :

8 hdc in a MR; pull the ring tight (8)

Info :

Finish off, cut the yarn leaving a tail for sewing.

โ€” Scarf :

Info :

In Peach.

Info :

Crochet in turning rows, make ch 1 and turn at the end of each row. Crochet loosely to make your work easier.

Info :

Ch 91 (adjust the length to your liking); start from the 2nd ch from hook.

Row 1-6 :

90 sl st, ch 1, turn (90)

Assembly Instructions

  • Sew the beak to the center of the face mask (the coral section) between rounds 9 and 11.
  • Attach, sew or embroider the eyes between Rounds 11 and 12 of the head, on either side of the beak, 3-4 sts apart from it. Use 4x3 mm plastic eyes with hot glue, or embroider with black yarn.
  • To make the eyes more prominent, embroider a straight stitch on one side of each eye using a scrap of Cream yarn.
  • Sew the cheeks on either side of the face. You can use a glue gun instead of a needle as these parts are flat and very small.
  • Sew the tail to the back of the body, centered, approximately between rounds 36 and 38. It's a good idea to try it on with the wings first.
  • Sew the legs to the bottom of the belly, approximately between rounds 36 and 41 of the body, about 6 sts apart from each other. Make sure the toes of the boots are pointing upwards. If you think the thighs (the beige parts of the legs) need stuffing, don't hesitate adding it.
  • Sew the wings to the sides of the body at approximately 45ยฐ angle. Play around with them first, finding the option you like best.
  • Using scraps of Cream yarn, embroider some vertical stitches on the bird's belly to make it look shabby.
  • Tie the scarf on the bird's neck.

Important Notes

  • ๐Ÿ’กUse stitch markers to keep track of your rounds, especially during color changes and spike stitch sections
  • ๐Ÿ’กStuff the body very firmly so it feels as stiff as a tennis ball for proper structure
  • ๐Ÿ’กCrochet tightly throughout to prevent stuffing from showing through the stitches
  • ๐Ÿ’กPin all parts in place before sewing to ensure correct positioning and symmetry
  • ๐Ÿ’กWhen working spike stitches, insert your hook into the corresponding stitch one round below the current round
  • ๐Ÿ’กDon't cut yarns during color changes if instructed to leave them hanging - this makes it easier to switch back
  • ๐Ÿ’กAdd stuffing in small portions and distribute it evenly for the best shape

This charming waxwing pattern brings winter magic to life with beautiful color transitions and delightful details. Named for their distinctive waxy red wing tips, waxwings are polite little birds known for their love of berries and their gentle nature. The pattern combines interesting techniques like spike stitches for texture with creative embroidery details that let you personalize your bird. Complete with a cozy scarf and pompom-topped hat, this sweet companion is perfect for seasonal decor or as a heartfelt handmade gift. ๐Ÿงถ Happy crocheting! ๐Ÿงตโœจ

You ask,

we answer.

FAQs

What is a spike stitch and how do I work it?

A spike stitch is a single crochet worked into the stitch one round below the current round instead of into the current round. Simply insert your hook into the corresponding stitch in the previous round, yarn over, pull up a loop (it will be taller than usual), then complete the single crochet as normal. This creates beautiful texture and color transitions.

Can I make this bird smaller or larger?

Yes! Simply use a smaller or larger hook with thinner or thicker yarn. The pattern notes that when made with thinner yarn like ALIZE Bella, these birds make great Christmas ornaments. Just adjust your hook size accordingly and be consistent with your yarn weight throughout the project.

Do I need to use safety eyes or can I embroider them?

You can use either! The pattern recommends 4x3 mm plastic safety eyes attached with hot glue, but you can absolutely embroider the eyes with black yarn if you prefer. If making this for young children, embroidered eyes are the safer choice.

What if I don't have all the exact colors mentioned?

Feel free to substitute colors! The pattern recommends staying within the same brand of yarn to maintain similar characteristics and proportions, but you can use any colors you like. Be creative and make your waxwing unique with your own color choices.

How do I get the wings to stay at the right angle?

The pattern suggests pinning the wings in place at approximately 45ยฐ angle before sewing to find the position you like best. You can experiment with different angles - some crafters prefer wings pointing downward while others like them more horizontal. Pin them first, step back to look, and adjust until you're happy with the result.

Can I skip the decorative embroidery on the wings?

While you can skip it, the embroidery adds wonderful character and captures the waxwing's distinctive markings. The pattern encourages using French knots and other stitches in various colors, or even beads and sequins. These details make each bird unique and special, so it's worth taking the time to add some decoration.