๐Ÿงถ Beautiful โœจ Detailed ๐Ÿ’ Adorable

Adorable Kitten Amigurumi Pattern

Adorable Kitten Amigurumi Pattern
4.4โ˜… Rating
3-4 Hours Time Needed
2.3K Made This
โœ‚๏ธ

Beginner Friendly Level

Perfect for those just starting their sewing journey, with clear instructions and simple techniques

โฑ๏ธ

Weekend Treat

Takes 5-7 hours, making it an enjoyable project to finish over a couple of days.

๐Ÿงธ

Cute Companion

An adorable friend to cherish, handcrafted with love to bring comfort and joy for years to come.

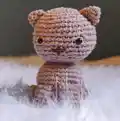
About This Adorable Kitten Amigurumi Pattern

This charming kitten pattern is designed for crochet lovers who want to create something truly special. Working in continuous rounds, you'll craft each piece separately - from the sweet rounded head to the tiny paws - before assembling them into one lovable cat. The pattern includes detailed instructions for embroidering the face, giving your kitty its unique personality and expression.

Adorable Kitten Amigurumi Pattern crochet pattern - detailed view of completed project

The embroidery technique used for the nose and mouth adds a professional finishing touch that brings your creation to life. With stuffing strategically placed during assembly, your kitten will have the perfect cuddly shape.

Why You'll Love This Adorable Kitten Amigurumi Pattern

I absolutely love this pattern because it captures the essence of feline cuteness in such a compact, huggable form! The embroidered facial details allow you to give each cat its own personality - you can make them sweet, sassy, or sleepy-eyed. I especially enjoy how the pattern teaches you the traditional way of creating amigurumi noses, which is a skill you'll use in countless future projects. The separate construction of each piece means you can work on it in small sessions, making it perfect for busy crafters. Plus, there's something incredibly satisfying about seeing those little ears and paws come together into an adorable kitten!

Adorable Kitten Amigurumi Pattern step 1 - construction progress Adorable Kitten Amigurumi Pattern step 2 - assembly progress Adorable Kitten Amigurumi Pattern step 3 - details and accessories Adorable Kitten Amigurumi Pattern step 4 - final assembly and finishing

Switch Things Up

I love experimenting with this versatile kitten pattern to create unique variations! You can easily transform this basic cat into different breeds by adjusting colors and adding details. Try making a Siamese cat with cream body and dark brown ears, paws, and tail, or create an orange tabby by using variegated yarn.

For a playful twist, I sometimes add small accessories like a tiny bow between the ears using ribbon or crocheted flowers. You can also modify the tail length by adding or reducing rounds to create anything from a stubby Manx-style tail to a long, elegant tail.

I've found that changing the eye placement dramatically affects the expression - placing them slightly lower creates a sweet, innocent look, while higher placement gives a more alert, curious expression. Experiment with embroidering different mouth shapes too - a simple curved line creates a gentle smile, while a tiny 'w' shape gives that classic cat mouth.

Another fun variation is to make the ears larger by adding extra rounds, creating a cute cartoon-style kitten. You can even make a whole family of cats in graduating sizes by using different yarn weights - from tiny keychain kitties with embroidery floss to large huggable cats with chunky yarn!

Common Mistakes & How to Fix Them

โœ— Forgetting to place safety eyes before closing the head - always insert them between rounds 8-14 as indicated before decreasing โœ— Over-stuffing the body and head which can distort the shape - fill firmly but gently for the best rounded appearance โœ— Not leaving enough yarn tail when finishing pieces - you need sufficient length to sew parts together securely and invisibly โœ— Rushing the facial embroidery without planning placement first - mark where features go with pins before starting to embroider for symmetry

Adorable Kitten Amigurumi Pattern

Create your own sweet little kitten companion with this charming amigurumi pattern! This delightful cat design features a rounded head with embroidered facial details, cute triangular ears, a soft stuffed body, and four adorable paws plus a curly tail. Perfect for cat lovers and crochet enthusiasts, this pattern guides you through creating an endearing feline friend that's ideal for gifting or adding to your handmade collection. The finished kitty is small enough to be portable yet detailed enough to showcase your crafting skills.

Beginner Friendly 3-4 Hours

Materials Needed for Adorable Kitten Amigurumi Pattern

โ€” Main Fabric

  • 01
    80 grams of cotton yarn or 3-ply cotton yarn in colors of your choice

โ€” Tools Required

  • 01
    Yarn needle (tapestry needle)
  • 02
    Safety eyes size 6
  • 03
    Crochet hook (size appropriate for chosen yarn weight)
  • 04
    Scissors
  • 05
    Stuffing/fiberfill
  • 06
    Pins for marking placement

Progress Tracker

0% Complete

โ€” Head :

Round 1 :

6 sc in magic ring (6)

Round 2 :

6 inc (12)

Round 3 :

(1 sc, inc) x 6 (18)

Round 4 :

(2 sc, inc) x 6 (24)

Round 5 :

(3 sc, inc) x 6 (30)

Round 6 :

(4 sc, inc) x 6 (36)

Round 7 :

(5 sc, inc) x 6 (42)

Rounds 8-14 :

sc in each st (42)

Round 15 :

(5 sc, dec) x 6 (36)

Round 16 :

(4 sc, dec) x 6 (30)

Info :

Place eyes, embroider details and stuff before continuing

Round 17 :

(3 sc, dec) x 6 (24)

Round 18 :

(2 sc, dec) x 6 (18)

Round 19 :

(1 sc, dec) x 6 (12)

Round 20 :

6 dec (6)

Info :

Finish with slip stitch and cut yarn leaving sufficient length. Thread through yarn needle and pass through all 6 sc. Pull tight and tie knot to close

โ€” Ears (make 2) :

Round 1 :

6 sc in magic ring (6)

Round 2 :

sc in each st (6)

Round 3 :

6 inc (12)

Round 4 :

sc in each st (12)

Info :

Finish with slip stitch and cut yarn leaving sufficient length to use this same yarn to sew ear to head

โ€” Body :

Round 1 :

6 sc in magic ring (6)

Round 2 :

6 inc (12)

Round 3 :

(1 sc, inc) x 6 (18)

Round 4 :

(2 sc, inc) x 6 (24)

Round 5 :

(3 sc, inc) x 6 (30)

Round 6 :

(4 sc, inc) x 6 (36)

Rounds 7-12 :

sc in each st (36)

Round 13 :

(4 sc, dec) x 6 (30)

Round 14 :

(3 sc, dec) x 6 (24)

Info :

Stuff body before continuing

Info :

Finish with slip stitch and cut yarn leaving sufficient length to sew body to head

โ€” Face Embroidery :

Nose and Eye Detail :

1. Calculate where nose will be placed. 2. Insert needle at a point slightly away from where nose will go. 3. Bring needle out at one of the marked points. 4. Insert needle at second point and bring out at first point. 5. Begin wrapping this thread as many times as desired. 6. Pass needle to center of nose and embroider a vertical line, then pass needle to where you first inserted it. Make a knot with both threads and hide inside the fabric

Mouth :

Embroider from one of the top extremes toward the middle, then from the middle toward the bottom extreme (or vice versa)

โ€” Front Paws (make 2) :

Round 1 :

5 sc in magic ring (5)

Round 2 :

5 inc (10)

Rounds 3-8 :

sc in each st (10)

Info :

Finish with slip stitch and cut yarn leaving sufficient length to use this same yarn to sew paws to body

โ€” Back Paws (make 2) :

Round 1 :

5 sc in magic ring (5)

Round 2 :

5 inc (10)

Rounds 3-4 :

sc in each st (10)

Info :

Finish with slip stitch and cut yarn leaving sufficient length to use this same yarn to sew paws to body

โ€” Tail :

Instructions :

Make 12 chains. Skip the last and second-to-last chain made and work sc starting from the next chain. In this chain make 3 sc, move to next chain and make 3 sc. Then make 6 sc in a row (one in each chain) leaving the last 2 chains free. In each of these make 3 sc again

Info :

Finish with slip stitch and cut yarn. Use this same yarn to sew tail to body

Assembly Instructions

  • Sew the ears to the top sides of the head, positioning them symmetrically between rounds 7-10 for a natural look
  • Attach the stuffed head securely to the body using the yarn tail left from the body, ensuring a firm connection
  • Position and sew the front paws to the upper sides of the body around rounds 5-7 of the body
  • Attach the back paws to the lower portion of the body, angling them slightly outward for stability
  • Sew the curly tail to the back center of the body at the desired height
  • Weave in all remaining yarn ends invisibly through the stuffing and trim excess

Important Notes

  • ๐Ÿ’กPlace safety eyes before decreasing rounds on the head - it's nearly impossible to insert them once the opening gets too small
  • ๐Ÿ’กDon't rush the embroidery process - take time to plan the facial features for a symmetrical, appealing expression
  • ๐Ÿ’กLeave adequate yarn tails when finishing each piece - at least 12 inches ensures comfortable sewing without running short
  • ๐Ÿ’กStuff each piece gradually as you decrease to achieve even, smooth shaping without lumps
  • ๐Ÿ’กPin all pieces in position before sewing to ensure proper placement and proportion of your kitten

This precious kitten pattern brings the charm of a tiny feline friend into your crochet world! With its sweet embroidered face and huggable body, this pattern teaches essential amigurumi techniques while creating an adorable companion. Whether you're making it as a gift for a cat lover or adding to your own collection, this little kitty is sure to bring smiles. The detailed facial embroidery tutorial ensures your creation has personality and character. ๐Ÿงถ Happy crocheting! ๐Ÿฑโœจ

You ask,

we answer.

FAQs

What size will the finished kitten be?

The finished size depends on your yarn weight and hook size, but using the recommended 3-ply cotton yarn, the kitten will be approximately 3-4 inches tall, making it a perfect pocket-sized companion or ornament.

Can I use different yarn weights for this pattern?

Yes! You can use any yarn weight, but remember to adjust your hook size accordingly. Thicker yarn will create a larger kitten, while thinner yarn creates a miniature version. Just ensure your stitches are tight enough that stuffing won't show through.

Do I need to know how to embroider for the face?

The pattern includes detailed step-by-step instructions for the nose and mouth embroidery technique, making it beginner-friendly. The visual guide in the pattern shows exactly where to insert and pull your needle for perfect results.

Can I make this kitten in different colors or patterns?

Absolutely! This pattern works beautifully with any color combination. Try tabby stripes, calico patches, or solid colors to create different cat breeds. You can also experiment with color changes between rounds for unique effects.

What's the best way to attach the parts securely?

Use the yarn tails left from finishing each piece and a yarn needle to whip stitch around each part multiple times. For extra security, especially for the head-to-body connection, stitch through several times in different directions before knotting and weaving in the end.