🧢 Beautiful ✨ Detailed πŸ’ Adorable

Adorable Duck & Chick Baby Booties Crochet Pattern

Adorable Duck & Chick Baby Booties Crochet Pattern
4.8β˜… Rating
4-5 Hours Time Needed
1.7K Made This
βœ‚οΈ

Intermediate Level

Ideal for those with basic knitting experience, featuring slightly more advanced stitches and techniques to expand your skills.

⏱️

Weekend Treat

Takes 5-7 hours, making it an enjoyable project to finish over a couple of days.

🧸

Cute Companion

An adorable friend to cherish, handcrafted with love to bring comfort and joy for years to come.

About This Adorable Duck & Chick Baby Booties Crochet Pattern

Adorable Duck & Chick Baby Booties Crochet Pattern crochet pattern - detailed view of completed project

With clear step-by-step assembly instructions and helpful photos, you'll master the techniques for creating perfectly positioned features and securely attached heads. The result is a pair of booties that are as functional as they are adorable!

Why You'll Love This Adorable Duck & Chick Baby Booties Crochet Pattern

I absolutely love this pattern because it transforms a practical baby item into something truly special and memorable! The process of watching these little duck or chick characters come to life as you work is incredibly rewarding. I enjoy the creative freedom of choosing between bright yellow for a classic duckling or soft pastels for a baby chick, and adding those tiny hair strands brings such personality to each bootie. The pattern strikes the perfect balance between being detailed enough to create professional-looking results while remaining achievable for crafters who've mastered basic crochet techniques. Plus, there's something deeply satisfying about creating a handmade gift that parents will treasure and babies will actually wear!

Adorable Duck & Chick Baby Booties Crochet Pattern step 1 - construction progress Adorable Duck & Chick Baby Booties Crochet Pattern step 2 - assembly progress Adorable Duck & Chick Baby Booties Crochet Pattern step 3 - details and accessories Adorable Duck & Chick Baby Booties Crochet Pattern step 4 - final assembly and finishing

Switch Things Up

I love experimenting with this pattern to create different looks and personalities! One of my favorite variations is making the duck in pastel colors - try soft mint green or baby blue with white accents for a modern, gender-neutral version that's perfect for baby showers. You can also play with the hair styling - instead of the standard fluffy top, I've created ducks with a mohawk-style strip down the center or even braided the hair strands for a whimsical touch.

For a seasonal twist, I make holiday-themed versions using festive colors. Picture a bright red duck with green accents for Christmas, or orange and black for a Halloween-ready chick! The beak color can also be customized - I've used bright coral, soft peach, or even glittery gold yarn for special occasions.

If you want to add extra details, consider embroidering small flowers or stars around the ankle cuff, or adding tiny ribbon bows between the ears. I've also experimented with making matching sets - a duck for one foot and a chick for the other, each in coordinating but different colors. For a more textured look, try using fuzzy or chenille yarn for the body to create an ultra-soft, plush feel that babies love to touch. The possibilities are truly endless with this versatile pattern!

Common Mistakes & How to Fix Them

βœ— Incorrect gauge measurement leading to booties that are too large or too small for the intended baby's foot size βœ— Placing safety eyes too close together or at the wrong rounds, creating an unbalanced facial expression that's difficult to correct later βœ— Stuffing the head too firmly before securing eyes, making it impossible to attach the safety backs properly through the opening βœ— Skipping stitch markers during continuous rounds, causing confusion about where each round begins and ends during shaping βœ— Sewing the beak before properly positioning the eyes, resulting in misaligned facial features that require time-consuming adjustments

Adorable Duck & Chick Baby Booties Crochet Pattern

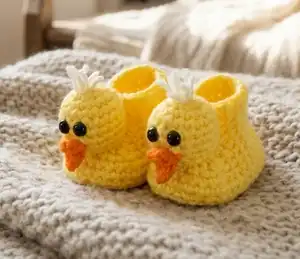
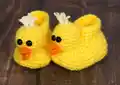
Create the sweetest little duck and chick baby booties with this charming crochet pattern! Perfect for keeping tiny toes warm while adding a playful touch to any baby's wardrobe. These adorable animal booties feature cute beaks, expressive safety eyes, and optional fluffy hair details that bring each character to life. Whether you're crafting a gift for a baby shower or adding to your little one's collection, these booties combine functionality with irresistible cuteness. The pattern includes multiple sizes from newborn to 18-24 months, ensuring a perfect fit as baby grows.

Intermediate 4-5 Hours

Materials Needed for Adorable Duck & Chick Baby Booties Crochet Pattern

β€” Main Fabric

  • 01
    Red Heart Super Saver yarn in Bright Yellow for duck body
  • 02
    Red Heart Super Saver yarn in Pale Yellow for duck hair accents
  • 03
    Red Heart Super Saver yarn in Pumpkin/Orange for duck beak
  • 04
    Worsted weight 4-ply yarn in coordinating colors (Gold, Cherry Red, or White for chick variations)

β€” Tools Required

  • 01
    Crochet hook size F (3.75mm)
  • 02
    Crochet hook size G (4.0mm)
  • 03
    Crochet hook size H (5.0mm)
  • 04
    9mm safety eyes (4 per pair of booties)
  • 05
    Yarn needle for sewing
  • 06
    Fiberfill stuffing
  • 07
    Stitch markers
  • 08
    Scissors
  • 09
    Pins for positioning parts before sewing

Progress Tracker

0% Complete

β€” BASE BOOTIE (Make 2):

Info:

Choose size based on foot measurement: 0-3 Month (3.5" use G hook) or 3-6 Month (4" use H hook)
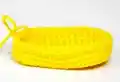
β€” Sole (bottom of bootie):

Rnd 1:

Using Sole Color, CH 10, SC in 2nd CH from hook, SC in next 5 CH, HDC in next CH, 2 HDC in next CH, 5 HDC in next CH, working down opposite side of starting CH, 2 HDC in next CH, HDC in next CH, SC in next 5 CH, 2 SC in next CH. (24 Stitches)

Info:

This piece is worked in continuous rounds so do not SL ST to join. Use a stitch marker to mark the beginning stitch.

Rnd 2:

2 SC in first SC, SC in next 8 stitches, *2 SC in next stitch, SC in next stitch*, repeat from * to * 2 more times, SC in next 8 stitches, 2 SC in next stitch. (29 SC)

Rnd 3:

2 SC in next stitch, SC in next 9 stitches, 2 SC in next stitch, *SC in next stitch, 2 SC in next stitch*, repeat from * to * 2 more times, SC in next 9 stitches, 2 SC in next stitch, SC in next stitch, SL ST in next stitch. (35 SC)

Info:

Check gauge here. Sole should measure 3.5" with G hook or 4" with H hook. If gauge is off, adjust as needed.

Row 1:

CH 1, working in back loops only, SC in same stitch as joining and in each SC around, SL ST in first SC to join. (35 SC)

Info:

At this point you can change colors if desired to have the sole one color and the bootie a contrasting color. If changing colors, fasten off and attach new color in same stitch.

β€” Main Bootie:

Row 2:

CH 1, working in both loops, SC in each SC around, SL ST in first SC to join. (35 SC)

Row 3:

CH 1, SC in same stitch as joining and in each SC around, SL ST in first SC to join. (35 SC)

Info:

We will now begin shaping the toe.

Row 4:

CH 1, SC in same stitch as joining and in next 11 stitches, skip next stitch, HDC in next stitch, skip next stitch, DC in next stitch, DC DEC next 2 stitches together, DC in next stitch, skip next stitch, HDC in next stitch, skip next stitch, SC in next 13 stitches, SL ST in first SC to join. (30 stitches)

Info:

Use a stitch marker to mark the first stitch so there is no confusion what stitch to join at the end of the row.

Row 5:

CH 1, skip joining stitch, SC in next 10 stitches, skip next stitch, SC in next stitch, skip next stitch, SC in next 2 stitches, skip next stitch, SC in next stitch, skip next stitch, SC in next 10 stitches, skip last stitch, SL ST in first SC to join. (24 SC)

Row 6:

CH 1, SC in same stitch as joining and in next 7 SC, *skip next SC, SC in next SC*, repeat from * to * 2 more times, skip next SC, SC in next 8 SC, skip last SC, SL ST in first SC to join. (19 SC)

Row 7:

CH 1, using front loops only, SC in same stitch as joining and in next 7 SC, skip next SC, SC in each of the next 2 SC, skip next SC, SC in next 7 SC, SL ST in first SC to join. (17 SC)

Info:

The last 3 rows form the ankle cuff.

Row 8-10:

CH 1, using front loops only, SC in same stitch as joining and in each SC around, SL ST in first SC to join, at end of row 10, fasten off and weave in ends. (17 SC)
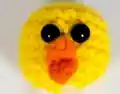
β€” HEAD (Make 2 - all sizes):

Info:

This head will work for all bootie sizes and uses an F hook. This piece is made in continuous rounds.

Rnd 1:

Using color of choice and F hook, CH 2, 6 SC in 2nd CH from hook. Do not join. Use stitch marker if needed. (6 SC)

Rnd 2:

2 SC in each SC around. (12 SC)

Rnd 3:

*SC in next SC, 2 SC in next SC*, repeat from * to * around. (18 SC)

Rnd 4-7:

SC in each SC around. (18 SC)

Rnd 8:

*SC DEC in next 2 SC, SC in next SC*, repeat from * to * around. (12 SC)

Rnd 9:

*SC DEC next 2 SC*, repeat from * to * around, fasten off leaving approximately a 12" tail to sew. (6 SC)

Info:

Do not stuff yet.

β€” DUCK/CHICK BEAK (Make 2 - all sizes):

Rnd 1:

With Orange and F hook, CH 2, SC in 2nd CH from hook, CH 1, turn. (1 SC)

Rnd 2:

2 SC in next SC, CH 1, turn. (2 SC)

Rnd 3:

Working in back loops only, SC in each of the next 2 SC, CH 1, turn. (2 SC)

Rnd 4:

Working in both loops, SC DEC, CH 1, turn. (1 SC)

Rnd 5:

Working around beak in each stitch and row ending, SL ST in each stitch around to form border, SL ST to join, fasten off leaving a tail for sewing.

Assembly Instructions

  • Stuff the head with fiberfill until it is round and to your desired firmness.
  • Insert 9mm safety eyes between Rnd 4 and 5 with a 1-2 stitch gap between the eyes. Do not attach the backs yet.
  • Weave the beak's starting tail, fold beak in middle, and sew the fold to the face at Rnd 6 & 7 centered with the eyes.
  • Pull out the last round of the head (6 SC DEC stitches), remove stuffing carefully, and attach safety backs to the inside of the head with two clicks.
  • Re-perform the 6 SC DEC stitches and re-stuff the head to desired firmness.
  • Sew the head to the top of the foot with the back of the head resting against the ankle cuff, securing with 3-4 stitches.
  • Cut 4" strands of pale yellow yarn and latch hook them through the top of the duck head for hair, leaving long for bangs or trimming short as desired.

Important Notes

  • πŸ’‘Always measure baby's foot before starting to ensure you're making the correct size, as shoe sizes vary by individual growth
  • πŸ’‘Use stitch markers consistently during continuous rounds to avoid losing your place, especially during toe shaping
  • πŸ’‘Do not attach safety eye backs until beak is positioned, as you may need to adjust eye placement for proper facial expression
  • πŸ’‘Stuff the toe of the bootie with tissue paper when sewing the head for larger sizes to create a firmer surface
  • πŸ’‘Keep loops small when creating hair details for better proportion relative to the small head size
  • πŸ’‘Pay attention to gauge during sole construction, as this determines the final bootie fit and comfort
  • πŸ’‘Weave in all ends securely as baby booties will undergo frequent washing and handling

These charming duck and chick baby booties bring farmyard fun to every step! Perfect for baby showers, newborn photography, or everyday wear, this pattern combines practical construction with adorable character details. The customizable hair and multiple size options mean you can create unique booties that grow with baby from newborn through toddler stages. With clear instructions and helpful assembly tips, you'll craft bootie pairs that become treasured keepsakes! πŸ¦†πŸ₯ Happy crocheting! 🧢✨

You ask,

we answer.

FAQs

What's the difference between making a duck versus a chick?

The main difference is in color choice and hair styling! Ducks typically use bright yellow with pale yellow hair accents, while chicks can be made in softer pastels or gold tones. You can also adjust the hair length - leave it longer and fluffier for a duckling or trim it very short for a baby chick look.

How do I ensure the safety eyes are securely attached?

The pattern includes a special technique where you temporarily remove the last round of stitches and the stuffing to access the inside of the head. This allows you to properly attach the safety backs with two clicks. Make sure not to click them too tightly or the head will bunch up. Always test the eyes by tugging gently before final assembly.

Can I make these booties in larger sizes for older babies?

Yes! The pattern includes instructions for four different sizes: 0-3 months (3.5"), 3-6 months (4"), 6-12 months (4.5"), and 12-18 months (5"). Always measure the baby's foot from heel to longest toe before starting to ensure the best fit, as individual growth varies.

What if my booties are coming out too large or too small?

Check your gauge carefully! The pattern specifies when to measure your sole and which hook size to use for each size. If your gauge is off, adjust your hook size - go down a size if too large or up a size if too small. Tension also affects size, so try to maintain consistent tension throughout.

How do I keep the booties on active babies?

The ankle cuff design (the last 3-4 rows worked in front loops only) creates a ribbed texture that helps the booties stay on. Make sure not to skip these rows and work them with consistent tension. The cuff should fit snugly but comfortably around baby's ankle without being too tight.